

These cases all sound the same on the phone but break down several different ways, because registering through LINE takes 5 screens and a customer can stall on any of them. So the first question is not "how did it fail" but "what does your screen say right now".
⚡ Quick Path: ask which screen they are on → if it is the OTP screen, go to
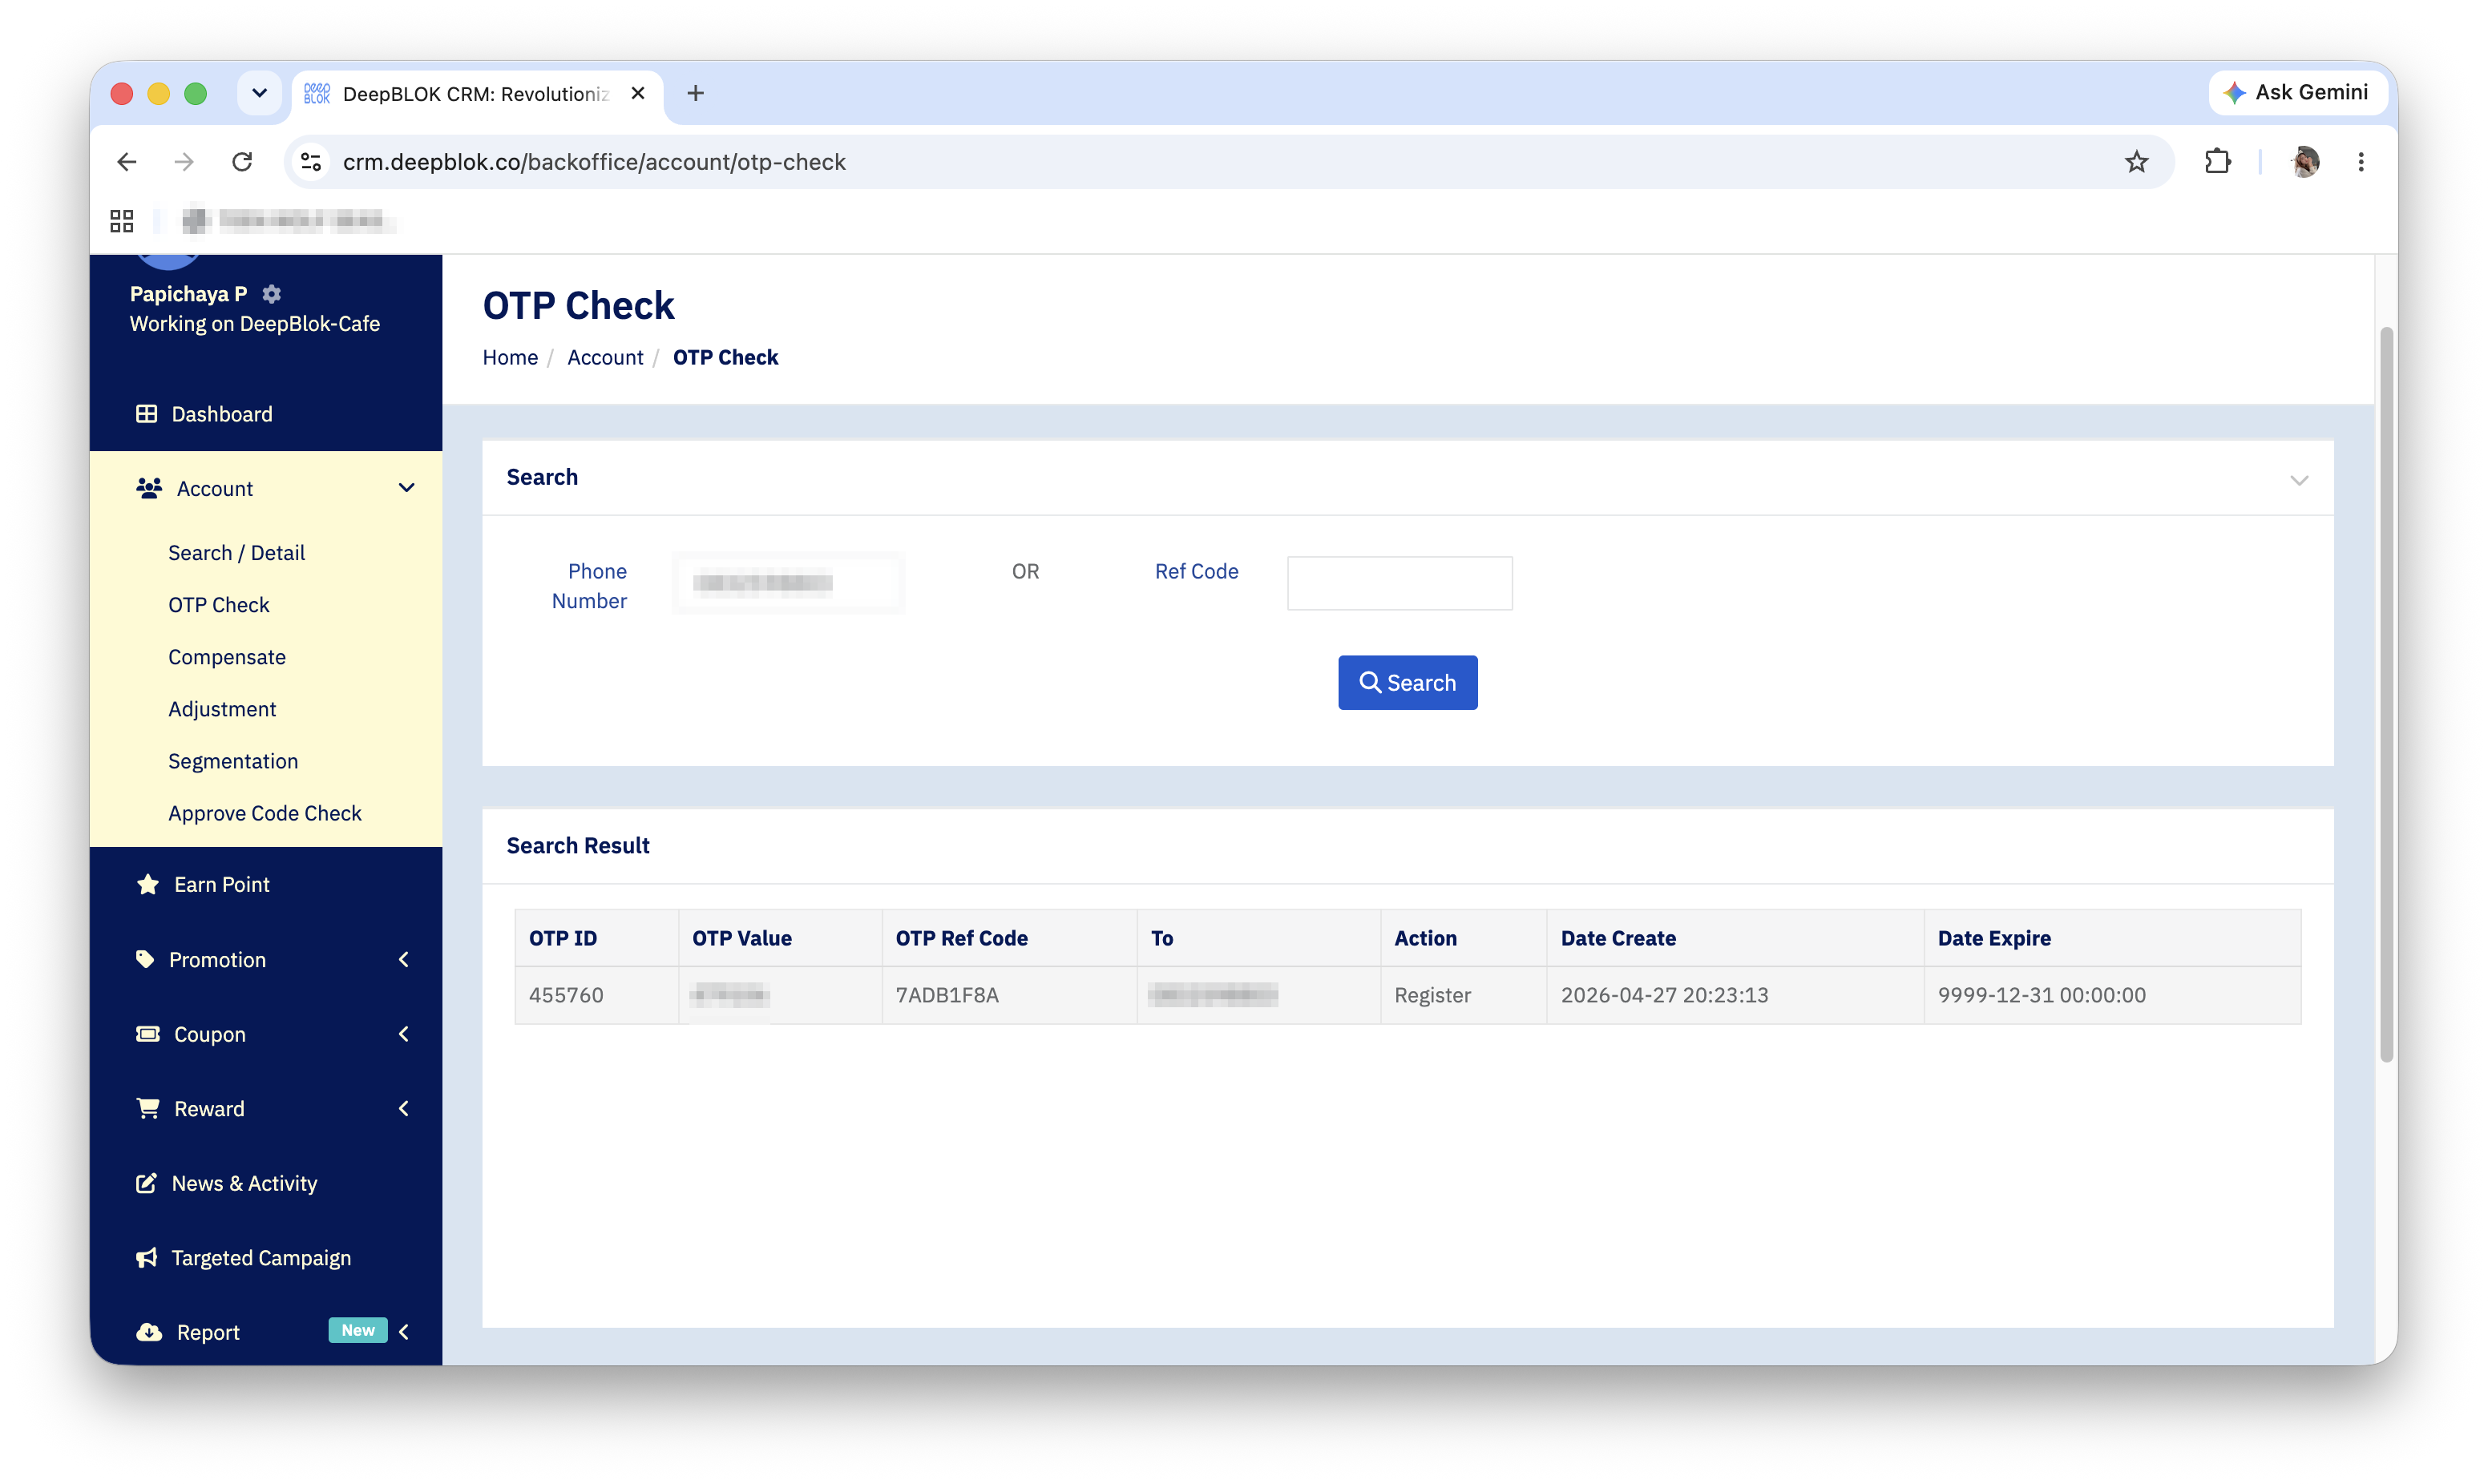
Account→OTP Check→ enter the phone number or theREFcode → read the OTP fromSearch Result
Information to gather from the customer first
- The screen they are stuck on — have them read out the heading, such as
PHONE REGISTRATIONorVERIFY OTP. This alone rules out more than half the possible causes. - The phone number they entered — it is both what you search on and where the OTP was sent. Read it back to them digit by digit.
- The
REFcode on the OTP screen, if they still have it open — it is the reference for that particular OTP request, and you can search on it directly. - Any red asterisk or message showing on the form — it tells you which field has not passed.
The 5 screens a customer passes through
Registration is not a single page but a sequence of four. Knowing the order makes locating the failure much faster.
1. The opening screen — Let's get start A brand splash with the logo, an EN / ไทย language toggle at the top right, and a single button reading JOIN NOW. There is almost nothing here to get stuck on. A customer stalled at this screen usually has a connection problem on their own device.
2. The phone screen — PHONE REGISTRATION One phone field, pre-filled with +66, and a Next button that stays grey until the number is in a valid format. If they say the button will not press, the number has not passed validation — usually a leading 0 typed on top of the +66 that is already there.
3. The code screen — VERIFY OTP 6 separate digit boxes, a Resend OTP button with a countdown, and a REF : line giving the reference code for that request. This is where customers get stuck most often, and there is a Backoffice menu built for it.
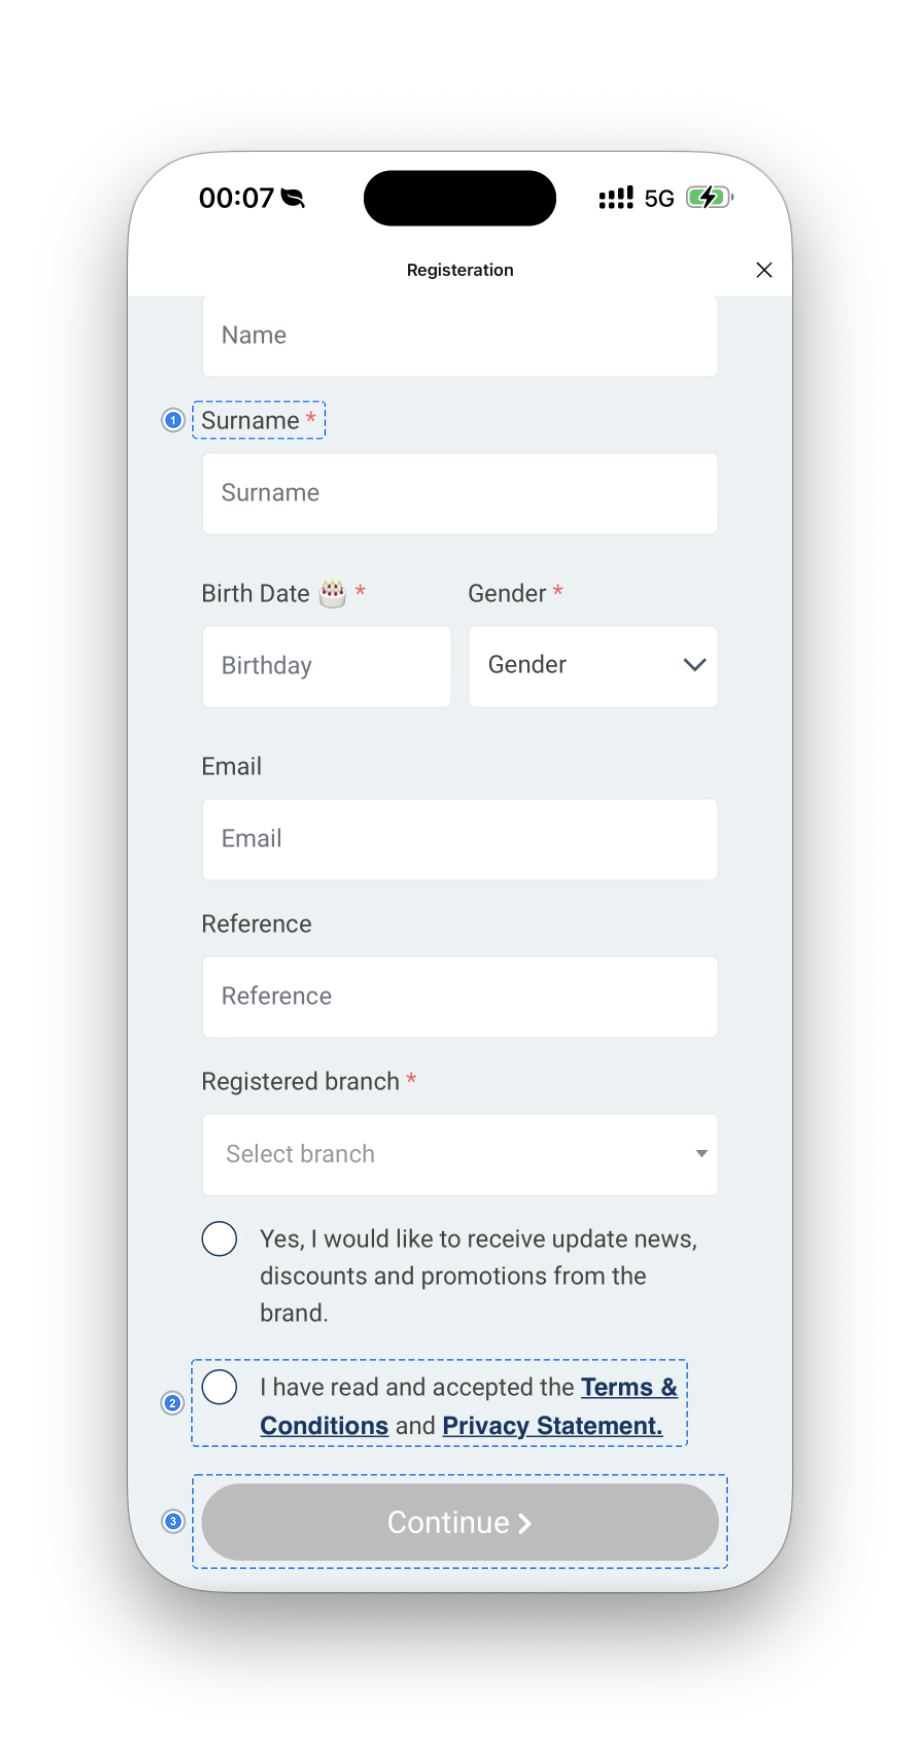
4. The form — Registeration, headed Let's get to know you The actual data form. Required fields carry a red asterisk. Below the fields are 2 consent items — marketing messages and acceptance of the terms — and the button that moves them on, Continue, stays grey until every required field is complete. It moves them to the questions page, it does not finish the registration.
⚠️ This screen differs from brand to brand, because its fields are configured in the Backoffice under Settings → Register Form Management. Before telling a customer which fields they must fill in, open that page and look at your own brand's setup. And read the customer's wording back to them, not the Backoffice wording — 3 of the field names differ between the two: First name shows as Name, Last name shows as Surname, and Register Branch shows as Registered branch with a Select branch placeholder. Quote the Backoffice name and the customer will tell you the field is not there.
Default fields are always present and cannot be removed: First name, Last name, Birth Date and Gender, all required; Terms and Conditions, Privacy Policy Consent, required; and News and promotion consent, optional.
Extra fields can be switched on or off, and each has its own required toggle. There are 5: Email, ID Card no., Passport no., Reference and Register Branch — the last carrying the note Please create at least one branch to procceed.
A brand can also add up to 5 custom questions under Custom Questions, which appear as a further step — the fifth screen.
5. The questions page — headed Tell us more about your preferences It appears only for brands that have set up Custom Questions. The questions are laid out as numbered cards; a required one carries a red asterisk and a line stating how many answers it takes, and a free-text one carries a character counter. The button at the bottom, Finished! Let's get started, is the one that finishes registration.
The point that trips people up is that the finishing button lives on this screen, not on the form. When a customer says the last button will not press, ask first whether their screen is showing questions or data fields — if it is questions, they are held up by a required question, not by a data field.
The OTP that never arrives
This is the single most common cause, and the system has a fallback menu specifically for it.
Step 1: Have them request a new code first
The OTP screen carries a Resend OTP button on a countdown. Have the customer wait for it to finish and request one more time. This clears more than half of these cases and needs no Backoffice access at all.
While waiting, read the phone number back to them and confirm it matches what they entered. One wrong digit and the code went to somebody else's handset.
Step 2: Look up the code in OTP Check
If a fresh request still does not arrive, go to the Account menu and open OTP Check, the menu for reading the OTP belonging to that request. The code shown here is the same one the system sent by SMS, not a separate backup code, so it works straight away when the SMS never reached the handset.
The page carries 2 separate search fields: Phone Number for the customer's number, and Ref Code for the code shown after REF : on the customer's own screen. Either one on its own is enough. If they still have that screen open, Ref Code is the more precise route, because it is tied to that specific request.
Press Search and the result appears in the Search Result table, which has 7 columns: OTP ID · OTP Value · OTP Ref Code · To · Action · Date Create · Date Expire. The code to read out sits in OTP Value. When nothing matches, the table says No data.
This page has no Thai translation — its title, field labels, button and column headings stay English in either language mode. Only the sidebar menu name is translated.
Step 3: Read it out only after verifying who you are speaking to
Once you have the code, pass it to the customer to enter.
⚠️ Watch out before reading a code aloud: an OTP is what proves the customer is who they say they are. Verify the identity of whoever has contacted you, following your team's process, every single time before reading a code out. Use this route only when the SMS genuinely has not arrived after a resend, not as a routine shortcut. If your team has a procedure for logging OTP disclosures, follow it here too.
✅ Confirm it worked: ask the customer whether their screen has moved on to the form headed Let's get to know you. If it has, the OTP stage is cleared and only the form remains. If they are still on the same screen and it says the code is wrong, have them request a new one and search again — the earlier code may have expired.
Problems on the registration form
The fourth screen is the data form, and its submit button stays grey until every required field is filled. If the customer says the button will not press, go through the fields with them one by one, paying particular attention to any carrying a red asterisk.
📌 Good to know: which fields are required is configured per brand from the registration form management menu in the Backoffice. So your shop's form may not match an example you have seen elsewhere. Before telling a customer they can skip a field, check your own brand's settings.
The field that causes the most trouble is Registered branch, the registration branch, a dropdown with a search box at the top. 2 things are worth knowing about it.
First, the list shows only branches whose status is switched on. A branch that has been switched off does not appear at all. If the customer cannot find the branch they want, check that branch's status in the Backoffice rather than telling them to pick a different one.
Second, the list is sorted alphabetically by the Thai branch name, and the customer sees only that Thai name — never the branch code. So if 2 branches share the same Thai name, the customer sees 2 identical lines with nothing to tell them apart, and picks at random. If you hit this, tell whoever maintains the branch data to make the names distinct.
Likely causes by symptom
Frequently Asked Questions
Q: Is the code from OTP Check the same one that was sent by SMS?
A: It is the same code. The menu lets an administrator read the OTP belonging to that request; it does not issue a second one. The customer can type the code you read out into the screen they already have open.
Q: How long does an OTP stay valid?
A: The customer's screen shows a countdown on the resend button. The safe approach is to have them request a fresh code and enter it immediately, using only the most recent one.
Q: Can a customer change their phone number partway through?
A: The number entered on the second screen is what the system sends the code to and what identifies the account. The most direct route is to have them close it and start again with the correct number.
Q: The customer registered fine but did not get the points from the code they scanned. What now?
A: That is a different symptom with its own article. First confirm the account was actually created by searching the number in the Account menu. If the account exists but the points did not arrive, move on to the article on missing points.