

The Billing page is where your brand reads what it owes DeepBLOK without waiting for an email or messaging anyone. It answers the 2 questions an accounting team asks most: how much is due and by when, and where the actual document can be downloaded.
⚡ Quick Path:
Billingat the bottom of the left sidebar → a red alert bar at the top means something is already overdue → in theใบแจ้งหนี้(invoices) section, read theวันครบกำหนด(due date) column to see when payment is due → press the download button at the end of the row to get the file for your accounting team
Requirements before you start
- The
Billingmenu in the left sidebar. It sits at the very bottom, belowSettings, with aNewbadge. If you sign in and the menu isn't there, ask the DeepBLOK team that looks after your account - Complete company details. Company name, tax ID and address have to match what your accounting team uses, because this is the set of details that appears on the actual documents
- Your accounting team's email address, if you want the documents delivered to them every cycle without anyone having to log in and download
- Access rights. Reading the tables and downloading a document are read-only, but
แก้ไขข้อมูล(edit details) changes what goes onto real documents, so agree in your team who is allowed to edit it
What is on the Billing page
📌 Good to know: the 2 lower tables are not the same set of documents. An
ใบแจ้งหนี้comes before payment and states how much is due by when; anใบเสร็จรับเงิน/ใบกำกับภาษีcomes after payment and is the proof that it was paid. When your accounting team asks for a document, ask which of the 2 they need.
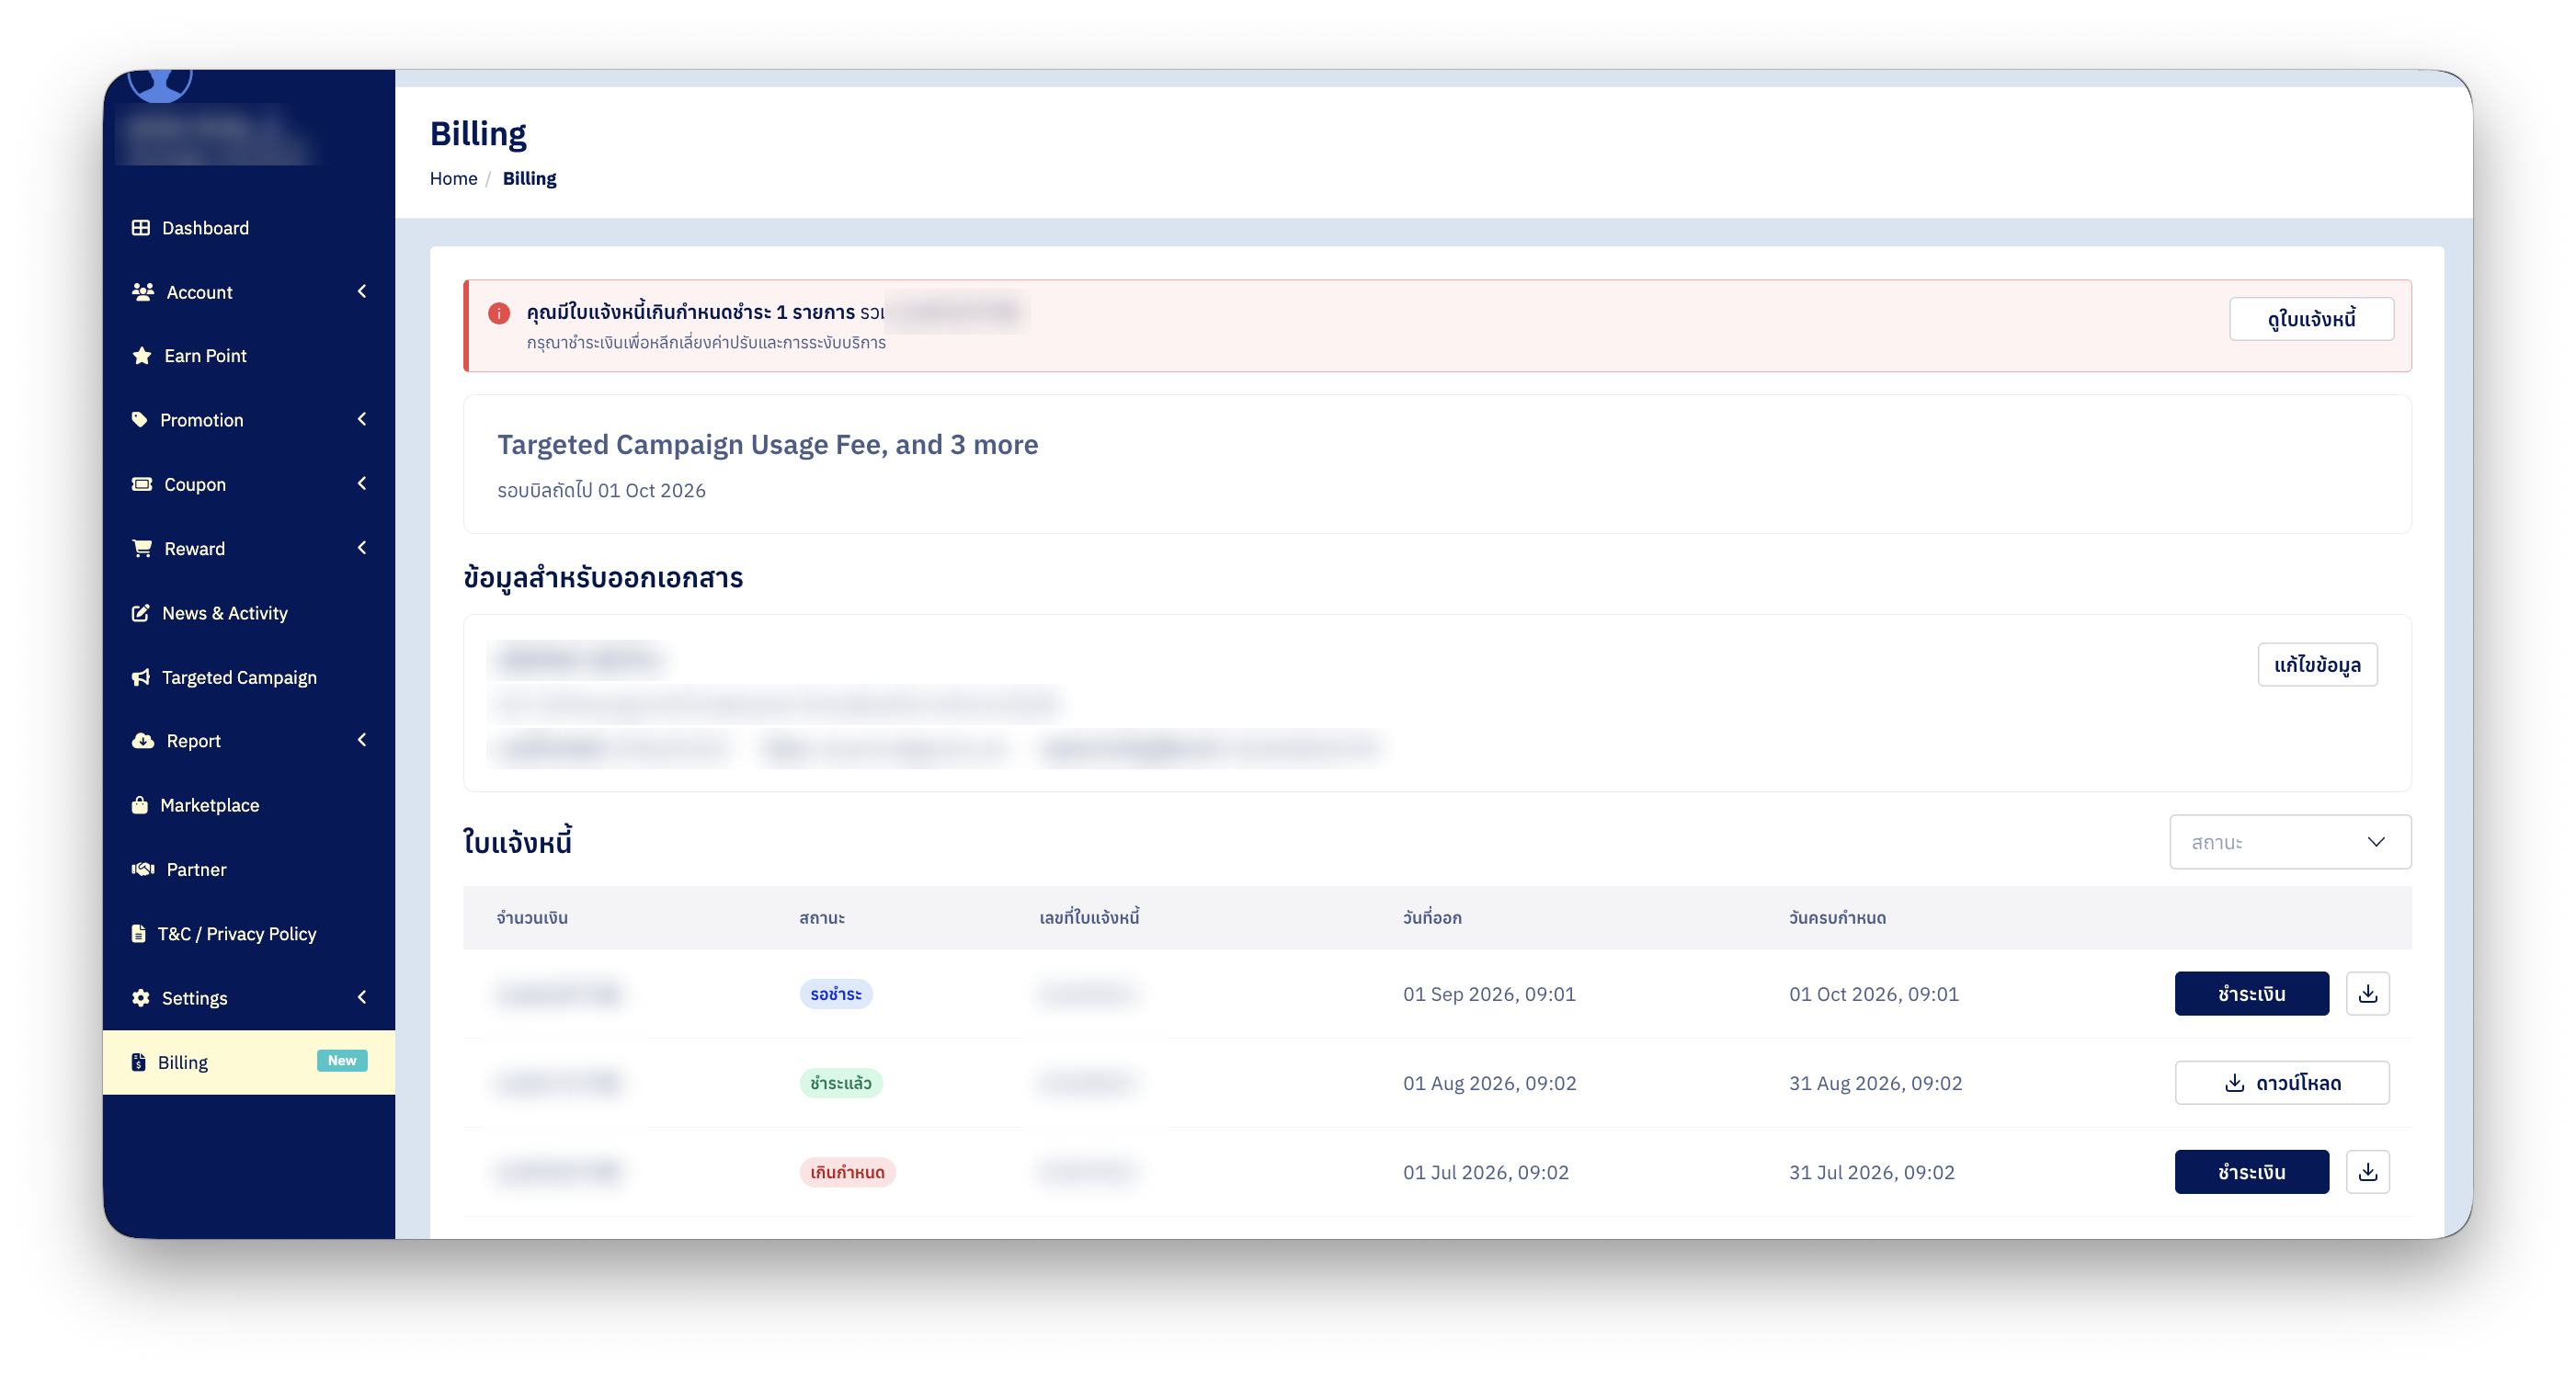
The alert bar and the next-cycle card
The 2 cards at the top of the page answer "when do we have to pay" faster than reading down the table does.
The red alert bar appears only when an invoice is past its due date. It gives the number of overdue items and their combined total, and states that late payment affects both charges and service. At its right is a ดูใบแจ้งหนี้ (view invoices) button that jumps to the table below. With nothing overdue, the bar isn't there at all.
The next-cycle card sits under the alert bar. Its top line is the service being billed for that cycle — with several services, it names the first and says how many more there are. Its lower line is รอบบิลถัดไป (next billing cycle) with a date, which is when the system issues the next invoice.
📌 Good to know: the service name on this card is always in English, because it is the name of a DeepBLOK service rather than an on-screen label that follows the language you picked.
⚠️ Watch out: if the red alert bar is showing and you aren't sure what the amount is for, message the DeepBLOK team that looks after your account before the next cycle's date comes round.
How to read the invoice table
The ใบแจ้งหนี้ table has 5 columns, and the one that answers "when do we have to pay" is the last.
📌 Good to know: document numbers come in more than one format, because numbers issued under an older scheme and a newer one sit in the same table. Use the number exactly as that row shows it — don't expect a particular prefix.
The invoice statuses
At the right of the ใบแจ้งหนี้ heading is a สถานะ filter that narrows the table to one status. There are 4, and each has its own pill colour: รอชำระ blue, ชำระแล้ว green and เกินกำหนด pale red.
How to download a document for your accounting team
At the end of every row is a download button, but it doesn't look the same on every row — its shape depends on whether that invoice has been paid.
⚠️ Watch out: on a row that hasn't been paid, the word
ดาวน์โหลดis nowhere on screen — the button shrinks to an icon once aชำระเงินbutton sits beside it. If you can't find the word, look for the downward-arrow icon at the far right of the row instead.
Start by finding the row for the cycle you need. Use the สถานะ filter to narrow the table to one status, or read the วันที่ออก column to find the right month. If the list runs past one page, change the row count at Rows per page below the table from 10 to 20, 50 or 100. The right of that same row tells you which rows you are looking at out of how many in total.
Once you have the right row, press the download button at the end of it to get the document file onto your computer.
✅ Confirm it worked: open the downloaded file and check 3 things — the company name matches what your accounting team uses, the tax ID is correct, and the document number matches the row you pressed download on. If all 3 are right, pass it straight to your accounting team.
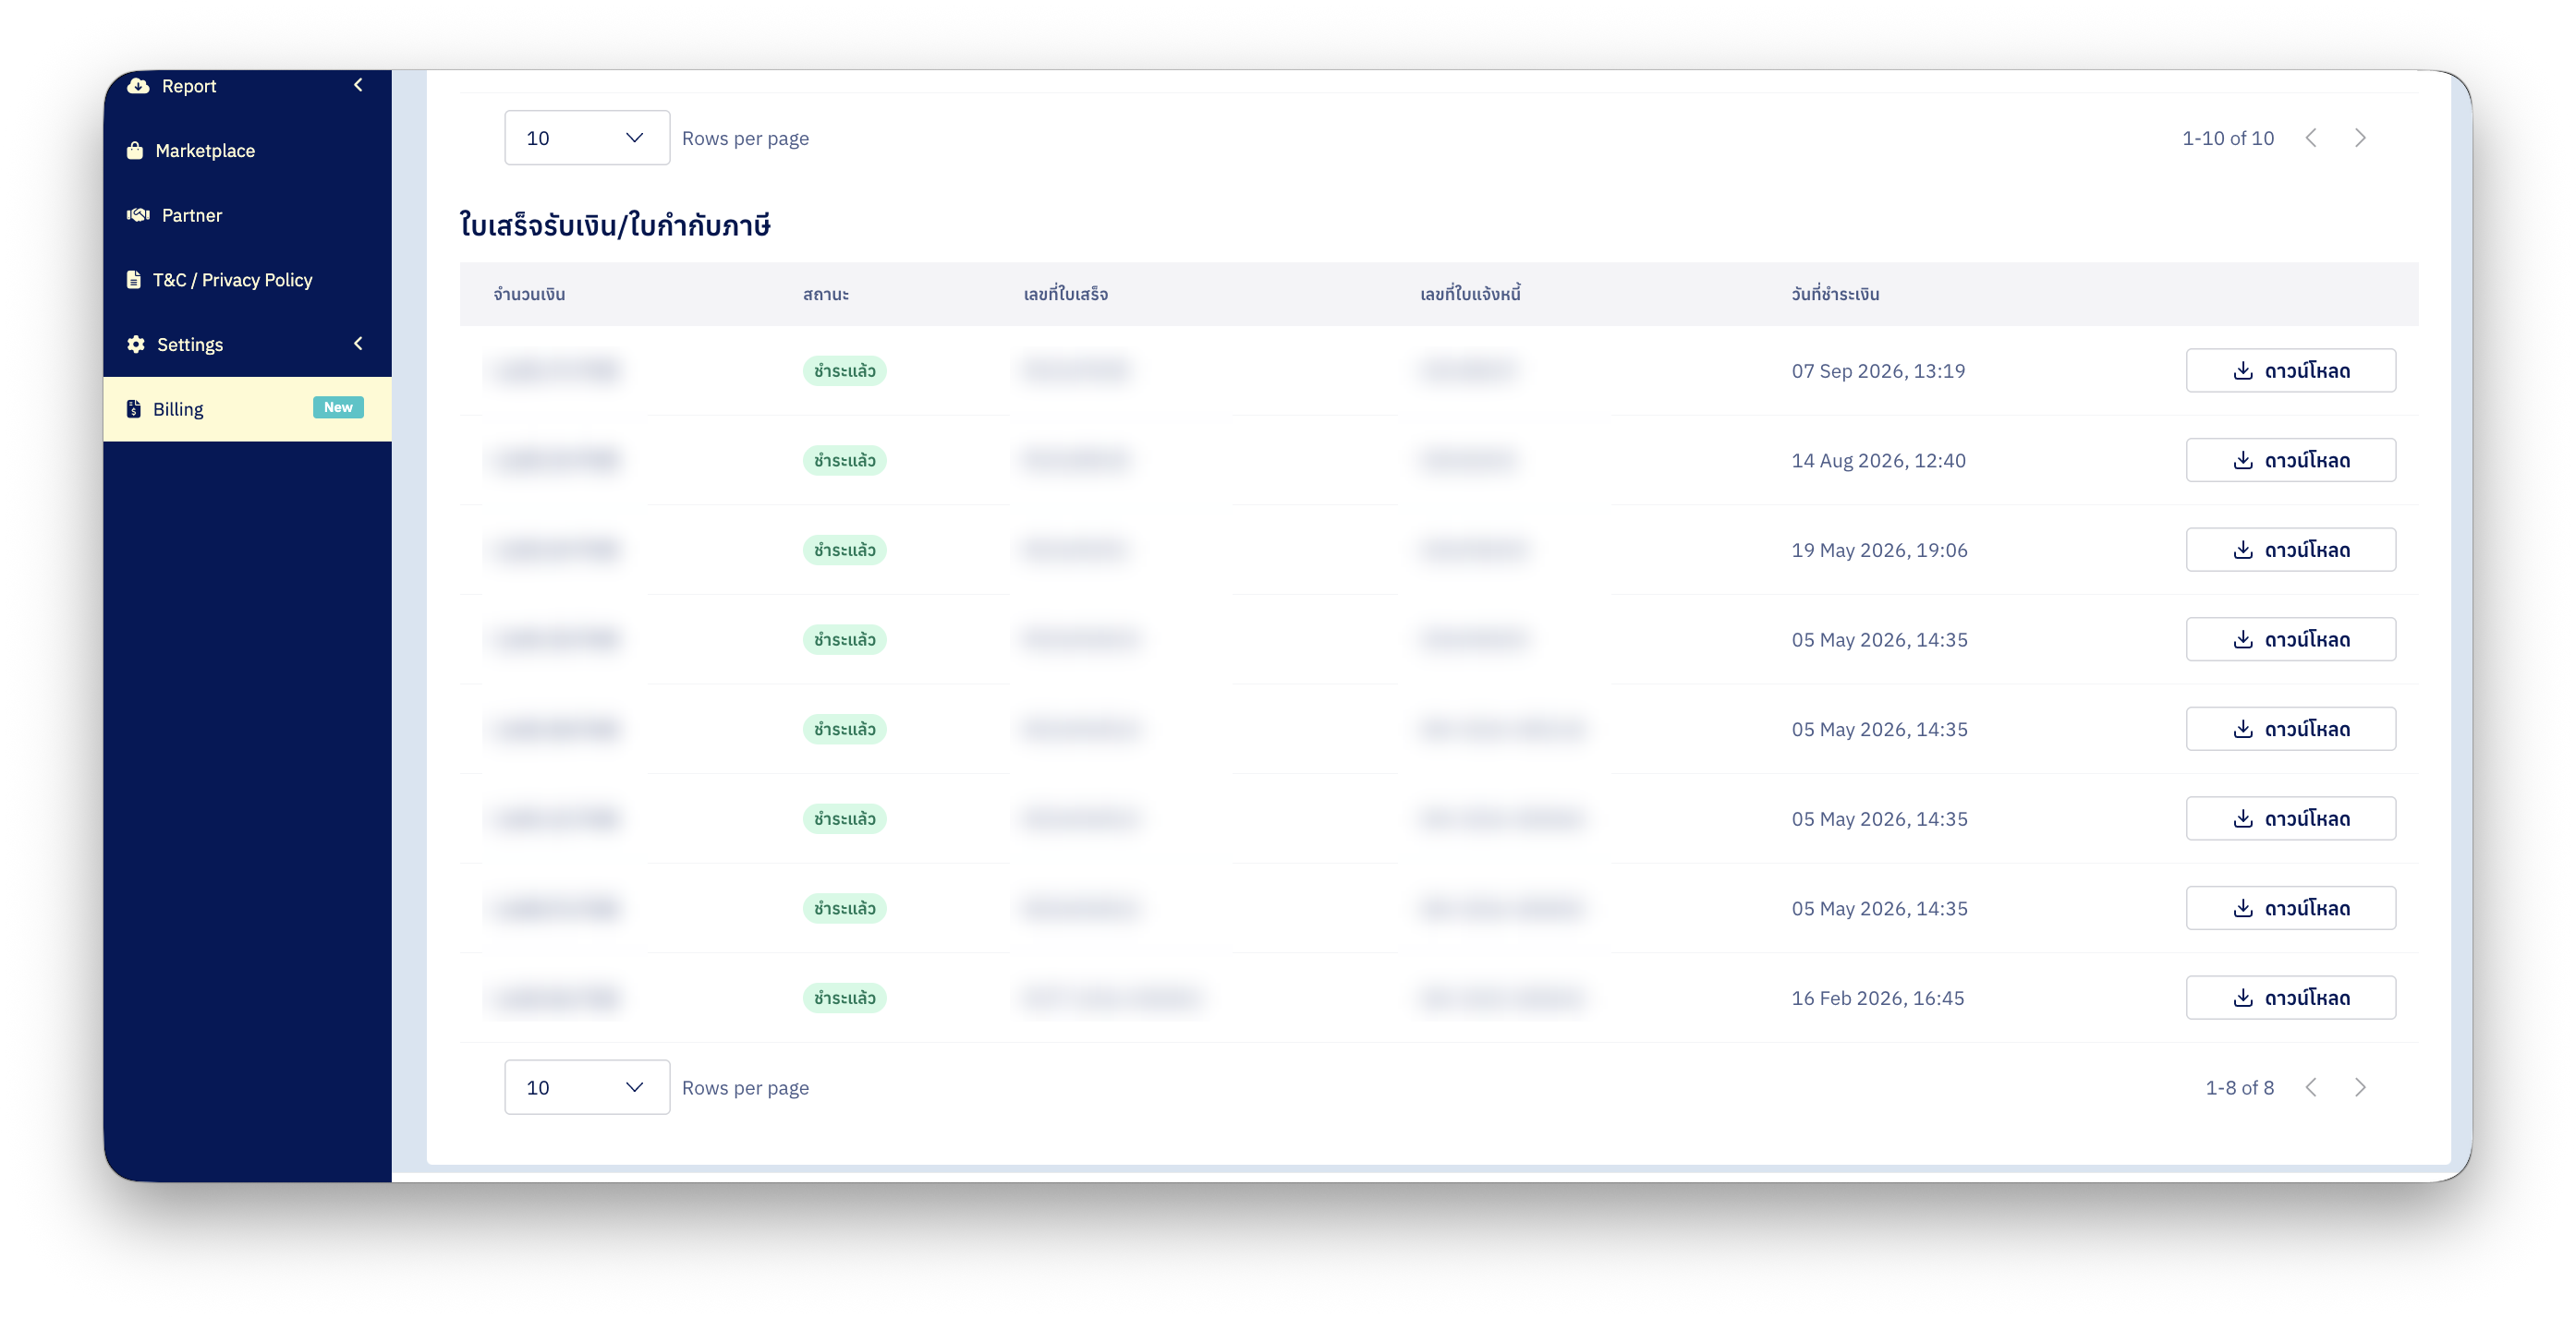
Where to find receipts and tax invoices
The ใบเสร็จรับเงิน/ใบกำกับภาษี table sits at the bottom of the page and holds the documents for cycles that have already been paid. It also has 5 columns, but the last 3 differ from the table above.
📌 Good to know:
เลขที่ใบแจ้งหนี้appears in both tables — it is what pairs a receipt with the invoice from the same cycle. When your accounting team asks for the full set of documents for one cycle, use that number to find the matching row in the other table.
This table has no สถานะ filter, so use the วันที่ชำระเงิน column to find the cycle you want. Rows per page works the same way as above. Every row here ends in a download button that carries its ดาวน์โหลด label, because every cycle in this table has been paid and so no ชำระเงิน button competes for the space.
How to have documents emailed to your accounting team
If you would rather nobody had to open the Backoffice and download a file every cycle, this page can send the documents to an address of your choosing. Press แก้ไขข้อมูล at the right of the ข้อมูลสำหรับออกเอกสาร section and the system opens a separate page, also headed ข้อมูลสำหรับออกเอกสาร. The กลับ link at the top left brings you back to Billing.
Step 1: check the company details against what your accounting team uses
The top of the page holds the details that appear on the real documents.
⚠️ Watch out:
ประเภทสาขาandเลขนิติบุคคลare the 2 fields an accounting team checks first, because a document that has either of them wrong cannot be filed. Correcting them afterwards means a new document has to be issued — the existing file is not edited.
Step 2: enter the addresses the documents go to
Scroll down to อีเมลสำหรับจัดส่งเอกสาร. This section decides which addresses receive every cycle's invoice and receipt. It has 2 fields.
สำเนา (CC) is the right field for your accounting team's address: the main recipient stays whoever manages the brand's account, while accounting receives the documents at the same time without anyone forwarding them.
Step 3: save
Press บันทึก at the bottom of the page. If you would rather not apply the change, press ยกเลิก and go back to Billing.