

A check-in mission is a news item that opens onto a check-in board instead of ordinary content. Customers check in once a day until they reach the number of days you set, then claim a reward. It has no menu of its own — it is one value in the Command Action dropdown inside Part 3 : Command & Button on the news editor. Budget about 20 minutes once your reward and icons are ready. Setting one up doesn't touch other items, points or coupons you already have.
⚡ Quick Path:
News & Activity→+ Add New Content→Part 3 : Command & Button→Command Actionset toMission→Mission Type→Check-ins Required→Progress Reward→Check-in Completion Reward→Icons Setting→Colors Setting→SAVE→SAVE ALL
Requirements before you start
- A news item with
Part 1andPart 2already filled in — a mission rides on a news item rather than being created separately. Those first 2 panels are covered in the article on creating news and promotions for the member screen. - 6 pieces of button copy — a mission uses 3 button states, and each one needs both English and Thai. Writing them beforehand is faster than composing at the screen.
- One completion reward — points or a coupon. If you want a coupon, create it first, or the coupon dropdown will be empty.
- 2 icon files — one for the along-the-way reward and one for the completion reward. The panel states 500 × 500 px recommended, 1 MB maximum, and PNG only.
📌 Good to know: the system ships default icons and a default colour set, so you can finish the mission now and swap them later. Just don't switch the item on for customers until you've checked it on a phone.
Create a check-in mission in 6 steps
1. Pick Mission in the Command Action dropdown
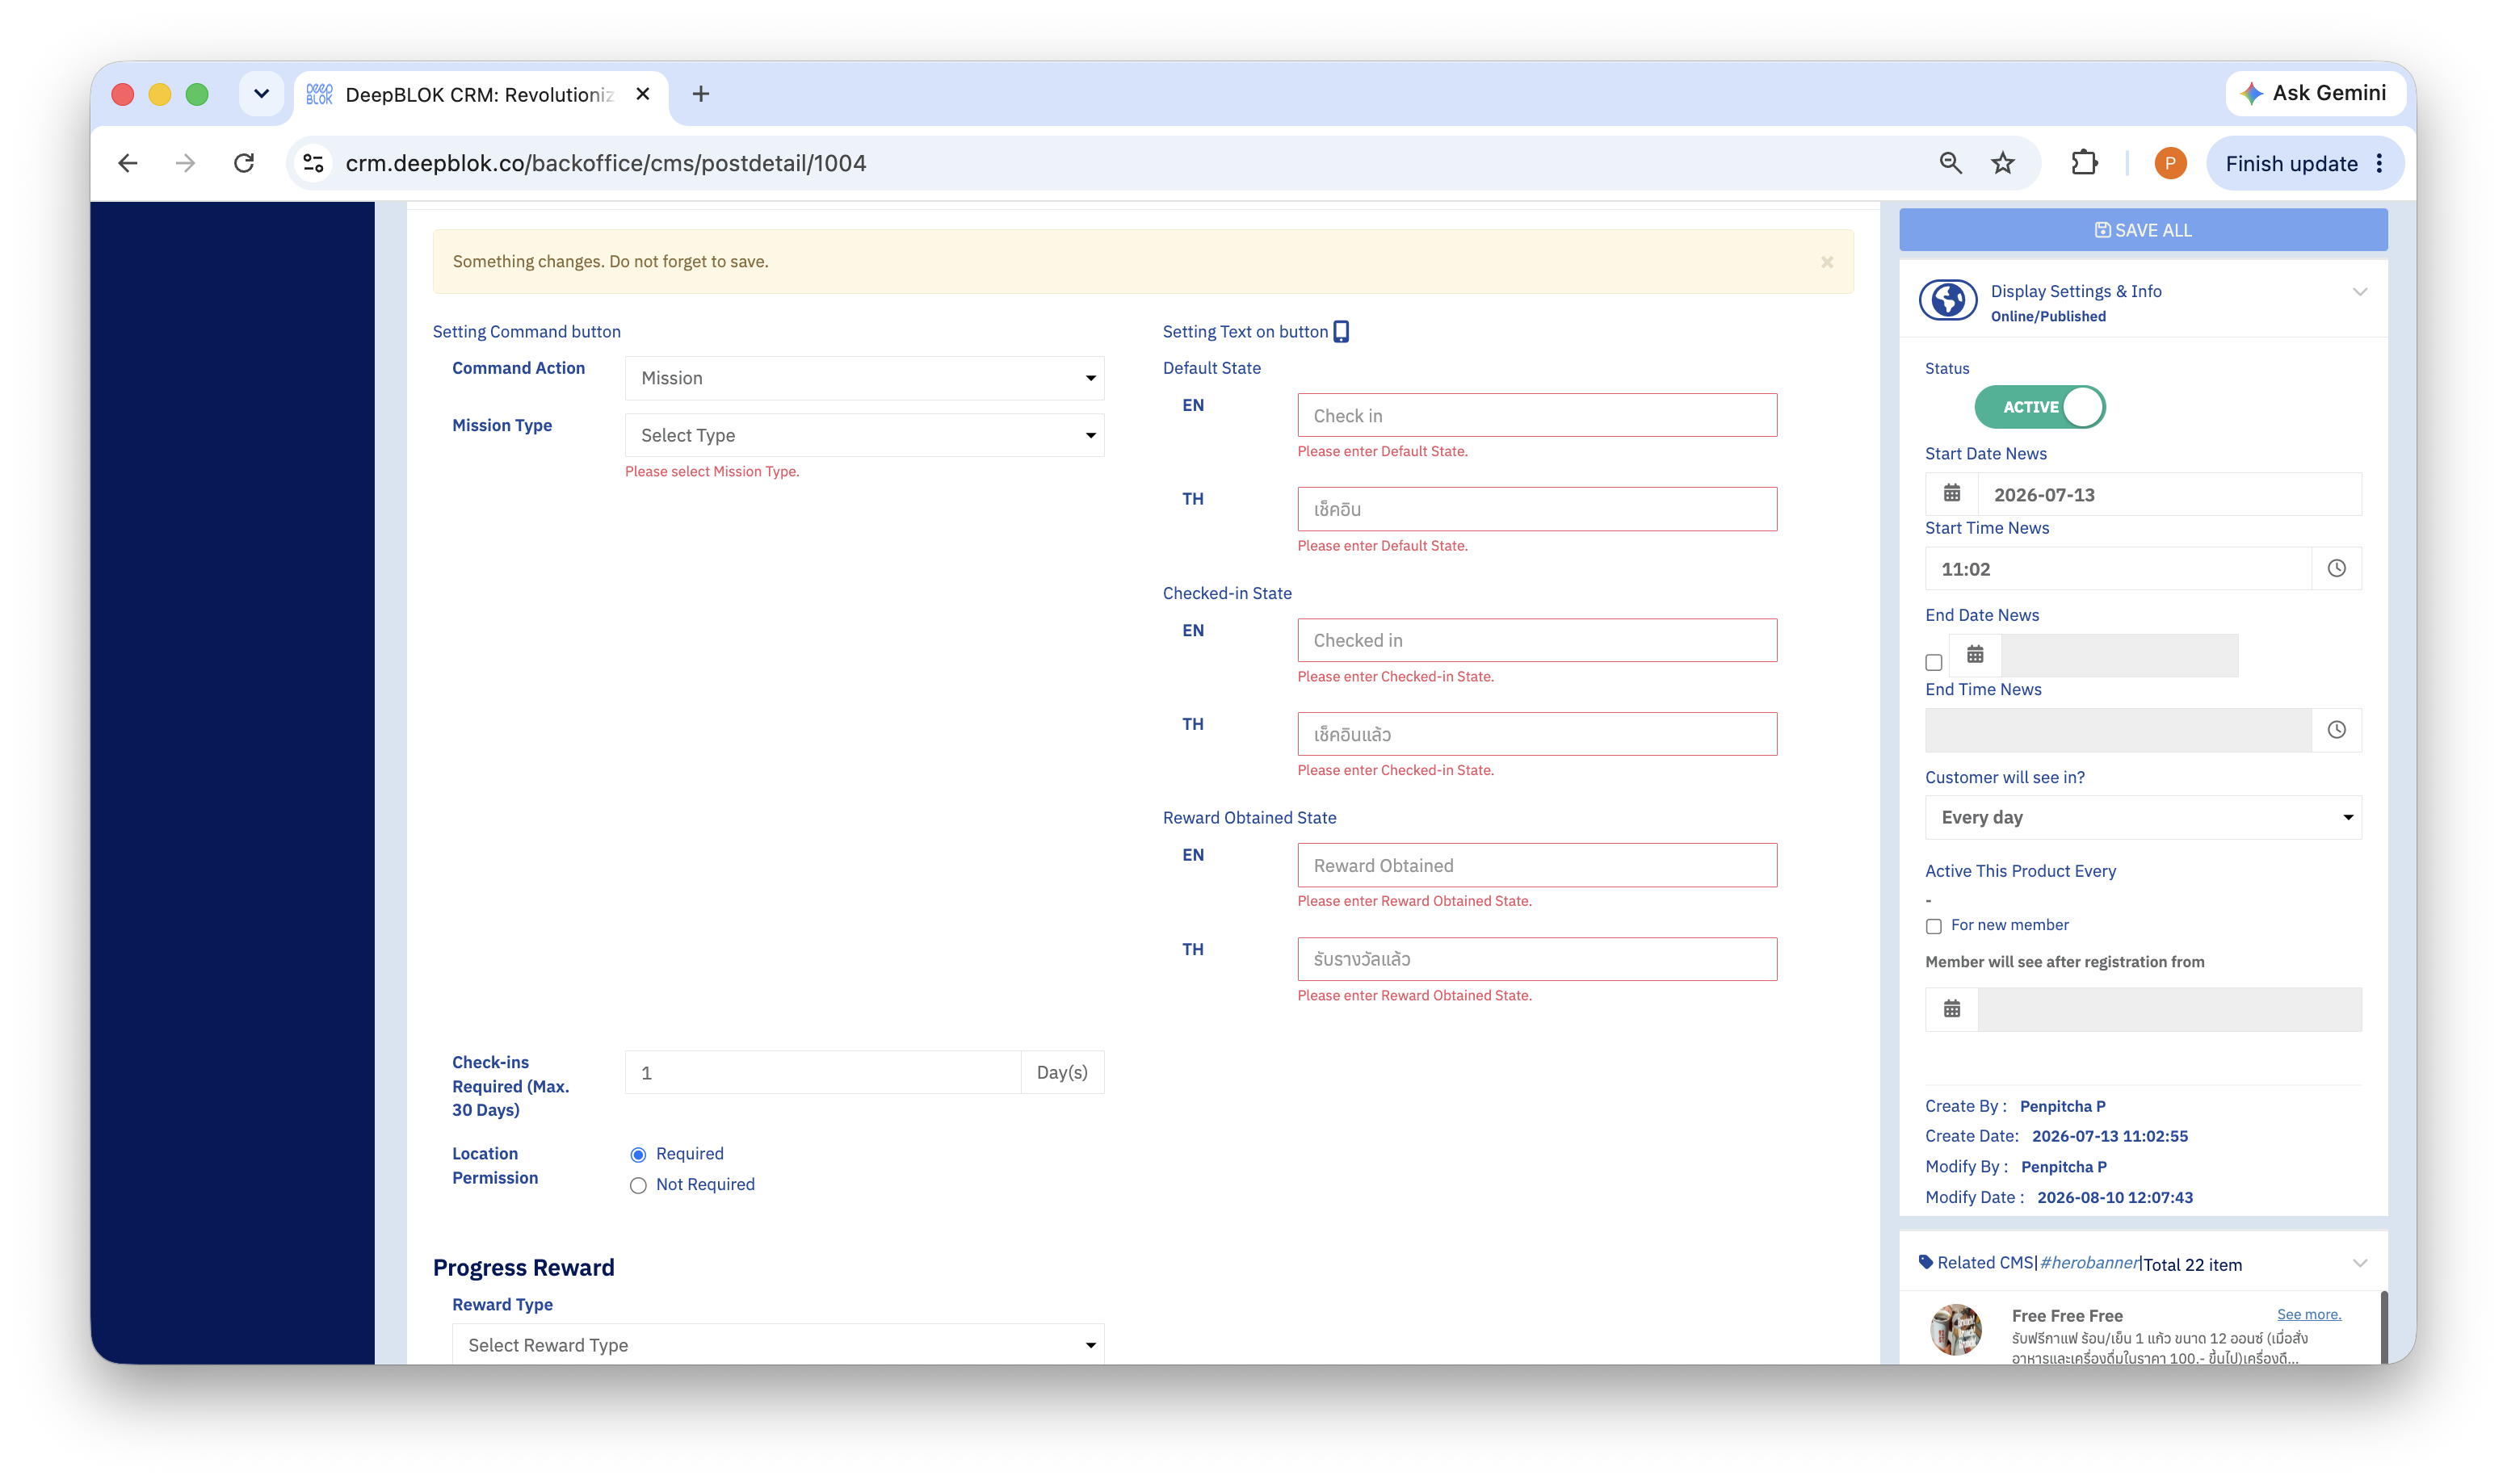
Open the item, scroll to Part 3 : Command & Button, and in the Command Action dropdown choose Mission.
The whole panel changes. The left side fills with mission settings, and the right side — which until now held a single pair of button-text fields — splits into 3 groups, one per button state.
2. Choose the mission type and the day count
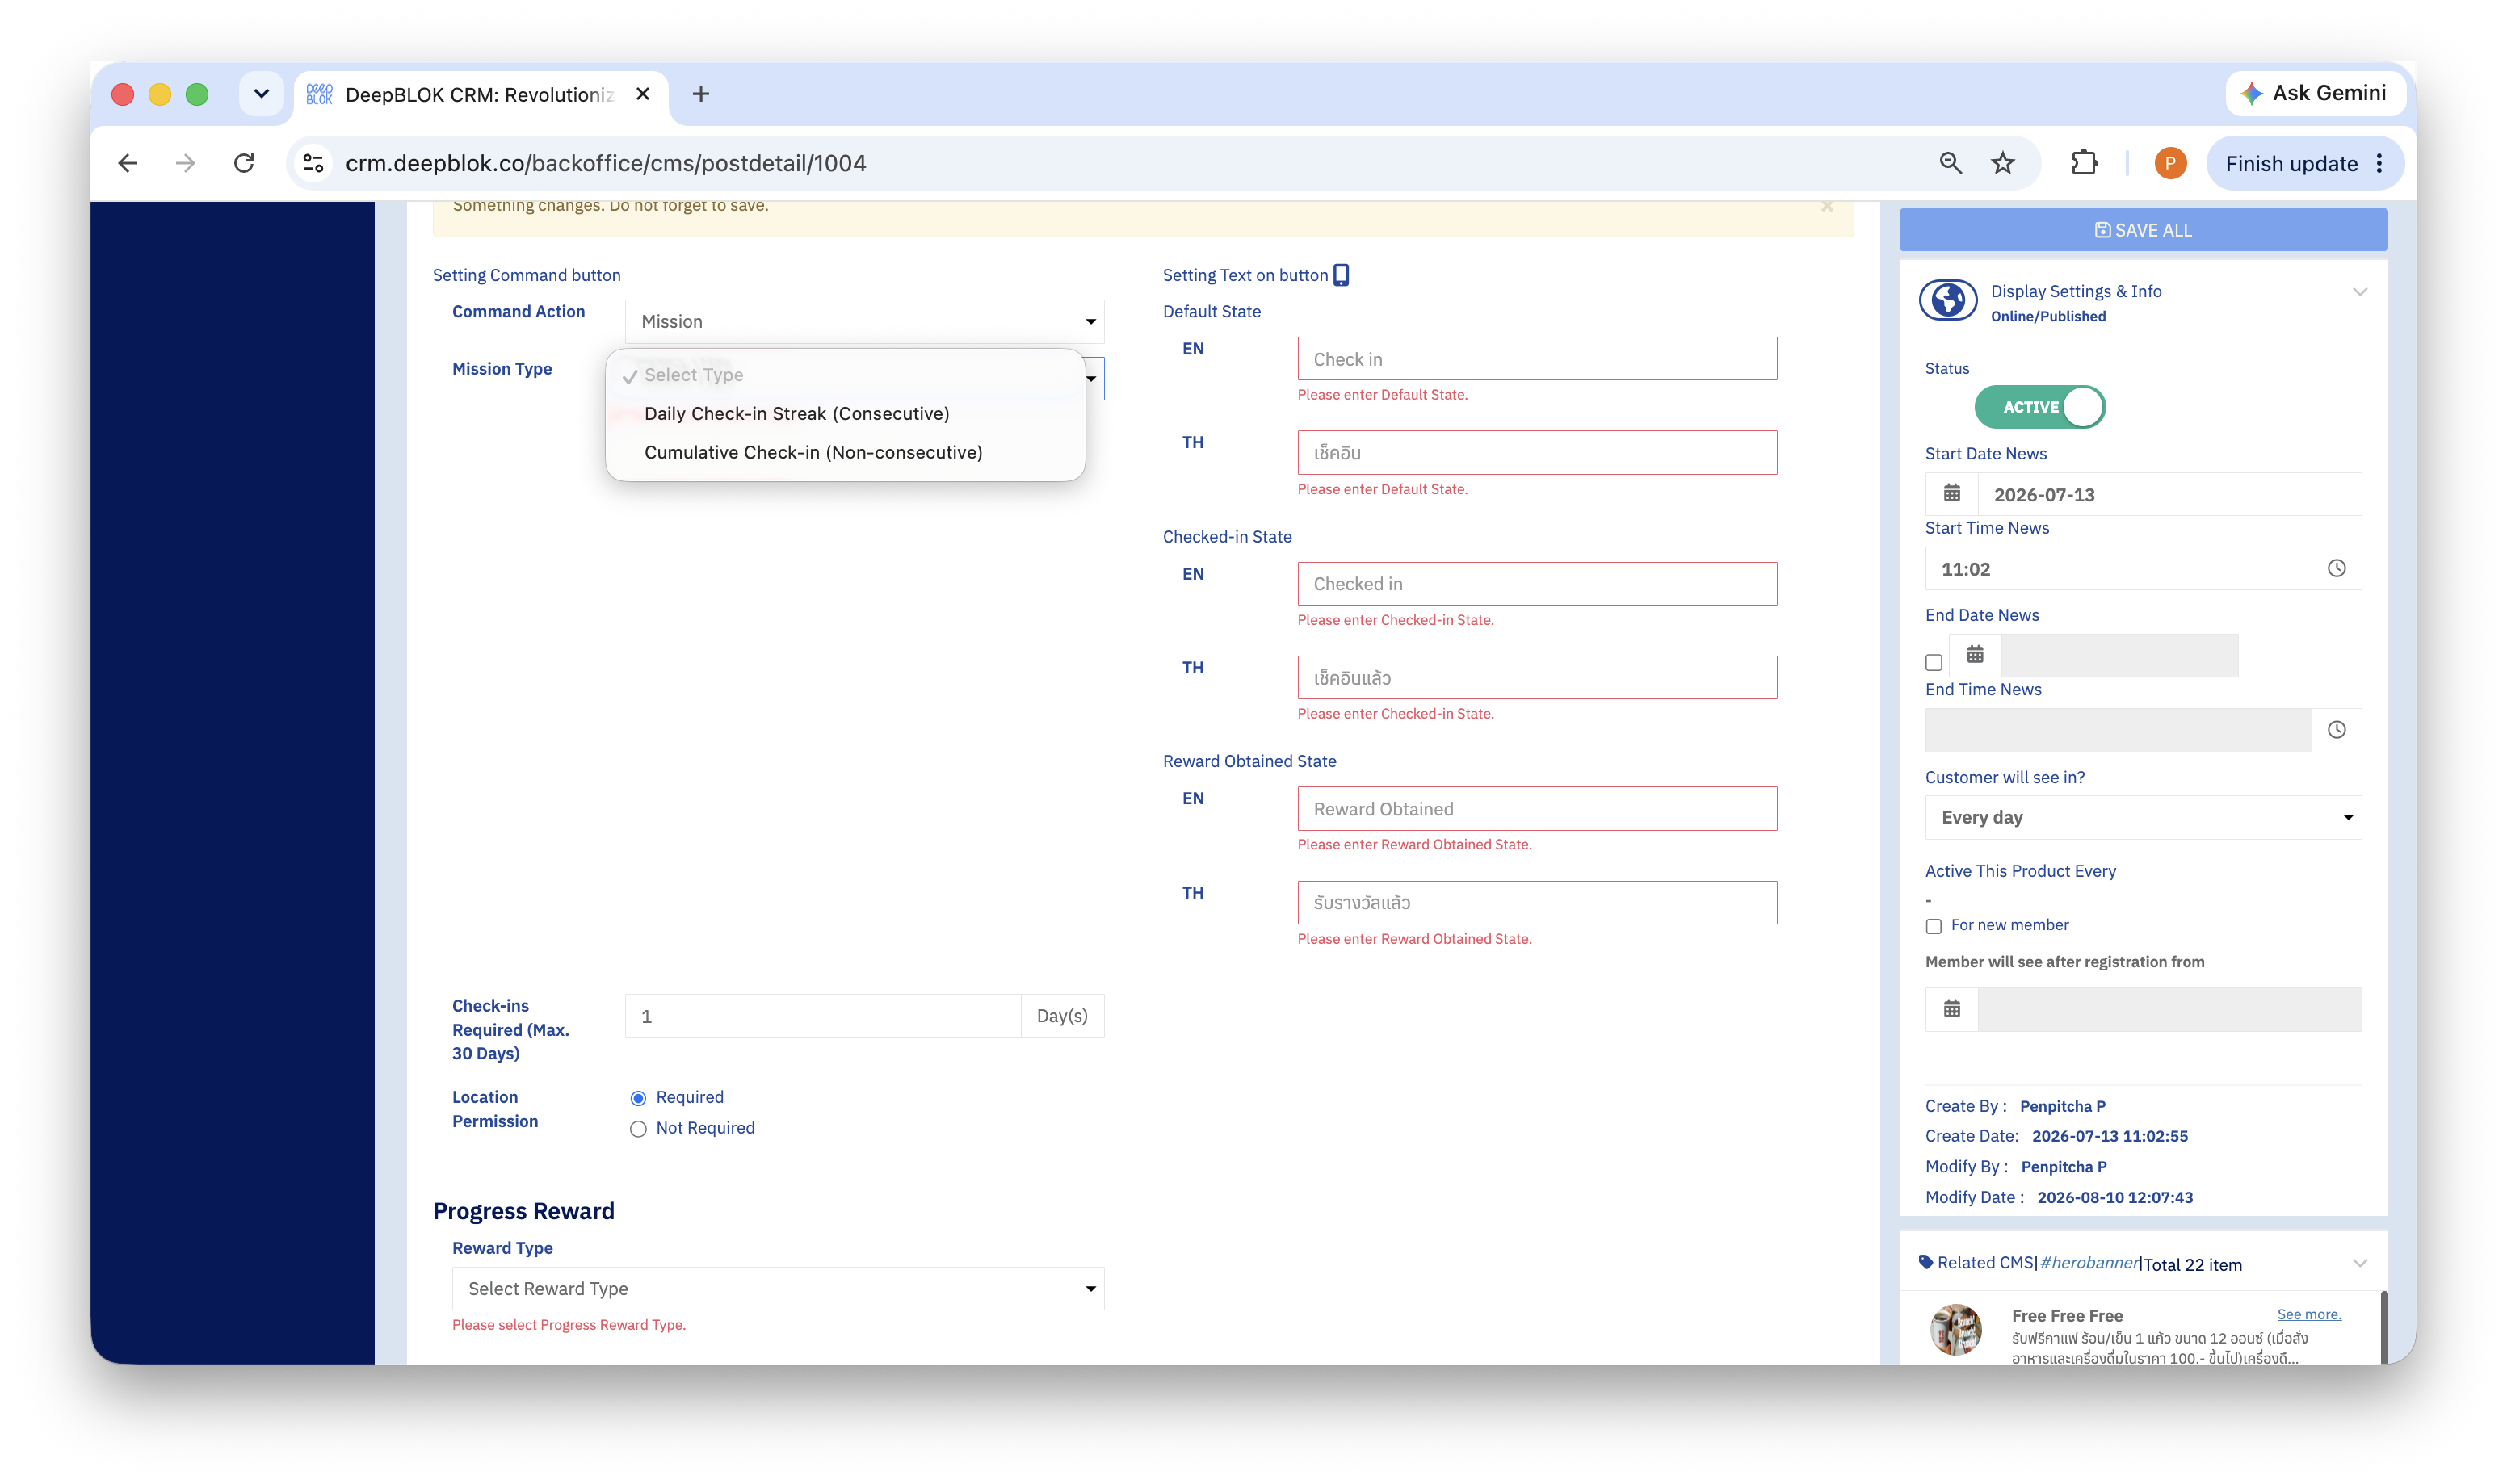
The Mission Type dropdown holds 2 values, and it decides whether a customer who misses a day loses all their progress.
Then fill in Check-ins Required (Max. 30 Days) — the number of check-ins needed. The unit beside the field reads Day(s), and the field's own name states the 30-day ceiling.
Finally, Location Permission is a 2-value radio: Required and Not Required. Choose Required when the customer must grant the app access to their location before they can check in.
⚠️ Watch out: setting
Location PermissiontoRequiredadds a step for the customer, and anyone who has location access switched off on their phone can't check in at all. Reserve it for missions genuinely tied to visiting a store; for an open-the-app mission, useNot Required.
3. Write the button copy for all 3 states
The Setting Text on button side splits into 3 groups, one for each thing the button has to say at each stage. Every group has an EN and a TH field — 6 fields in total — and all of them are required.
1. Default State What the button says before the customer has checked in today. This is the one that has to invite the tap. The system's defaults are Check in and เช็คอิน.
2. Checked-in State What it says once they've checked in for the day. Its job is to confirm today is done. Defaults: Checked in and เช็คอินแล้ว.
3. Reward Obtained State What it says after they've completed the mission and taken the reward. Defaults: Reward Obtained and รับรางวัลแล้ว.
⚠️ Watch out: leave any one of them empty and a red message appears under that field —
Please enter Default State., or whichever state is missing — andSAVEwon't go through. Work down all 3 groups before saving.
4. Set the along-the-way reward under Progress Reward
Progress Reward is what the customer gets each time they successfully check in for a day. Its Reward Type dropdown holds 2 values: No Reward and Points.
Choose No Reward if you'd rather give a single reward at the end. Choose Points and 2 more fields open.
1. Point Amount The number of points per check-in.
2. Reward Expiration How long those points last. 3 options: Apply the same setting as in the system configuration, which follows your system setting; Use the promotion's expiry date; and Expiry after earn point for, which opens a number field and a Day unit for you to set yourself.
Recommendation: multiply Point Amount by the number of days in Check-ins Required before you save. A figure that looks small per day becomes a large one across 30 days and your whole customer base.
5. Set the completion reward under Check-in Completion Reward
Check-in Completion Reward is what the customer gets on reaching the required number of check-ins. This section's Reward Type dropdown holds Points and Coupon — there is no No Reward option here.
Choose Points and the fields that follow are identical to Progress Reward's: Point Amount and Reward Expiration.
Choose Coupon and the fields change to a coupon set.
1. Coupon Name A dropdown of the coupons already in your system. Its placeholder reads Select coupon.
2. Coupon Amount How many coupons one customer receives on completing the mission.
3. The coupon summary box A green-bordered box below the dropdown that the system fills in once you've picked a coupon: Coupon Name:, Start Date:, End Date: and Remaining Coupon:.
4. Reward Expiration How long this coupon lasts — the same set of options as on the points side.
⚠️ Watch out: read
Remaining Coupon:in the summary box every time before you save. If it's lower than the number of customers you expect to finish, the coupons run out mid-campaign. Top the coupon pool up before you switch the mission on.