

When you want customers to earn points on every purchase without anyone awarding them by hand, what you need to build is a spend-based promotion — a Transactional Promotion — under Promotion → Transactional Promotion. The create page is split into 3 tabs: promotion details, conditions, and rewards. Allow about 15 minutes for your first one. Once you save it, the system starts awarding points automatically on every transaction after the start time you set.
⚡ Quick Path:
Promotion→Transactional Promotion→+ Promotion Create→1. Promotion Information, clickSave→2. Condition, clickNext→3. Reward, click+ Save reward→ switch it on in the promotion list
The quick path names all 3 buttons deliberately, because the 3 tabs each save with a differently named one — and that is the number one reason promotions get saved with no reward attached.
Requirements before you start
- Access to the
Promotionmenu — if it isn't in your left sidebar, ask an Admin on your team to grant it. - Check the brand name in the top-left corner — the
Working on …line has to be the brand you mean to build this for, because the promotion belongs to that brand. - The conditions you want to set — for example "spend ฿50, earn 1 point, Bangkok branches only, excluding alcohol categories". That sentence divides neatly across the 3 tabs.
- Set up whatever the conditions will reference first — branches if you'll limit by branch (the "How to set up branches for the member registration form" article), member tiers if you'll limit by tier (the article on member tiers). If the reward is a coupon, create it under
Reward Managementfirst, because the reward tab only lets you pick from what already exists. - Decide how many promotions you need — if the rewards you want need different conditions on tab 2, they have to be separate promotions. If they differ only in rate, one promotion is enough, because the rate belongs to the individual reward. The worked calculation is in the Promotion system limits you should know before you configure article.
Example promotions based on an order
DeepBLOK stands out for how flexibly a promotion's conditions can be expressed. The system is built so a brand can combine conditions down to the level of an individual line item, a time window, a membership tier, a branch and a payment channel — so a campaign can target exactly the customers and hours you mean, rather than a blanket discount whose cost is far harder to control.
The examples below are real situations from the floor, and how each one translates into conditions in the system.
📌 Good to know: each condition type can be used once per promotion. Once you've used one, it greys out in the dropdown. If you need the same criterion across 2 separate ranges, build a second promotion.
Create the promotion in 6 steps
Step 1: Open Transactional Promotion and start a new promotion
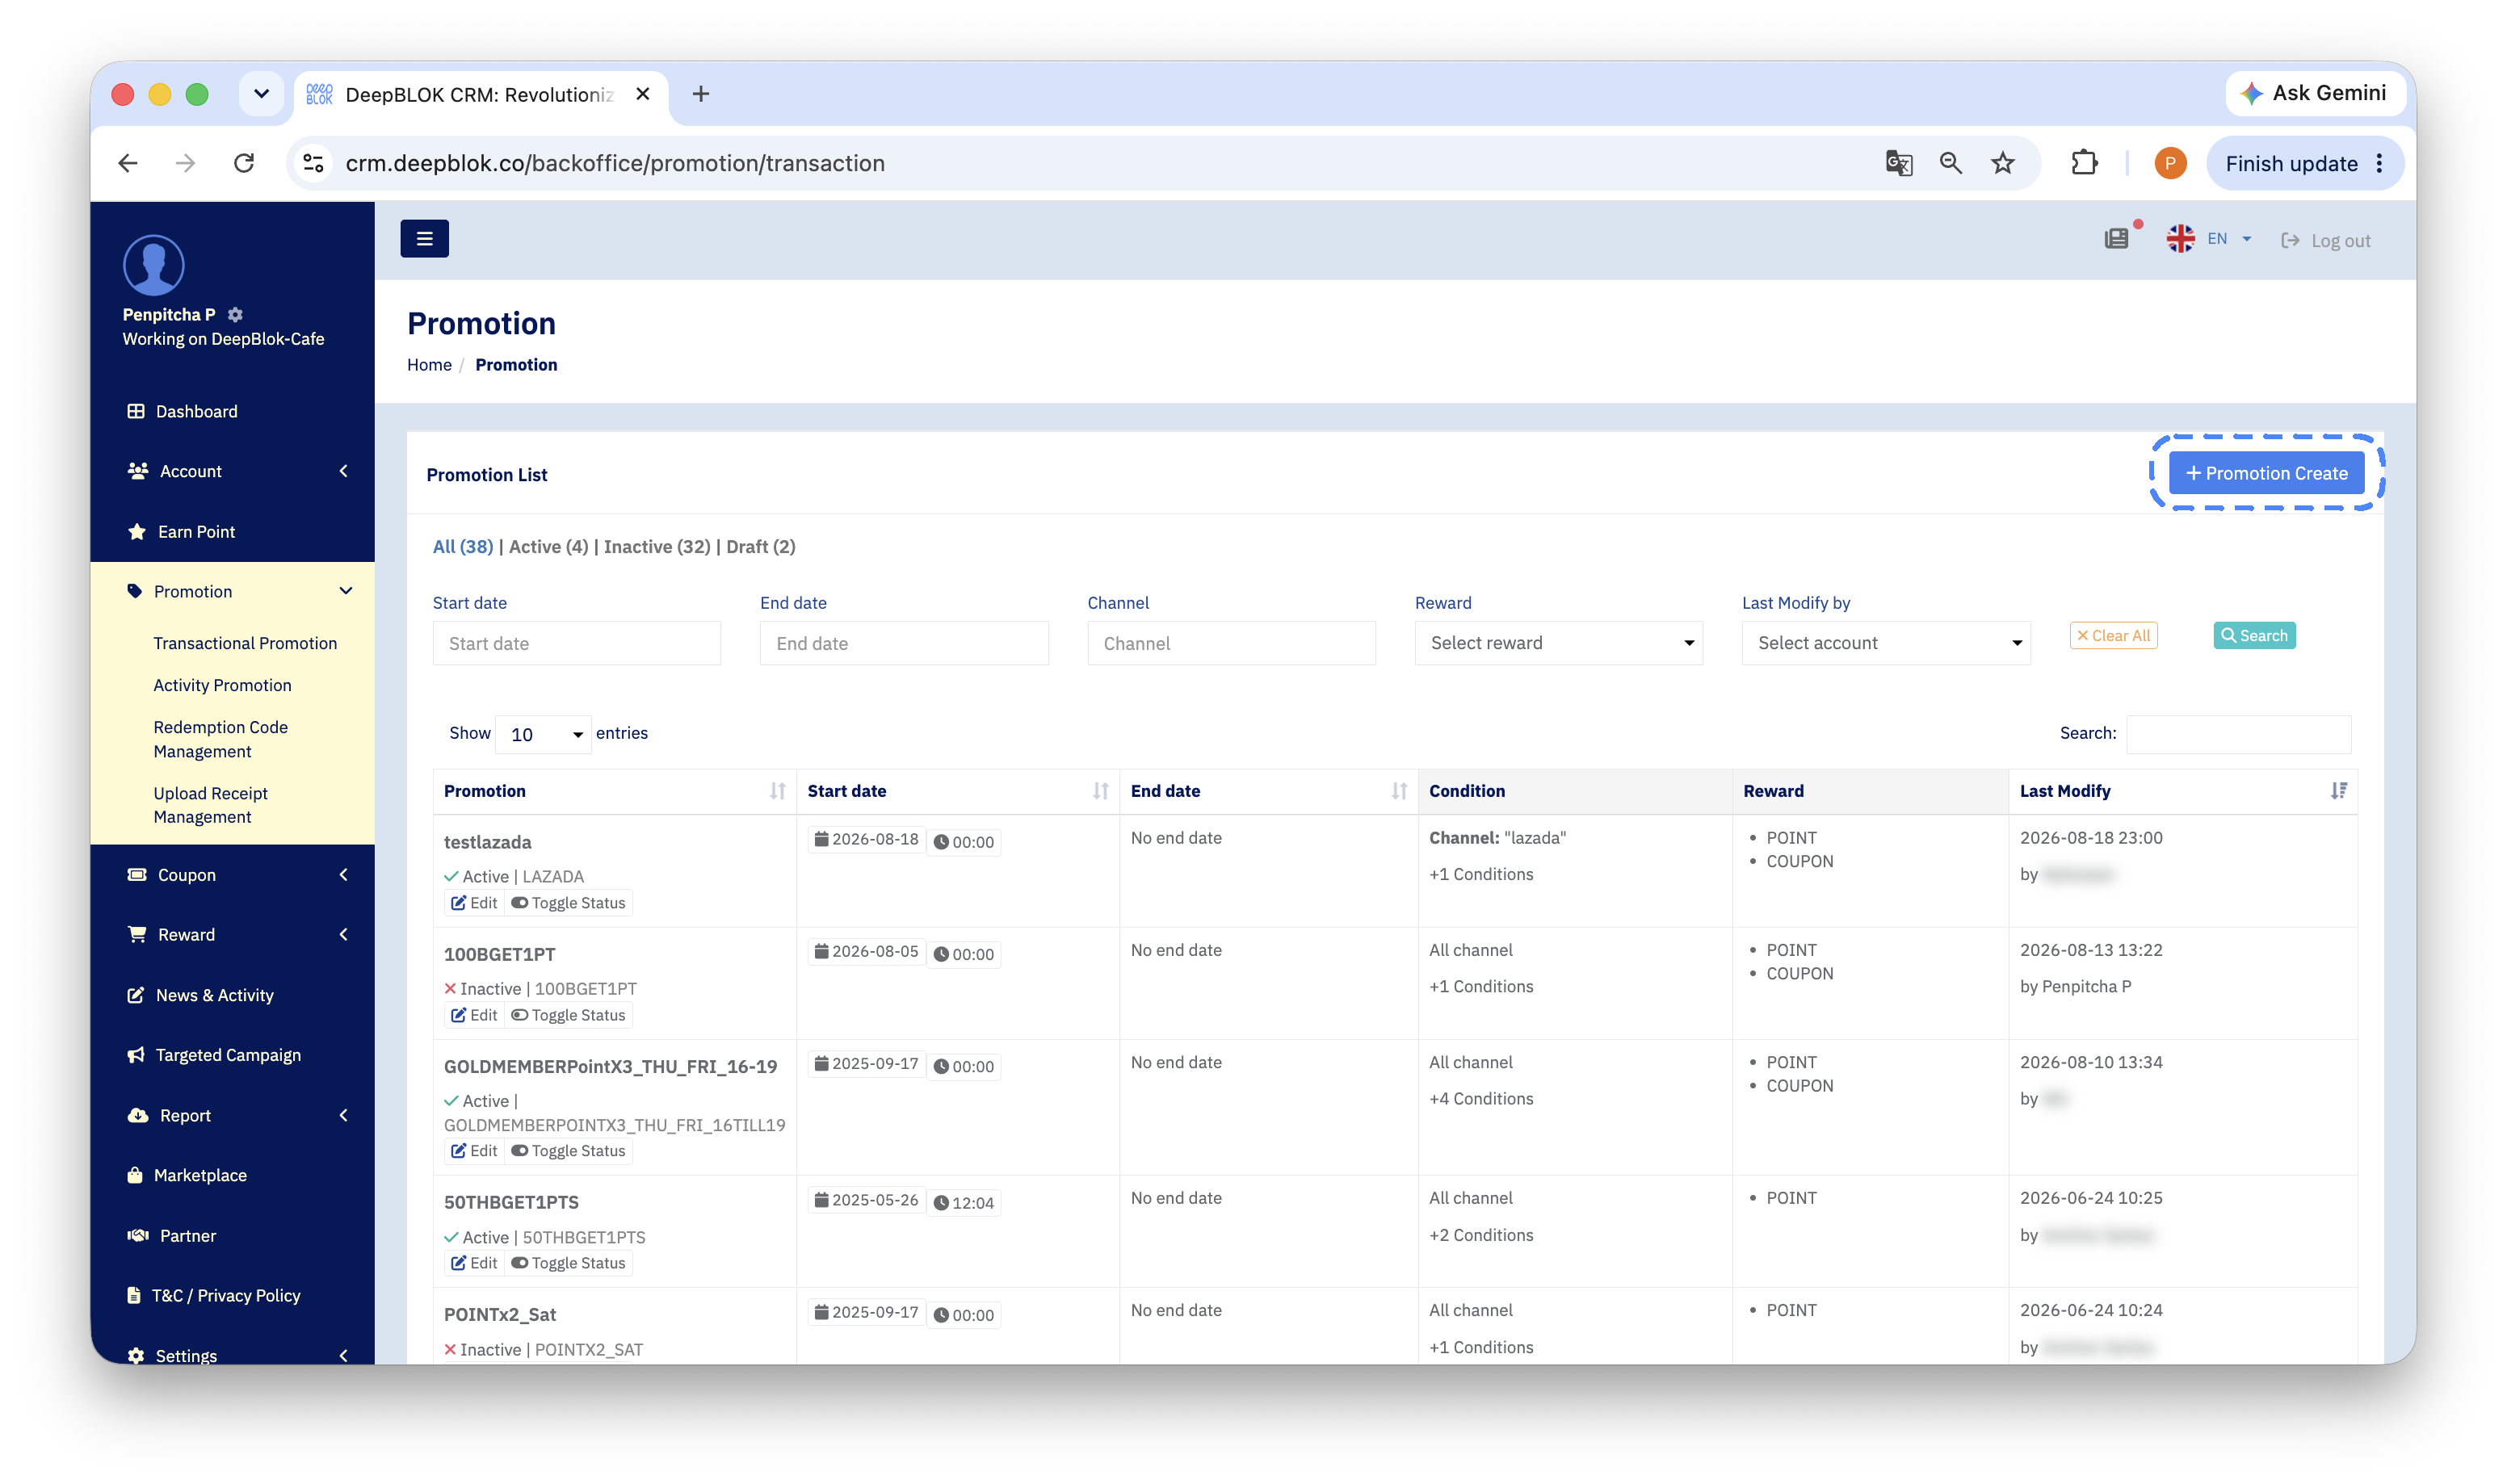
Click Promotion in the left sidebar to expand it, then click Transactional Promotion. The system opens the Promotion page, which already lists every promotion your brand has.
📌 Good to know:
Promotionholds several submenus.Transactional Promotionis the one that awards points against a purchase;Activity Promotionjust below it awards points for an action such as signing up, which is a different thing entirely.
Click the blue + Promotion Create button in the top-right corner of the list.
Step 2: Fill in the promotion details
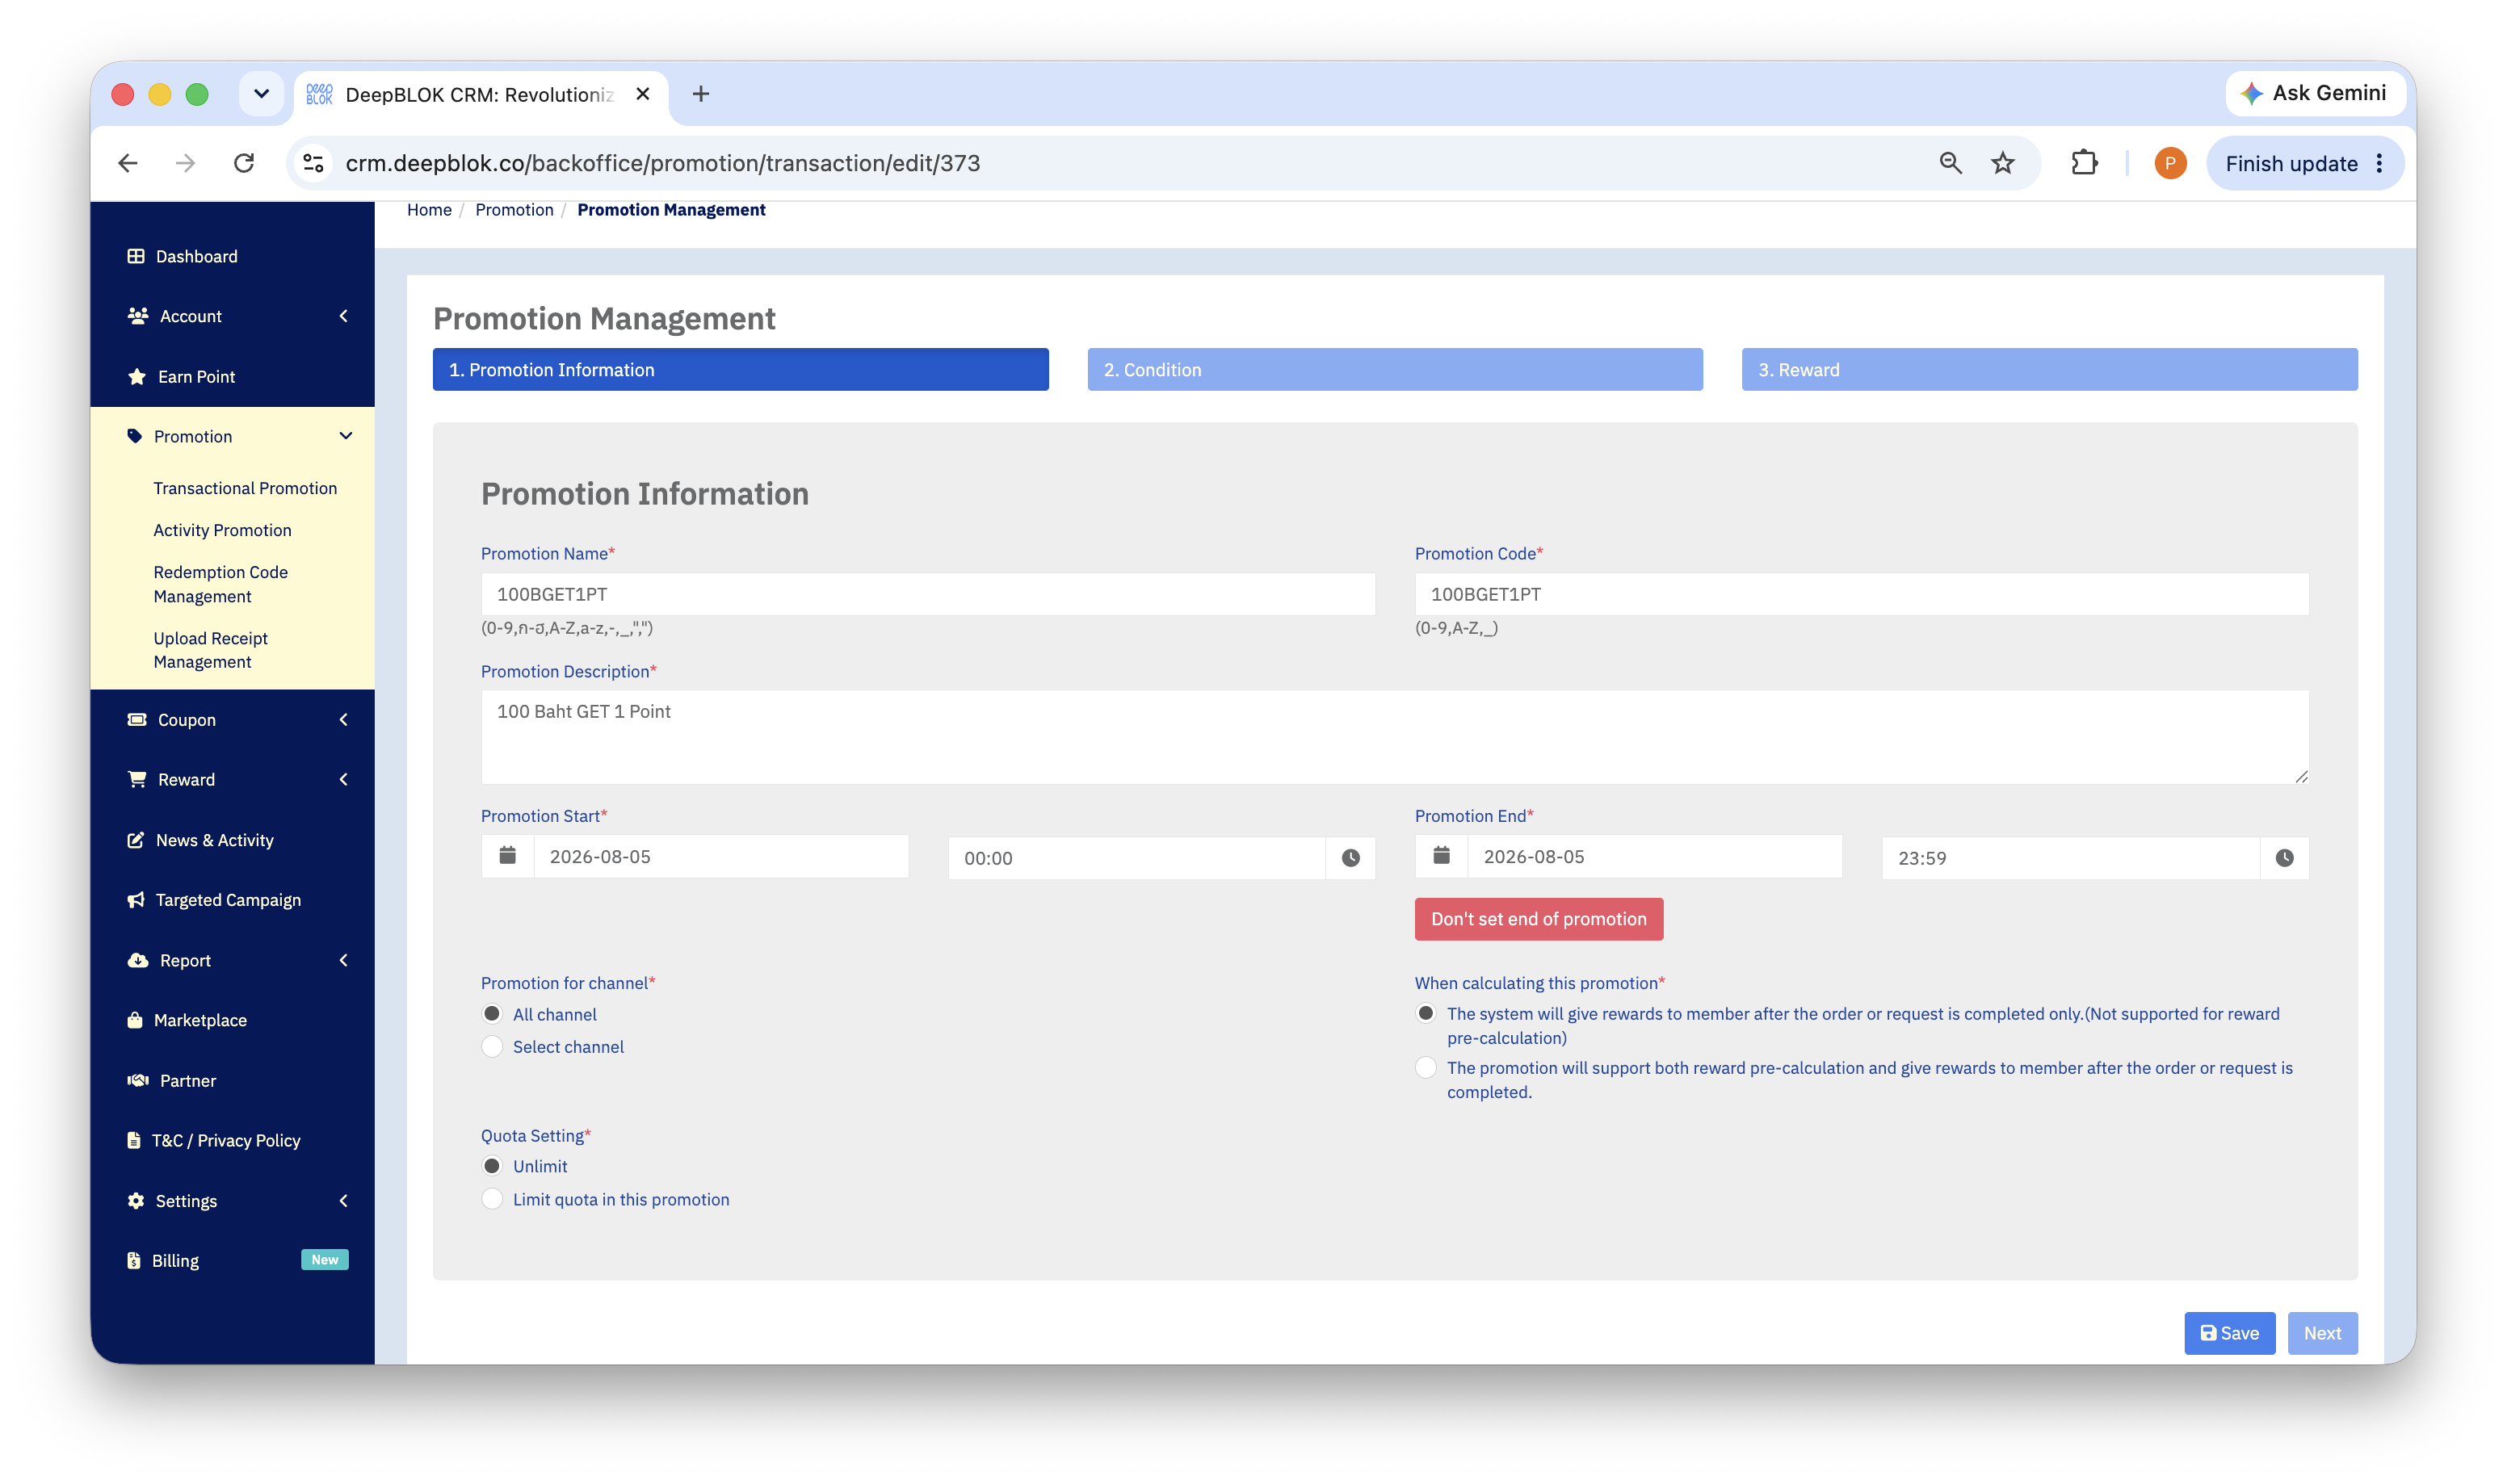
The system opens the 1. Promotion Information tab for you. Fields with a red asterisk are required.
Once everything is filled in, click the blue Save button in the bottom-right corner.
📌 Good to know: the option that awards only after the bill closes explicitly states that it doesn't support reward pre-calculation. If your shop floor needs to show customers the points they're about to earn before they pay, choose the option that supports both.
On quota: quota can be capped over a time period and at several levels — promotion level, brand level, branch level and per individual customer. That suits campaigns with a budget ceiling, such as limiting how many times one customer can benefit. For an earning rule that should apply to every bill, choose Unlimit.
Step 3: Create the conditions
The 2. Condition tab is where you define which transactions qualify.
- Click the
+ Add new conditionbutton. - The
Condition managementwindow opens with aSelect a conditiondropdown. - Open the dropdown and pick the condition you want. There's a search box at the top — type to narrow the list down.
- Enter that condition's value, then save it.
The dropdown offers 18 conditions in 6 groups, organised by what they key on.
A basic spend-based rule uses Purchase Amount from the Payment group.
Real promotions usually combine several conditions, narrowing the offer by place, time and spend at once.
Example 1 — a lunch-hour offer at one branch Branch Name = Paragon · Specific Time = 12:00-13:00 · Purchase Amount = ฿500 or more → a customer who spends that much in that window at that branch earns double points.
Example 2 — a weekday offer for higher tiers Member Tier = Gold · Business Date = Monday to Friday · Payment Channel = QR → a Gold member paying by QR on a weekday earns 100 bonus points.
📌 Good to know
- Conditions that reference the items themselves —
Item category nameandItem Code— work once the brand has connected its sales-channel API to the membership system. That is what lets the system tell which item categories are included in or excluded from a promotion.- The system always requires at least 1 condition before it lets you move on. If you intend to award points on every bill with no minimum, add the broadest condition you're comfortable with — a payment amount of ฿1 or more, say — rather than leaving it blank.
Adding several conditions to one promotion: repeat steps 1 to 4 as many times as you need. Saved conditions stack up as a list you can read back. When they're all in, click Next in the bottom-right corner.