

Not every reward is meant for everyone — a perk that opens to the top tier first, or a goodwill reward for a named list of customers. Both cases are set in the fourth tab of the reward edit page, and it takes about 3 minutes.
⚡ Quick Path:
Reward→Reward Group List→View Rewards→Editon that reward → theWho sees this rewardtab → pickBy membership tier — everyone, or selected tiers only→ choose tiers inSelect member tiers→Save
📌 Good to know: the tiers available in this tab are the ones already configured in the system. If no member tiers have been set up, the field has nothing to offer — set the tiers up first and come back. A link to the member-tier article is in the last section.
Requirements before you start
- A reward that already exists — open it with the
Editbutton on its row, from the group'sReward Listpage - Member tiers already configured — the tiers in the field are the ones your own brand has set up, so the list differs from brand to brand
- A decided list of accounts, only if you are limiting account by account — you need the account numbers of the customers who should see it, ready either as a
.csvfile or as comma-separated account numbers
The 2 routes, and how they differ
The Choose the group by field in this tab offers exactly 2 options, and they work in completely different ways.
The second option carries a line underneath it reading Only customers on this list see it · tier is ignored, so it removes the tier condition entirely rather than adding a condition on top of it.
Setting it by member tier in 3 steps
Step 1 Open the Who sees this reward tab
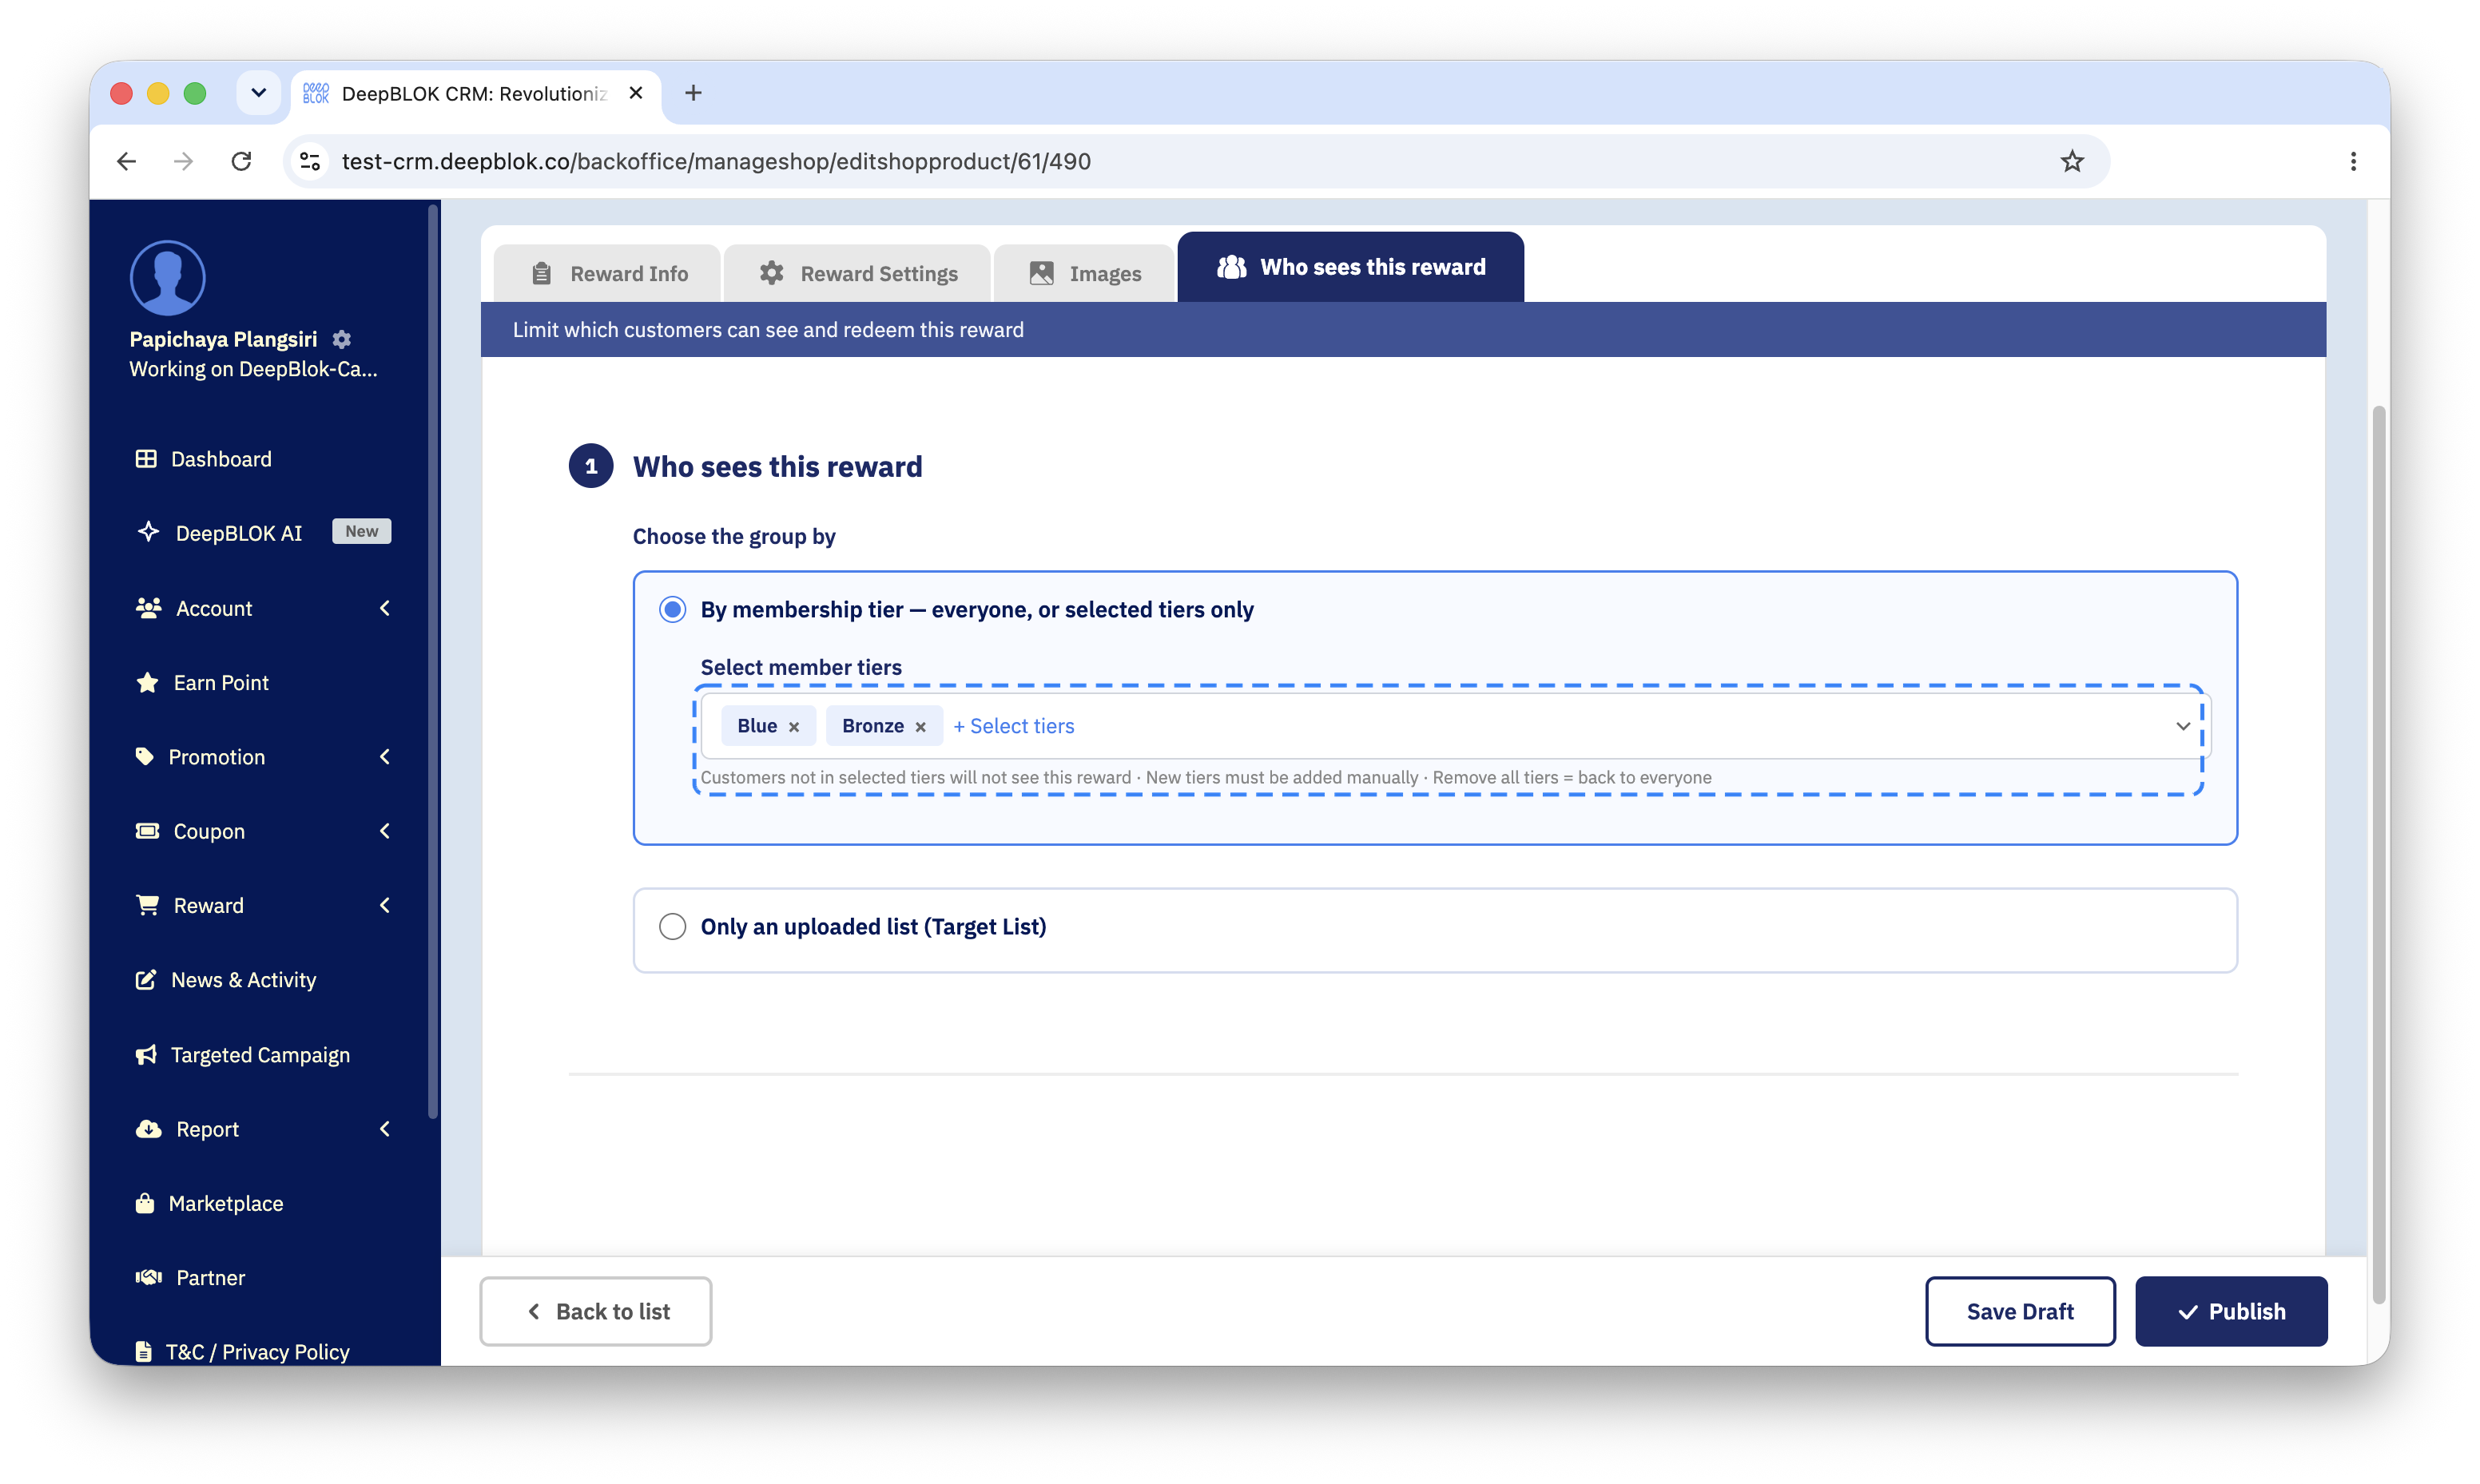
From the Edit Reward page, press the Who sees this reward tab — the last one — then pick the first option in the Choose the group by field, By membership tier — everyone, or selected tiers only, which is already the default.
Step 2 Choose tiers in the Select member tiers field
Below the option sits Select member tiers, and this single field carries both "everyone" and "only these tiers".
With no tier chosen, the field shows an Everyone — all tiers chip, meaning every tier sees the reward, including tiers added later. That chip is a real value rather than an unset state, which is why it cannot be removed.
Press + Select tiers and add a tier and the Everyone — all tiers chip disappears, leaving only the tiers you picked. The line underneath changes to state the effect of what you have set — read it back before saving, every time.
⚠️ Watch out: the system does not read this as "this tier and above". The chips in the field are the complete list of tiers that can see the reward — pick only a middle tier and members above it will not see it either. Add every tier that should see it.
And "everyone" is not the same as picking every tier. A tier your brand adds later is included automatically only if the field is left as Everyone — all tiers. So if the intent is "everybody sees this", leave that chip alone rather than picking every tier.
Step 3 Press Save
Press Save on the action bar at the foot of the page. The page has one action bar, so all 4 tabs are saved in one press. If the reward is in Draft the button reads Save Draft.
✅ Confirm it worked: press Back to list and check the Member Tier column on that reward's row — every tier you picked should appear there as a chip. An empty column means the reward is still on Everyone — all tiers.
Naming the audience account by account
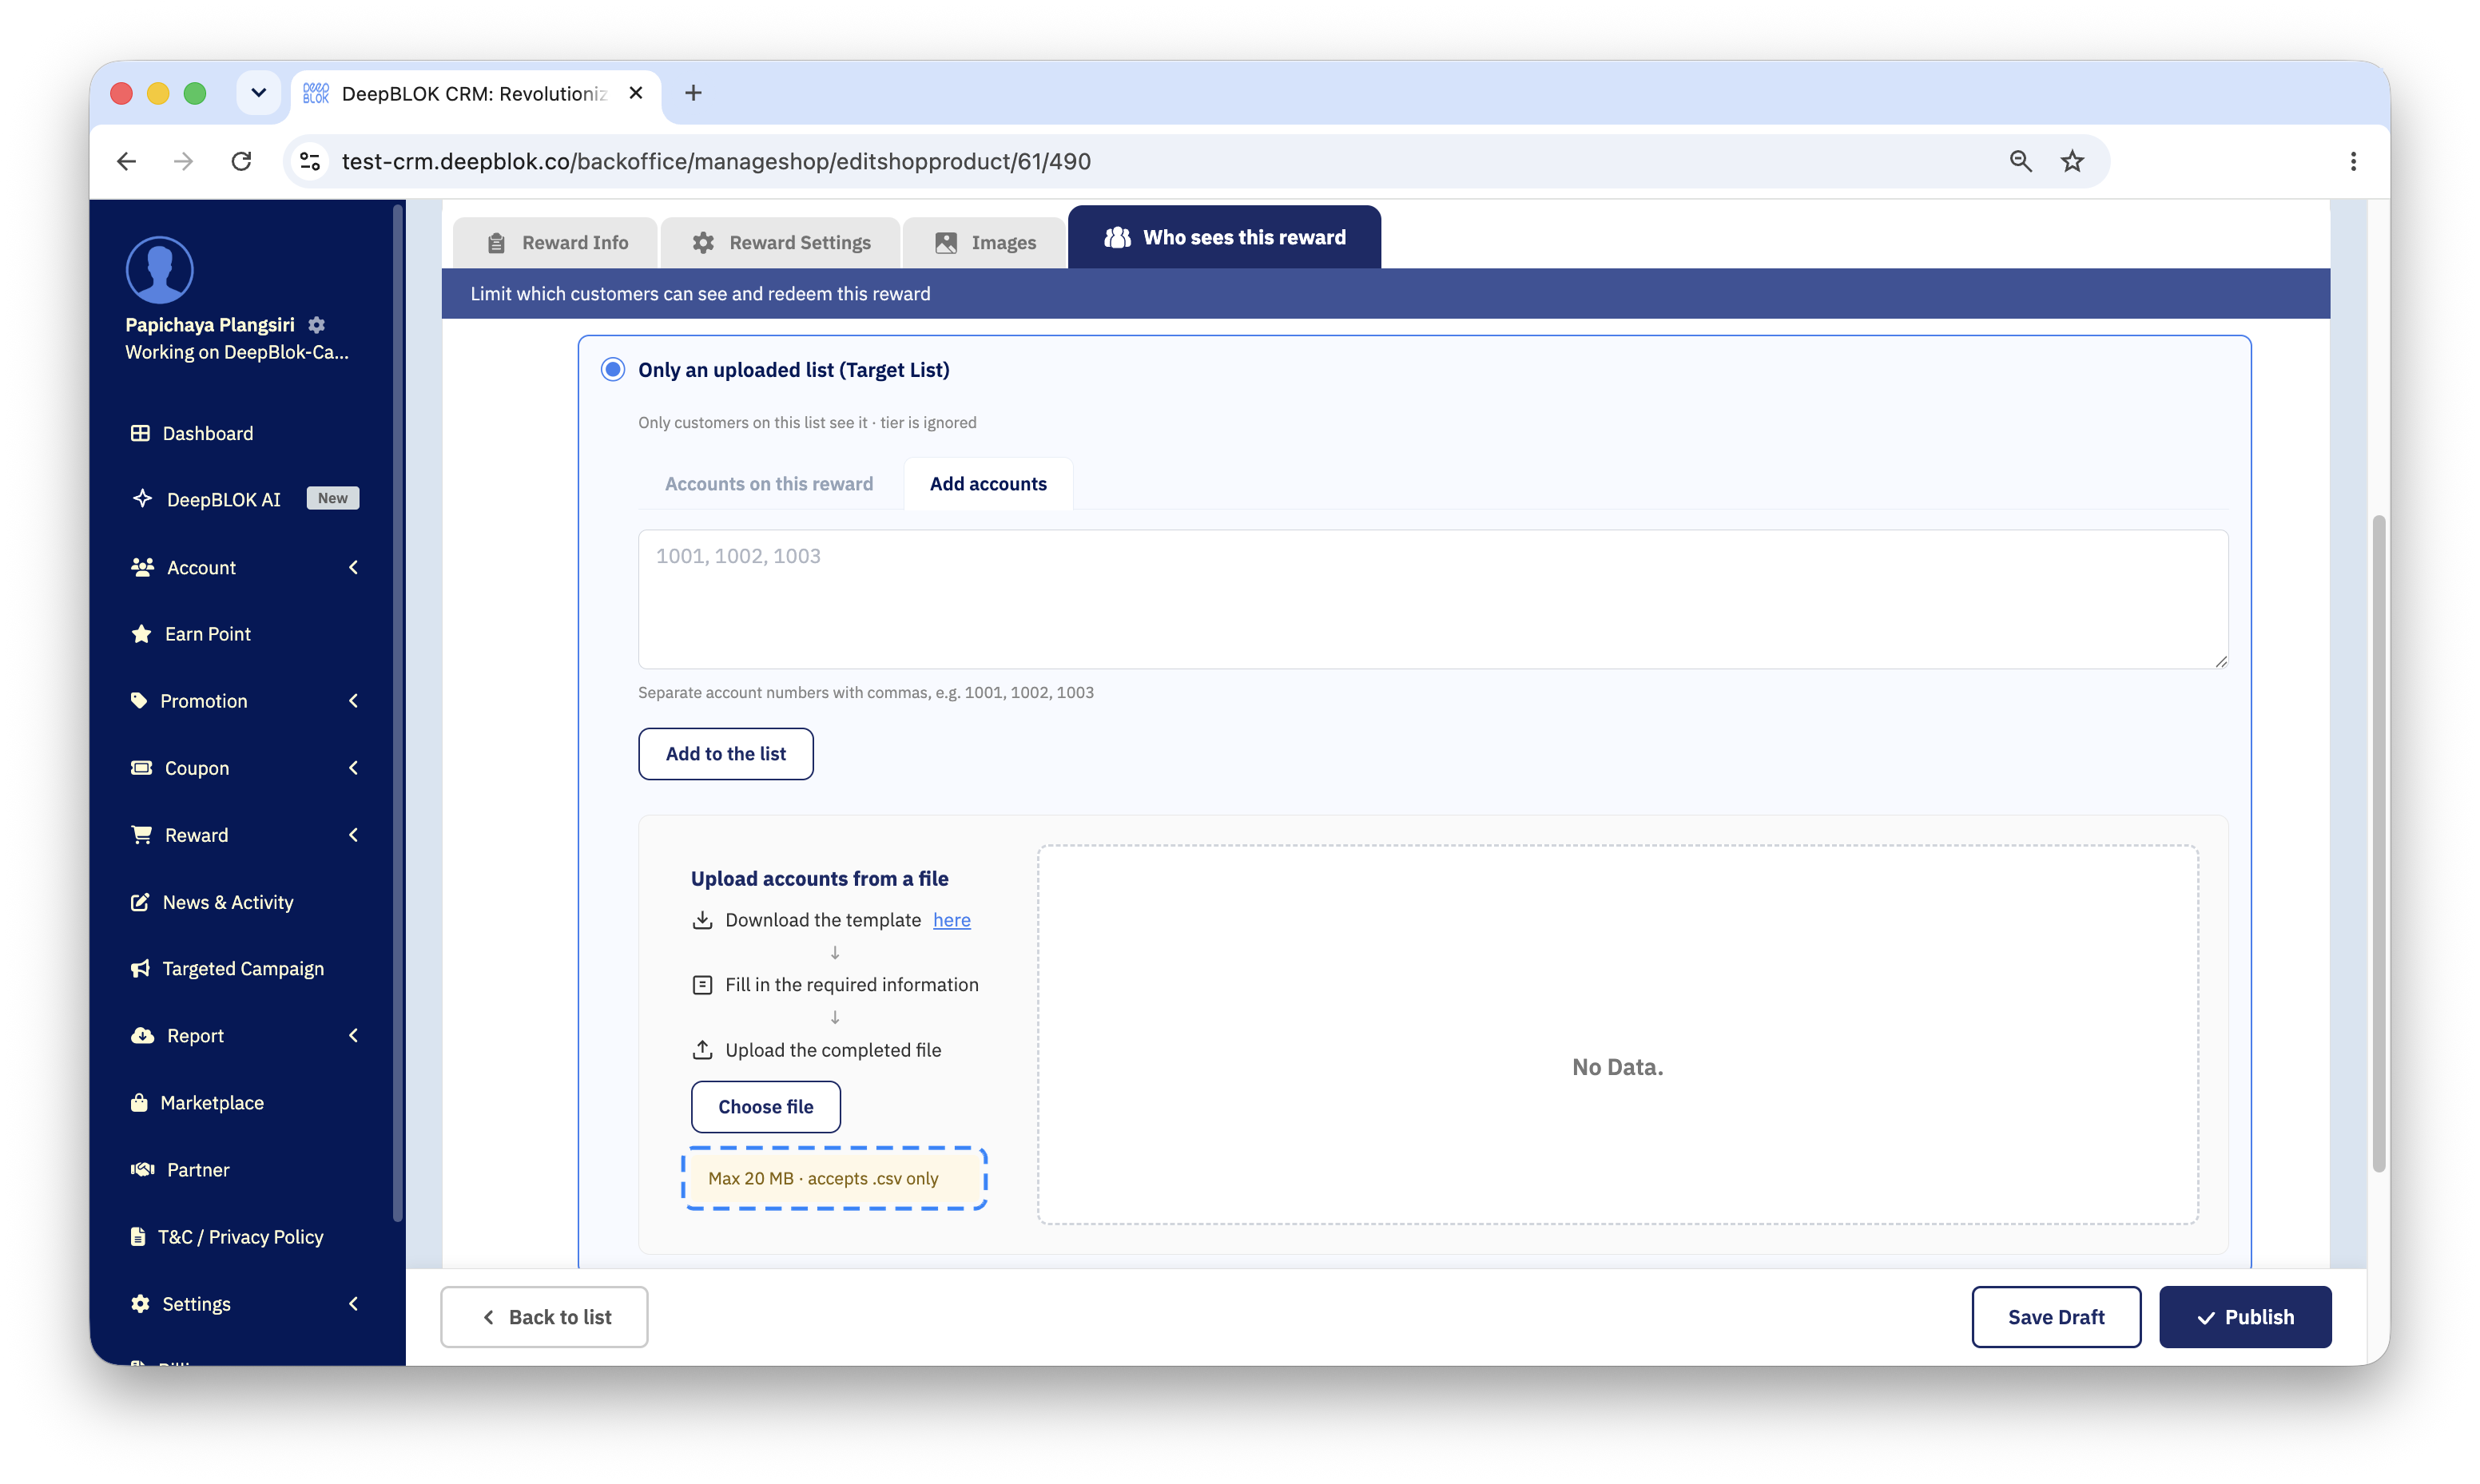
Pick Only an uploaded list (Target List) and the system opens the list-management area, which has 2 sub-tabs.
The Accounts on this reward tab shows the accounts already on the list, with a count and a table carrying an Account No. column. It has a search box for looking up an account number directly, and buttons for removing selected accounts and removing all of them. With no accounts on the list yet, it reads No accounts yet — go to "Add accounts" tab.
The Add accounts tab offers 2 ways in. The first is pasting account numbers into the text box separated by commas, following the example the system prints above it, then pressing Add to the list. The second is the Upload accounts from a file box, which walks 3 steps — download the template, fill in the required information, then press Choose file to upload the completed file. The system accepts .csv only, up to 20 MB, as the line under the button states.
What goes in the file is the account numbers of customers who already exist in the system, not new customers. Uploading a list opens an existing account's access to the reward; it does not add members to the brand.
Common Problems
Frequently Asked Questions
Q: Is leaving the field on Everyone — all tiers different from picking every tier by hand
A: Yes, and the difference matters. Everyone — all tiers means no tier restriction, so a tier your brand adds in future sees this reward automatically. Picking every tier by hand records a list of tiers, and a new tier will not be included until someone adds it. If the intent is for everybody to see it indefinitely, leave the everyone chip alone.
Q: Can it be limited by tier and by uploaded list at the same time
A: No. Choose the group by takes one option, and the list option states plainly that tier is ignored. If you need both conditions, filter the list down to accounts in the tiers you want before uploading it.
Q: Can the tiers be changed after the reward is published
A: Yes, but the new value changes what customers see the moment you press Save. Anyone who falls outside the condition stops seeing the reward, while coupons already redeemed keep working as normal. If you have several changes to make, press Unpublish first, finish them, then publish again.
Q: If an account is removed from the list, does a customer lose a reward they already redeemed
A: Removing an account affects visibility and any future redemption. A coupon the customer has already redeemed stays in their hands and keeps working, because that entitlement has already been issued.