

Your terms and conditions are the document members accept before they can use your membership programme. The system stores it as versions, and the version you activate is the one members see. All of it happens under the T&C / Privacy Policy item in the left menu.
⚡ Quick Path:
T&C / Privacy Policy→ theTerms & Conditiontab →+ Add New→ fill inVersionand both language tabs → tickActive→Save
Have the approved wording ready first, and the work inside the system takes under 5 minutes.
Requirements before you start
- Approved wording in both Thai and English — the form has a separate tab per language, so have both texts ready before you open it. Terms and conditions are binding on your customers, so the wording should be signed off by your legal team or an authorised approver before it goes into the system.
- An agreed version number — for example
1.0.0for the first edition, incremented whenever the wording changes, because that number is recorded against each member as the edition they accepted. - Access to the
T&C / Privacy Policymenu — if you can't see it in the left menu, ask someone with theAdminrole to grant access per the article on changing the role on an existing admin account. - A plan for when it goes live — the form has an
Activetick box, so you can save the wording now without activating it, and come back to switch it on the day you want.
Add your terms in 5 steps
1. Open the T&C / Privacy Policy menu
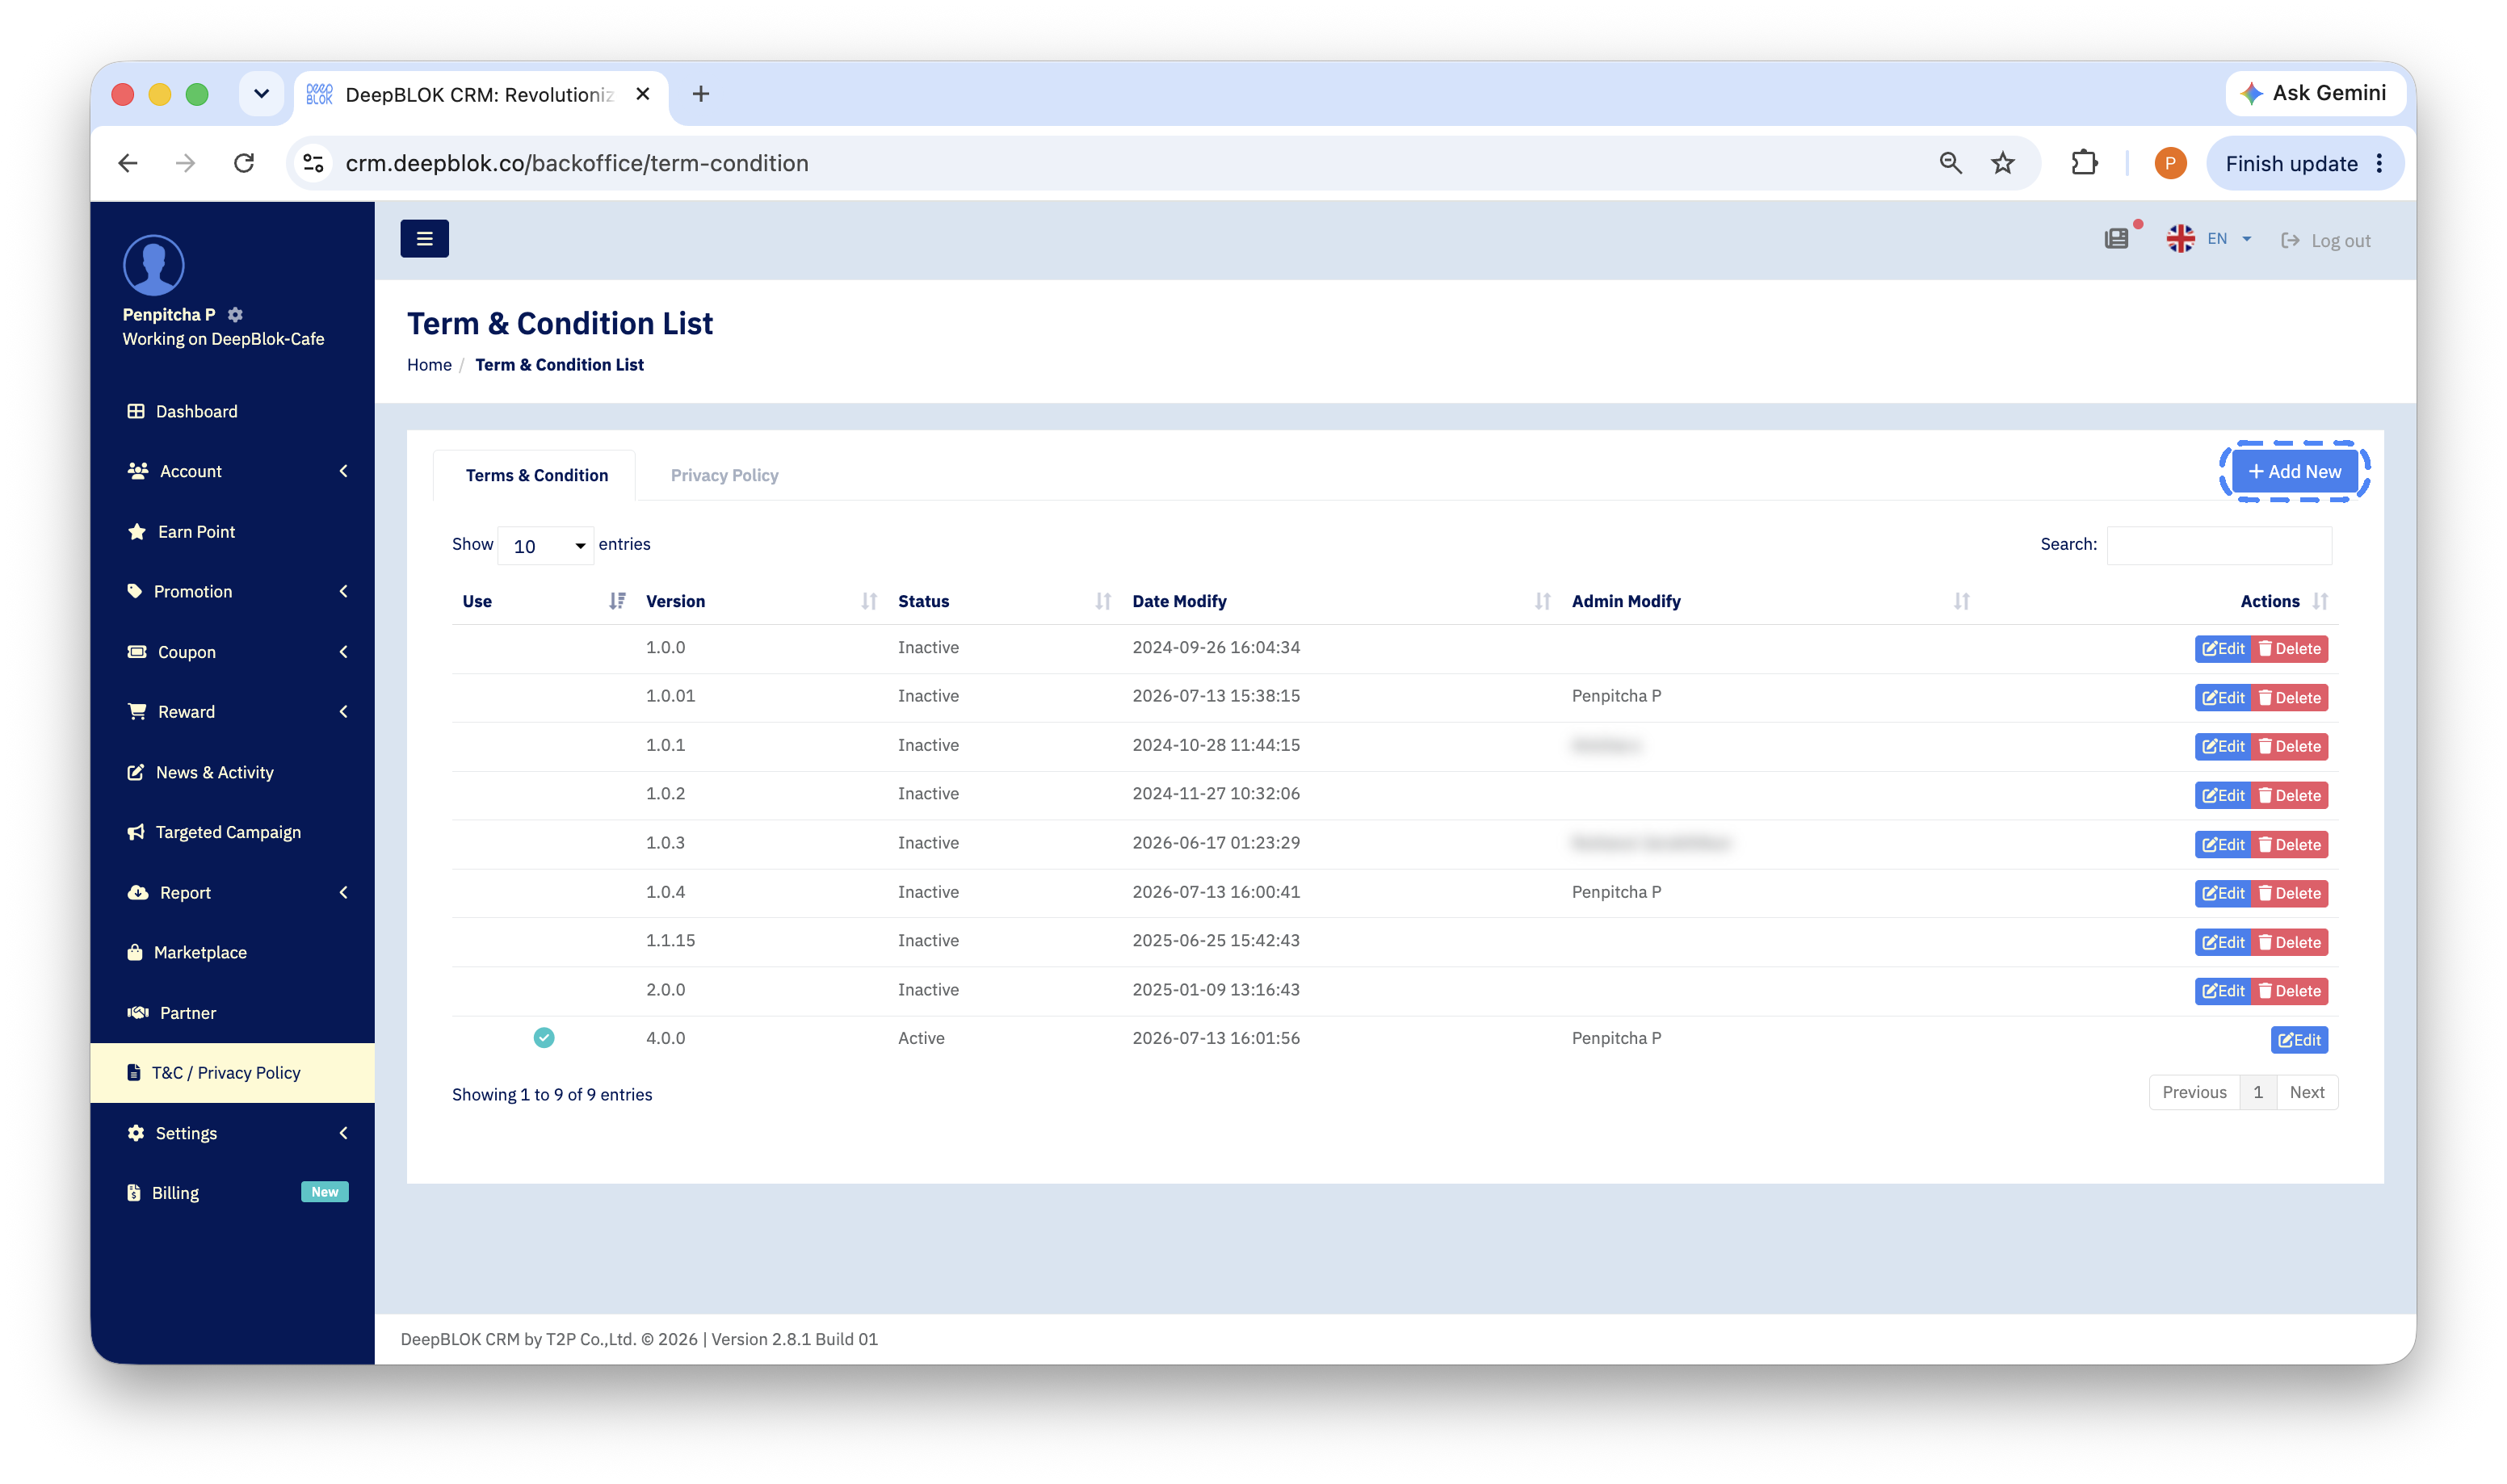
In the left menu, click T&C / Privacy Policy. The Term & Condition List page opens with 2 tabs at the top: Terms & Condition and Privacy Policy.
Make sure you're on the Terms & Condition tab first.
2. Click Add New
Click the blue + Add New button at the top right of the table panel. The Term & Condition Create form opens.
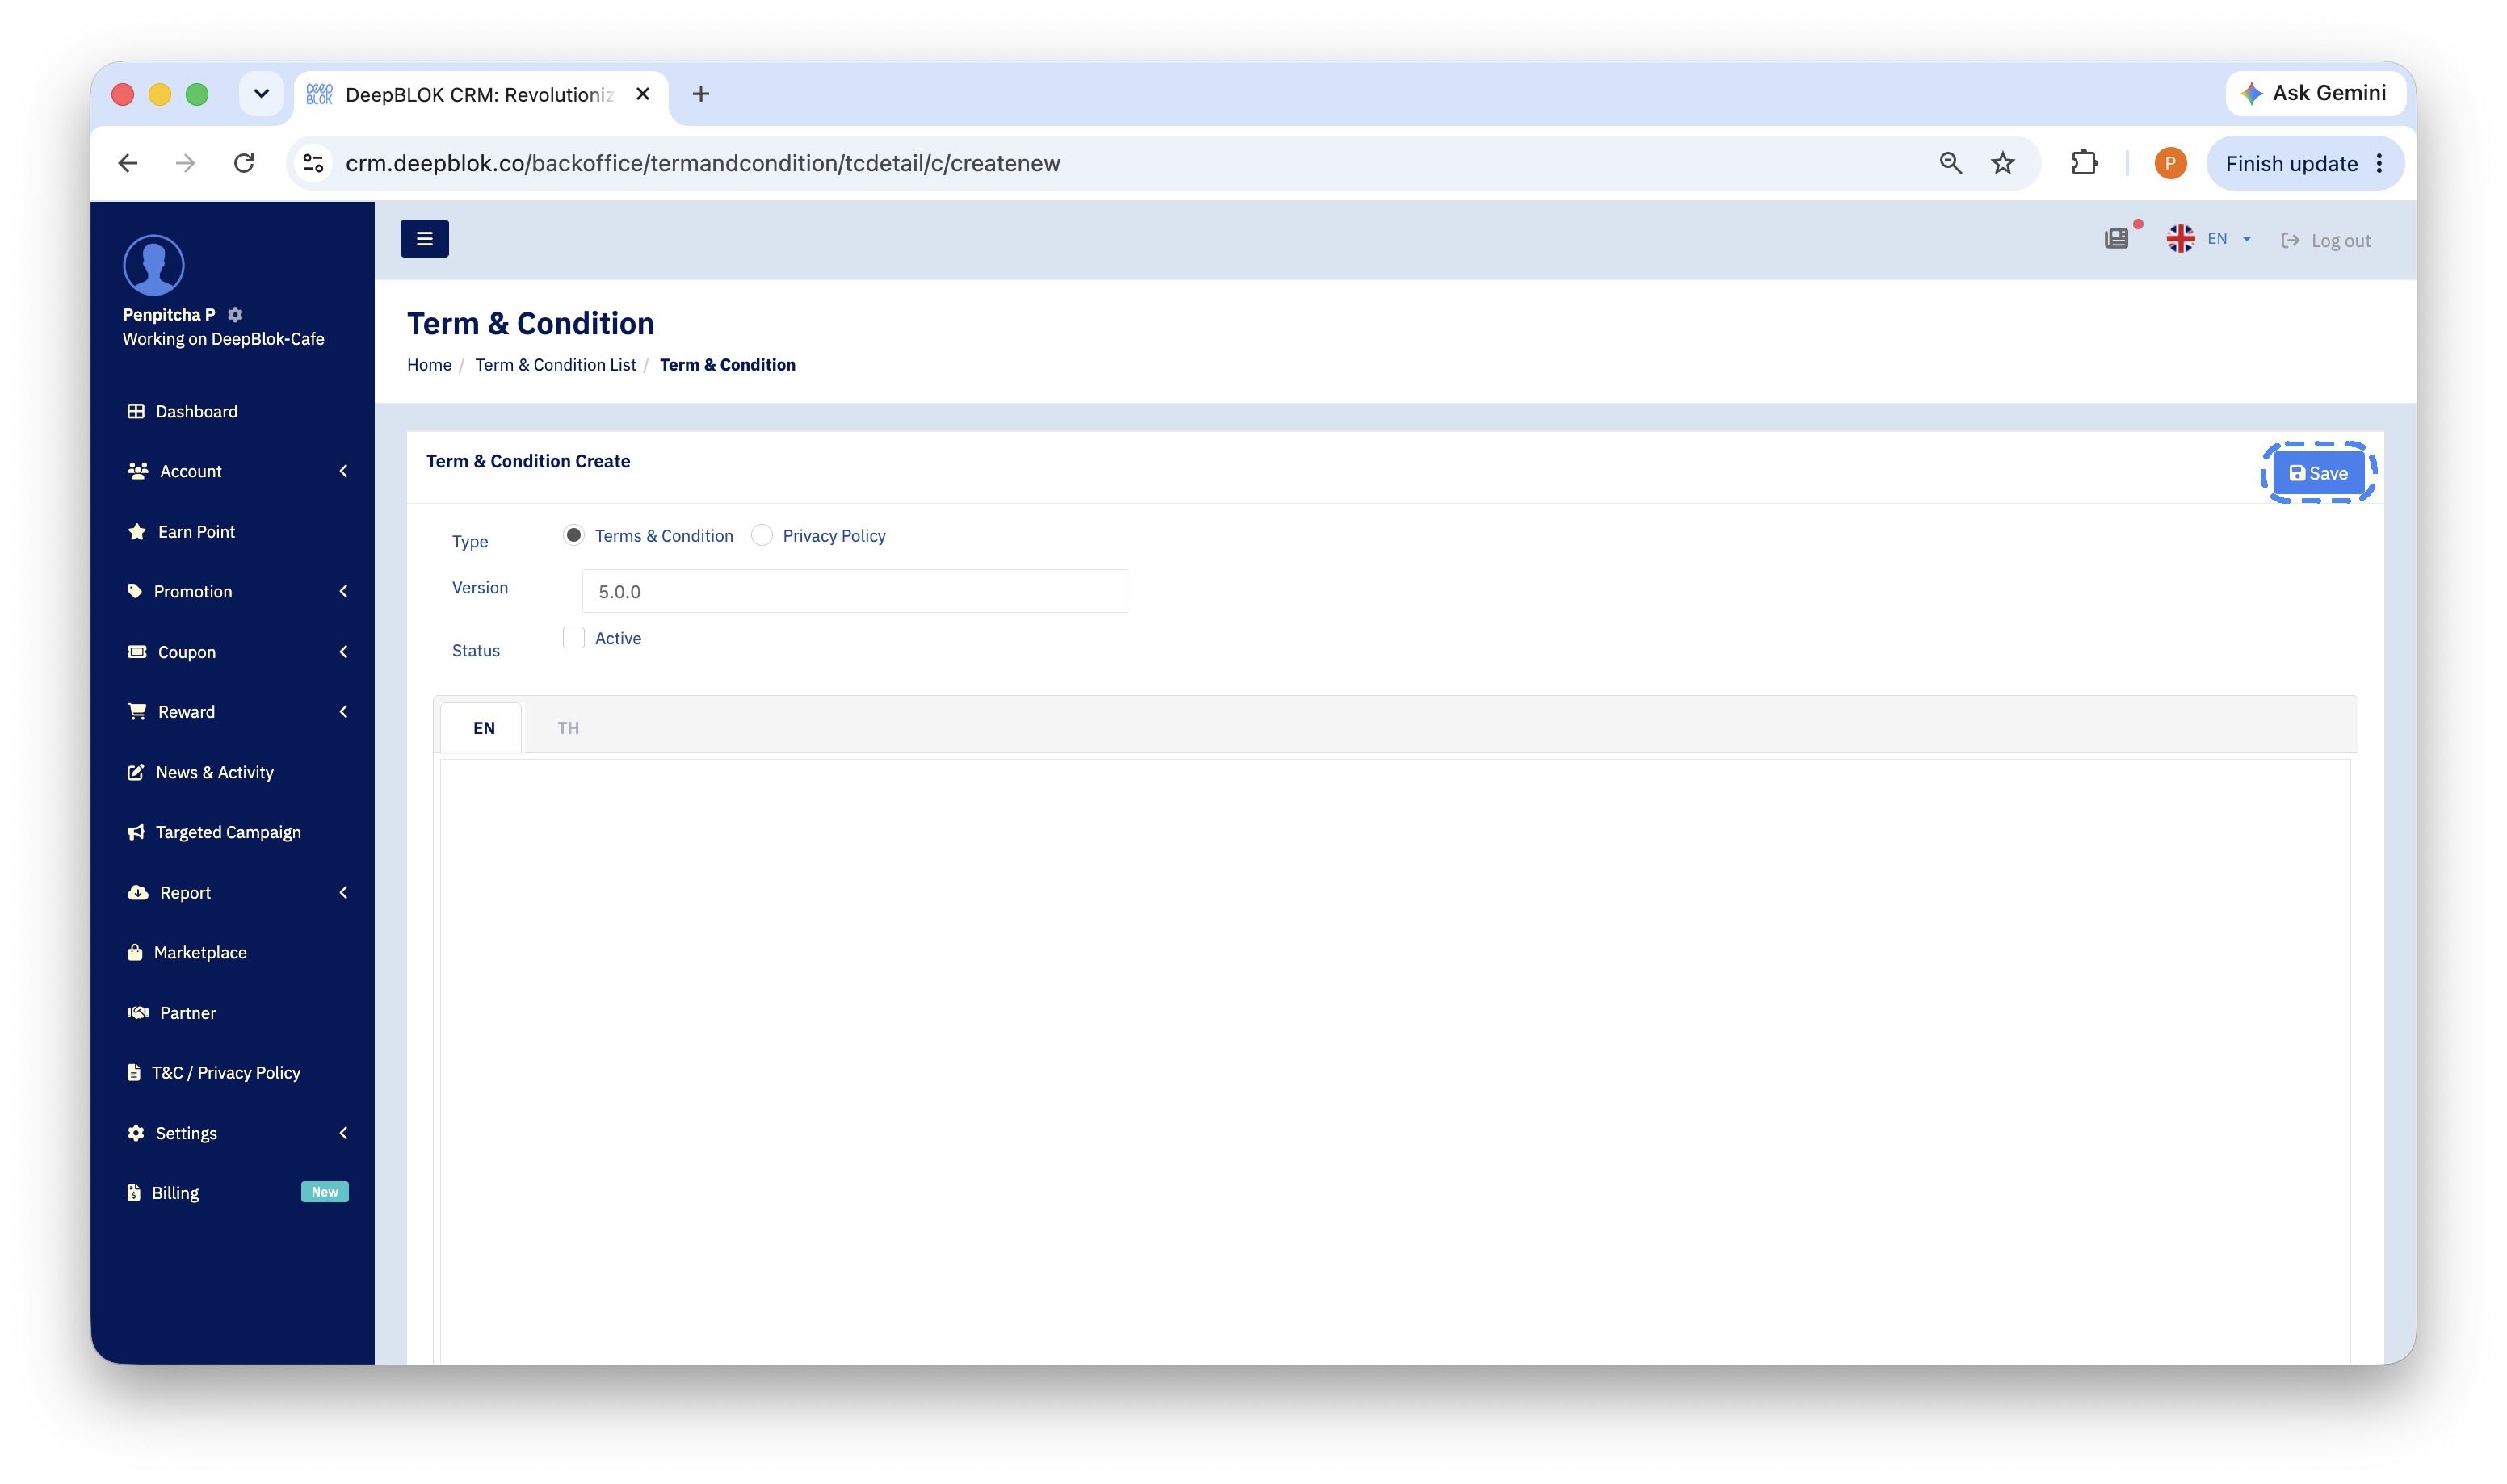
3. Choose the document type and enter a version number
The form has 3 fields, top to bottom.
Type— 2 radio buttons,Terms & ConditionandPrivacy Policy. ChooseTerms & Condition.Version— type this edition's version number, for example1.0.0.Status— theActivetick box. Tick it when this is the edition members should be accepting. If the start date is still ahead, leave it clear for now.
4. Enter the wording in both languages
Below the status field are 2 language tabs, EN and TH, each with its own large content box.
Paste the English wording into the EN tab, then switch to the TH tab and paste the Thai. Fill both before saving, because members see the wording from the tab matching the language they use.
5. Save, then check the result in the table
Click the blue Save button at the top right of the form. The system saves and returns you to the list page.
✅ Confirm it worked: the table should now contain a new row whose version number matches what you typed, and if you ticked
Active, that row should carry the green check in theUsecolumn and readActiveunderStatus. Then open the member-facing side with a test account to see the new wording. Checking both ends proves the record saved and that customers are seeing the right edition.
Reading the document list
Every row is one version of a document, and these 6 columns tell you which one is live.
📌 Good to know: the row for the version currently in use carries only the
Editbutton, while the redDeletebutton appears on rows that aren't in use. So if you want to remove a version, activate a different one first.
A note on the page name: one page holds both documents
The page is called Term & Condition — both the list and the form — even while you're creating a privacy policy, because it is the single page that looks after both documents.
What decides where a document lands is the radio button on the Type line, not the page name and not the tab you came in through.
How to check you're creating the right document: before every Save, look at the Type line and confirm the selected radio is Terms & Condition. If Privacy Policy is selected instead, the document appears under the Privacy Policy tab — which you fix by opening it, correcting the selection, and saving again.
Issue a new version when the wording changes
When the terms change, the clearest approach is a new version rather than editing the existing one, because the system records against each member which version number they accepted.
- Create a new document with the 5 steps above, using a higher version number — for example
1.0.1→1.0.2. - Tick
Activeon the new one. - Return to the table and confirm the green check in the
Usecolumn has moved to the new row. - Read the article on checking a member's consent status for how to check which version an individual member has accepted.
⚠️ Watch out: a new version affects every member, because when the version is updated members have to give their consent again before they can use the membership programme. This step is important enough to schedule with your marketing and store teams first, so everyone is ready for customers who meet a consent screen.
Common Problems
Frequently Asked Questions
Q: Can I just edit the existing version instead of creating a new one?
A: You can, with the Edit button — but a new version reads back far more clearly, because the system records against each member which version number they accepted. Editing in place leaves that recorded number unchanged while the wording behind it has moved on. So when the substance changes, issuing a new version is the recommended route.
Q: How many versions can be Active at once?
A: The Use column carries a green check against the version in use, so the reliable check after every save is to come back and confirm the check sits on the row you intended.
Q: Do I have to fill in both the EN and TH tabs?
A: You should. Members see the wording from the tab matching the language they use, so filling only one tab leaves the other group with incomplete wording.
Q: Can I see which members have already accepted?
A: Yes — on the individual member's page, in the Consents & Privacy tab, which shows both the acceptance status and the version number that member accepted. How to open and read it is the article on checking a member's consent status.