

The Merchant App is the phone app your counter staff use to award points, redeem coupons and review transactions. Its main purpose is to be a fallback for when the web or your POS is unavailable, so staff can still award points to the customer standing in front of them. For everyday use, DeepBLOK still recommends running this through DeepBLOK Backoffice. You cannot register from inside the app — its first screen only offers a login. Your account is created ahead of time by your brand's own admin in the Merchant Application Portal, following the How to create branches and users for the merchant app article. Once you have the sign-in details, first-time setup takes under 5 minutes and is done entirely on the phone.
⚡ Quick Path: Get
รหัสสาขา(branch code), username, password and PIN from your brand's admin → open the app, fill 3 fields, tapเข้าสู่ระบบ(Log in) → enter the OTP → set a new password → enter your PIN
📌 Good to know: the app runs in English or Thai — switch under
Setting→Change language.Change languageis only reachable once you are signed in, so the sign-in, OTP and PIN screens below are quoted exactly as the app shows them, in Thai. From the home screen onward every label is the app's own English string. InEnglishthe date picker also switches to Gregorian years.
Requirements before you start
- A shared understanding of when to use it — it's designed as the fallback for when the web or POS is down, so agree in advance what counts as "down enough" to reach for the phone.
- Your brand must already be live on DeepBLOK — a Merchant App account is tied to an existing brand and branch, not opened standalone.
- One shop phone with a working camera — nearly every task in the app scans the customer's QR code.
- The OTP channel open and to hand — the first-time code goes to the phone number or the email address the account is registered with, whichever the app names on screen, and has to be read while you're standing there.
- The branch and the user already created in the Portal — your brand's admin creates the branch and sets its
Branch Codefirst. If that hasn't happened yet, start with the How to create branches and users for the merchant app article. - The app installed on the shop phone — the iOS and Android download links are in the
Welcome to DeepBLOK CRM!email DeepBLOK sends the brand when the account is opened, under theYou can download Merchant application via this linksheading.
📌 Good to know: A Merchant App account is not your Backoffice account.
Who creates your account
Getting the Merchant App running involves 3 parties, and the account staff sign in with is the product of stage 3.
1. The brand asks DeepBLOK Message the DeepBLOK representative who looks after your brand and ask to have the Merchant App switched on.
2. DeepBLOK opens the brand's Portal account The representative opens a Merchant Application Portal account, creates your brand, and emails the username, password, sign-in link and app download links — subject line Welcome to DeepBLOK CRM!.
3. The brand's admin creates the branches and the users The admin signs in to the Portal, creates each branch, sets its branch code, chooses the menus staff will see, and creates an account for each staff member with a starting password and PIN. All of it is covered in the How to create branches and users for the merchant app article
📌 Good to know: the 4 things you need on the next screen come from stage 3, not directly from a DeepBLOK representative. If you are the brand's admin, they are the values you set in the Portal yourself. If you work at the counter, ask your shop's admin for them.
Open a Merchant App account in 5 steps
Step 1: Get the 4 sign-in details
The sign-in details come from whoever created your account in the Portal — your brand's admin. If that is you, they are the values you set when you created the branch and the user. If you work at the counter, ask your shop's admin for them, along with the app download link, in one message.
There are 4 things to collect:
⚠️ Watch out: These details are the keys to your shop's account. Don't forward them into a group chat that includes people outside the shop, don't write them on a note at the counter, and delete the message containing the starting password once you've set your own.
Step 2: Log in for the first time
Open the app on the shop phone — on the home screen it is called T2P Merchant App, not DeepBLOK, so search for "Merchant" if you can't spot the icon. The first launch asks for camera permission: tap Allow, because every main menu in the app scans the customer's QR code.
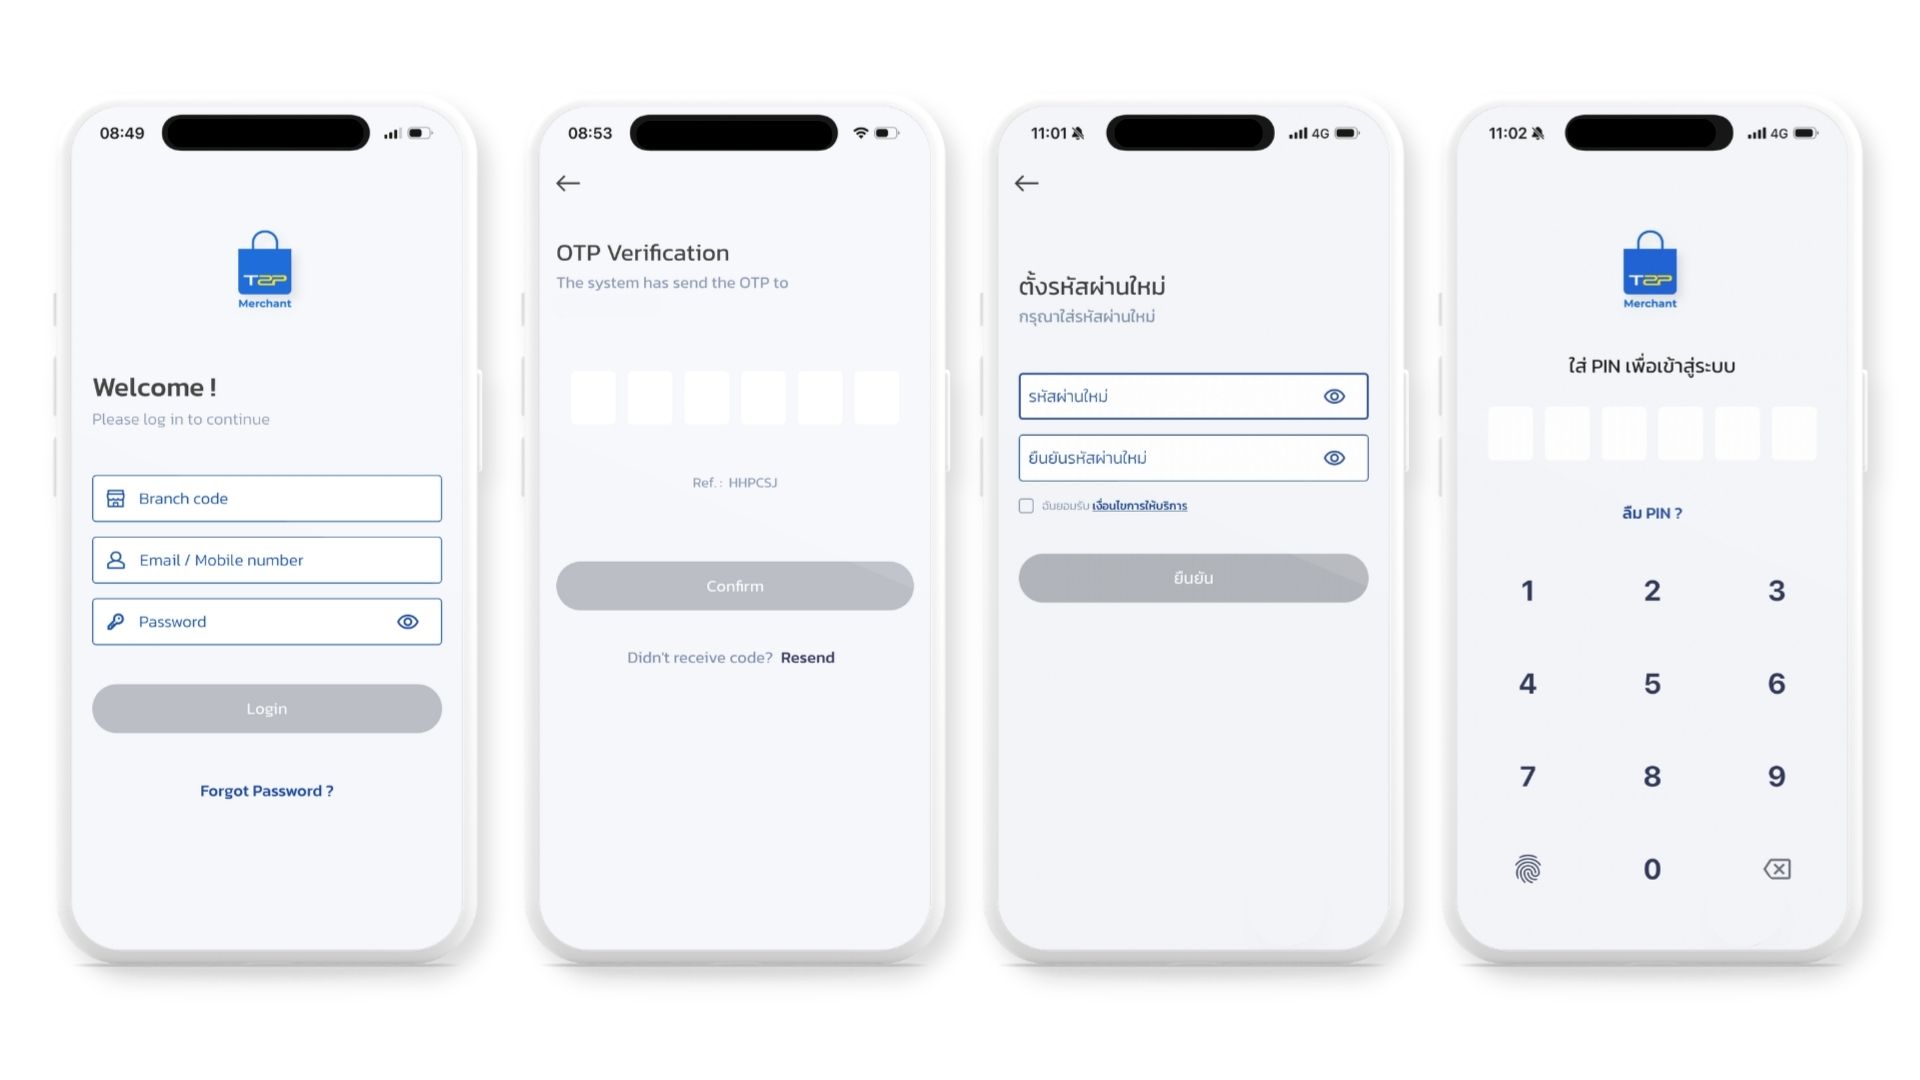
After the splash screen you land on Welcome ! (Welcome). Fill in all 3 fields with what you were given, then tap เข้าสู่ระบบ (Log in).
รหัสสาขาที่ทำงาน(branch you work at) — your branch codeอีเมล/เบอร์โทรศัพท์(email / phone) — your username. The field accepts either format, so enter exactly what you were sentรหัสผ่าน(password) — the starting password. Tap the eye icon at the end of the field to check what you typed
Step 3: Confirm the OTP
The app moves to ยืนยันรหัส OTP (Confirm OTP) and shows where it sent the code in blue under the heading — that may be a phone number or an email address, depending on what the account is registered with. Go by that line, open that channel, type the code into the 6 boxes, then tap Confirm (Confirm).
Below the boxes is a 6-character รหัสอ้างอิง (reference code) you can match against the one in the message, to be sure you are reading the right one. If nothing arrives, tap ขอรหัสอีกครั้ง (request a new code) at the bottom of the screen.
Step 4: Set a new password
Set a new password (Set a new password) opens automatically once the OTP is accepted. Type your own password into รหัสผ่านใหม่ and ยืนยันรหัสผ่านใหม่, making sure both match. Tick ฉันยอมรับ (I accept) in front of the เงื่อนไขการให้บริการ (terms of service) link, then tap Confirm.
This step is important: the starting password your admin set stops working after this. Choose something the counter team can genuinely remember, and not a password you reuse elsewhere.
The password has to satisfy all 4 rules at once. Miss any of them and the field turns red with the rules printed underneath:
- Between 8 and 12 characters long
- At least 1 lower-case letter
- At least 1 upper-case letter
- At least 1 digit and 1 special character such as
$!#@