

A Coupon Bucket is the store your discount coupons sit in, and it has to exist before any reward that hands out a code, because the bucket picker on the reward only offers buckets that already exist. This article covers naming the bucket, choosing the code type, and defining the shape of the codes the system will generate. One bucket takes about 5 minutes; filling it with coupons is the next step and has its own article.
⚡ Quick Path:
Coupon→Coupon Bucket→+ Add New Bucket→ fill inBucket CodeandCoupon Code Type→ set the format inCoupon Setting in this Bucket→Save
📌 Good to know: creating a bucket does not put any coupons in it. A newly created bucket shows a count of 0 until coupons are added, which is done either by uploading a file or by having the system generate them. Both articles are linked at the end.
Requirements before you start
- Permission for the
Couponmenu — if it is missing from the sidebar, we recommend asking an administrator on your team to grant it first. - The bucket code you intend to use — make it readable, so it says which campaign's coupons it holds. This is the string you will see when picking a bucket on a reward.
- The code format you want — how many characters, whether letters mix with numbers, and whether a fixed prefix or suffix is needed. All 3 go into the same dialog.
Creating a bucket in 4 steps
Step 1 Open the Coupon Bucket page
From the sidebar, open Coupon and select the Coupon Bucket submenu. The system opens the Coupon Bucket List page, whose table panel is headed Bucket List and shows the buckets that already exist.
3 buttons sit at the top right of that panel: + Add New Bucket in blue, Report Coupon in blue for code reporting, and Threshold Setting in orange for the low-stock notification settings.
Step 2 Name the bucket and save it
Press + Add New Bucket and the system opens a dialog titled Create New Bucket.
🚨 That dialog holds exactly one field, Bucket Code. Everything else — the code type, the expiry, and the code format — is not in the create dialog. Save the empty bucket first, then press the pencil icon on its row to open Edit Bucket, which is where the rest lives. Step 3 below happens in Edit Bucket.
1. Bucket Code This bucket's reference, such as OCT2024DISCOUNT. A character counter in brackets beside the label shows how much of the limit you have used, for example (15/45). This is the string that appears in the bucket picker on a reward, so make it say which campaign it belongs to. The dialog also notes No space allowed, so the code cannot contain a space.
Press Save, and the empty bucket appears in the table. Press the pencil on its row to continue.
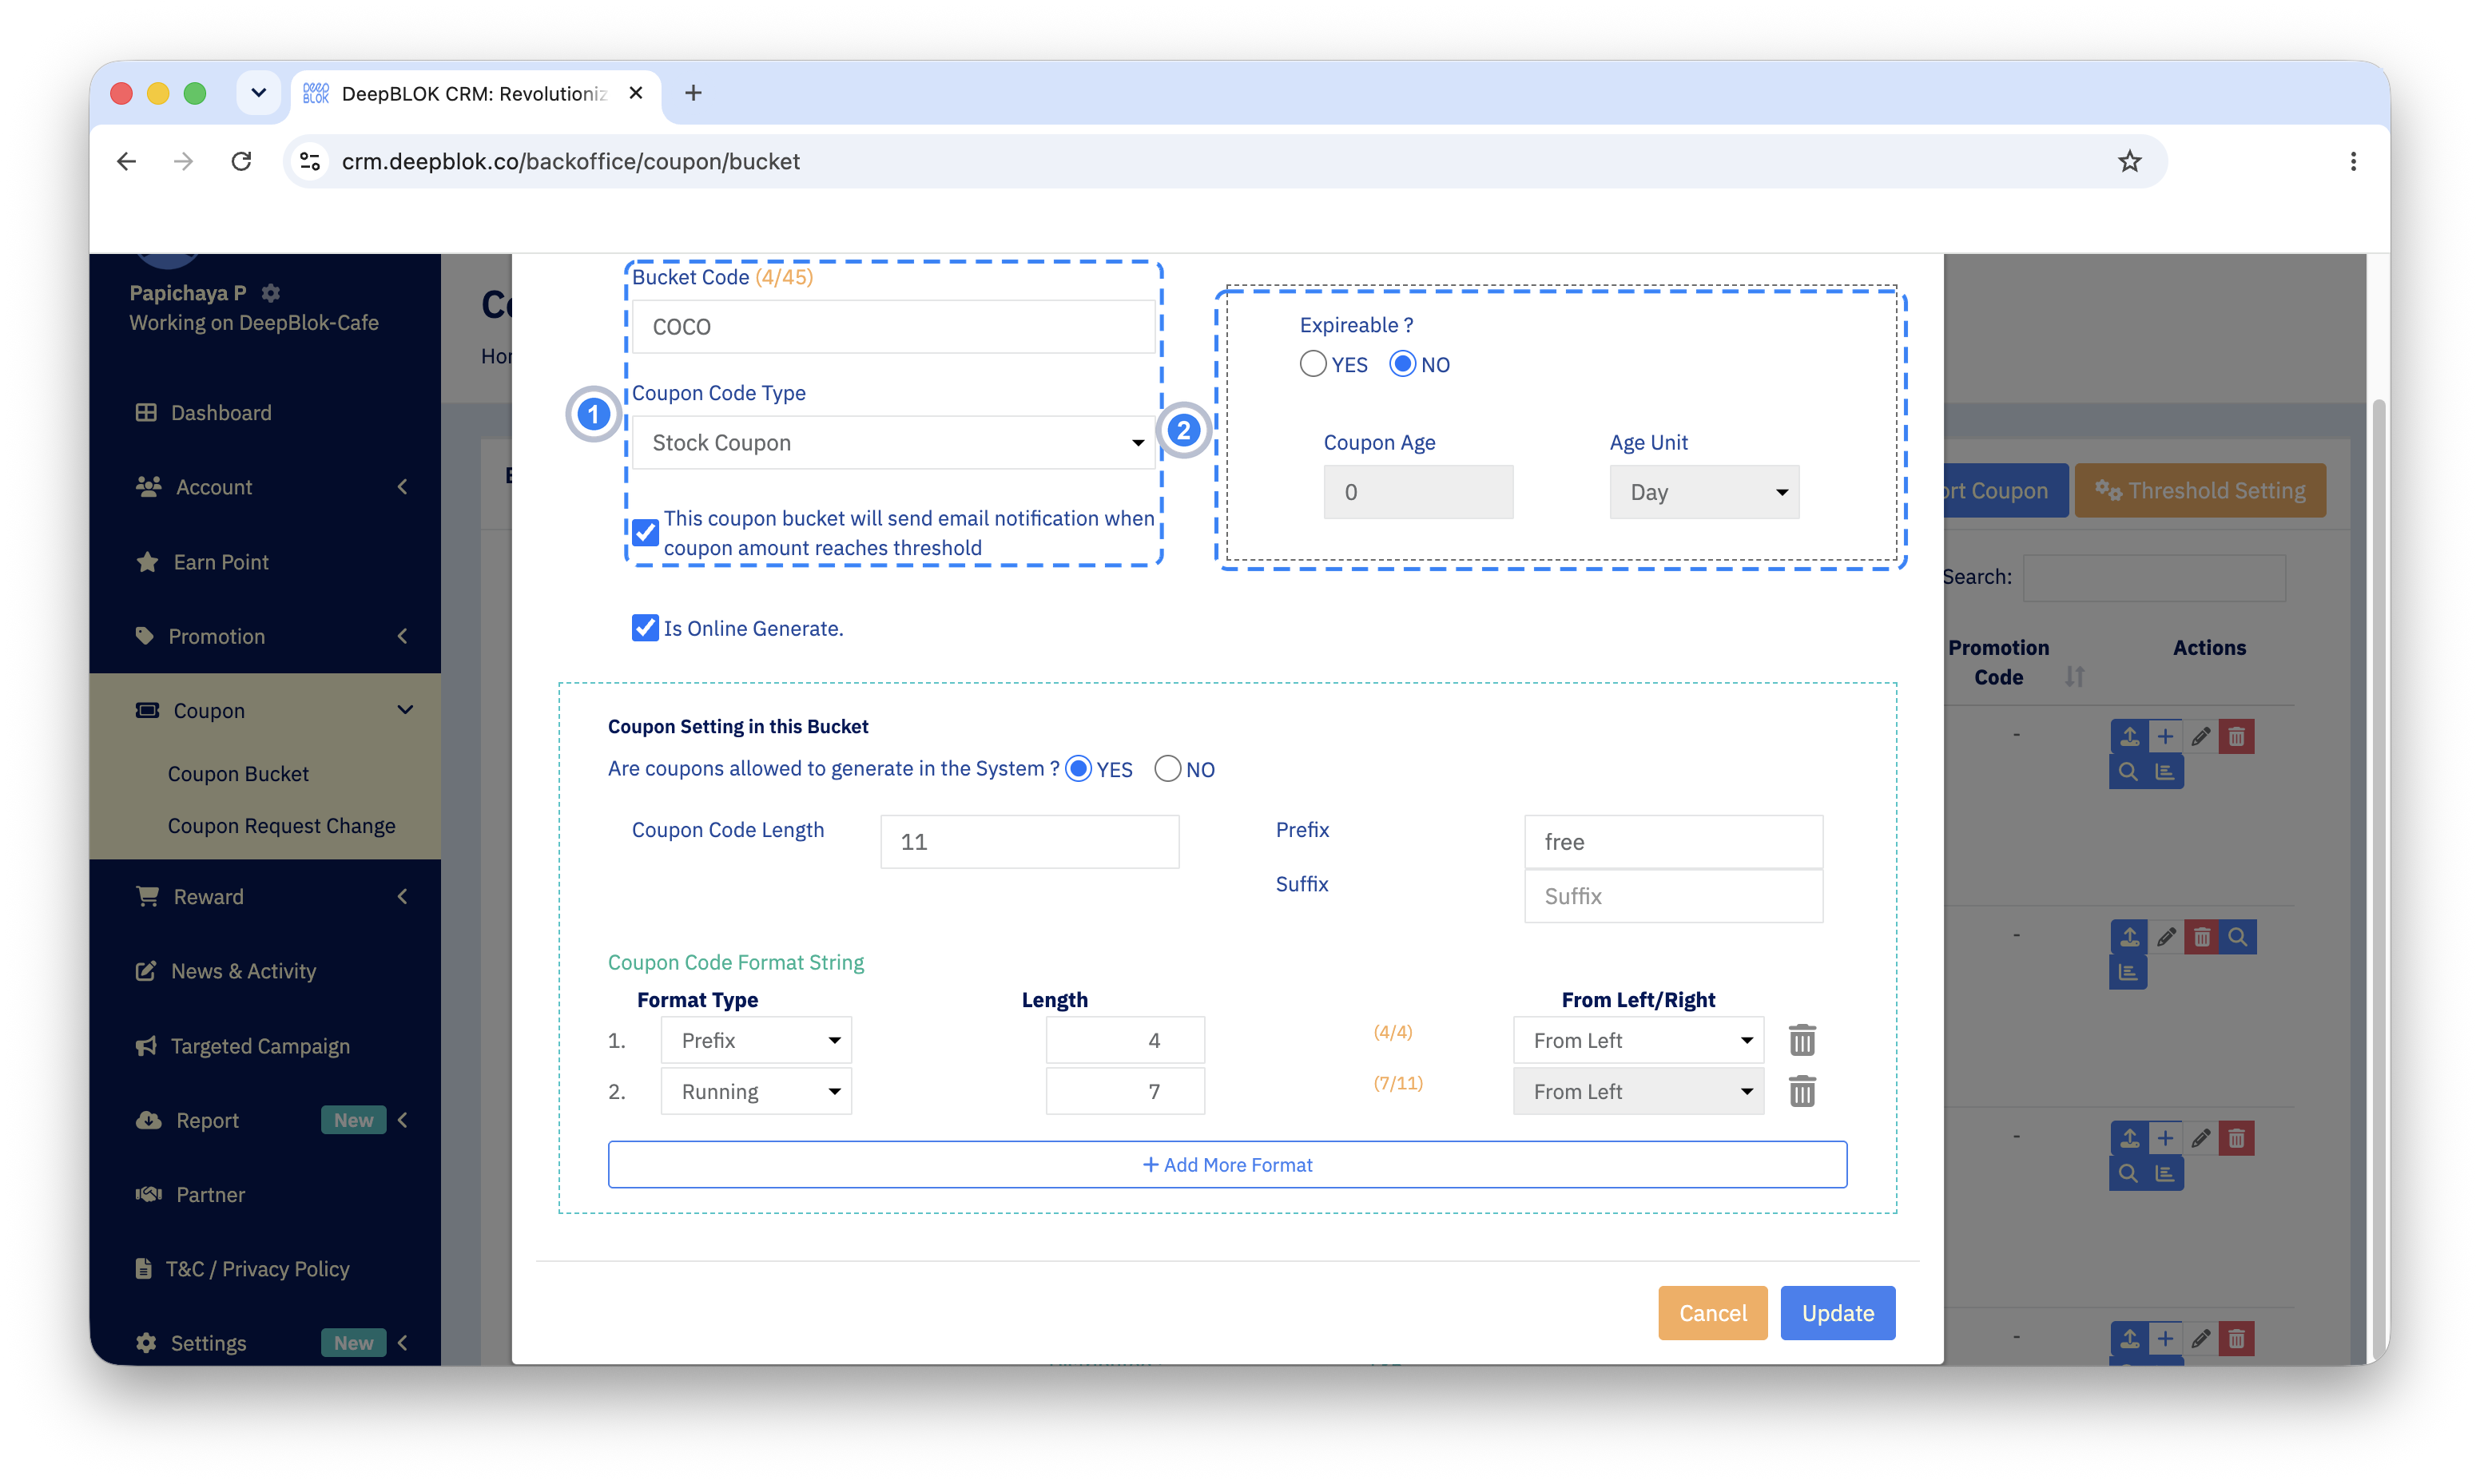
2. Coupon Code Type (in the Edit Bucket dialog) The kind of coupons the bucket holds, with 3 values: Online Coupon, Stock Coupon and Stock Coupon - SingleCode. Stock Coupon is the usual choice — a bucket holding coupons in stock for the system to hand out.
Below them sit 2 checkboxes: This coupon bucket will send email notification when coupon amount reaches threshold, which emails you when the code count falls to the configured level, and Is Online Generate. To the right, an Expireable ? box takes YES or NO for whether coupons in this bucket carry an age. With YES, the Coupon Age and Age Unit fields open for the code's lifetime; with NO, both stay greyed out.
Step 3 Define the shape of the generated coupons
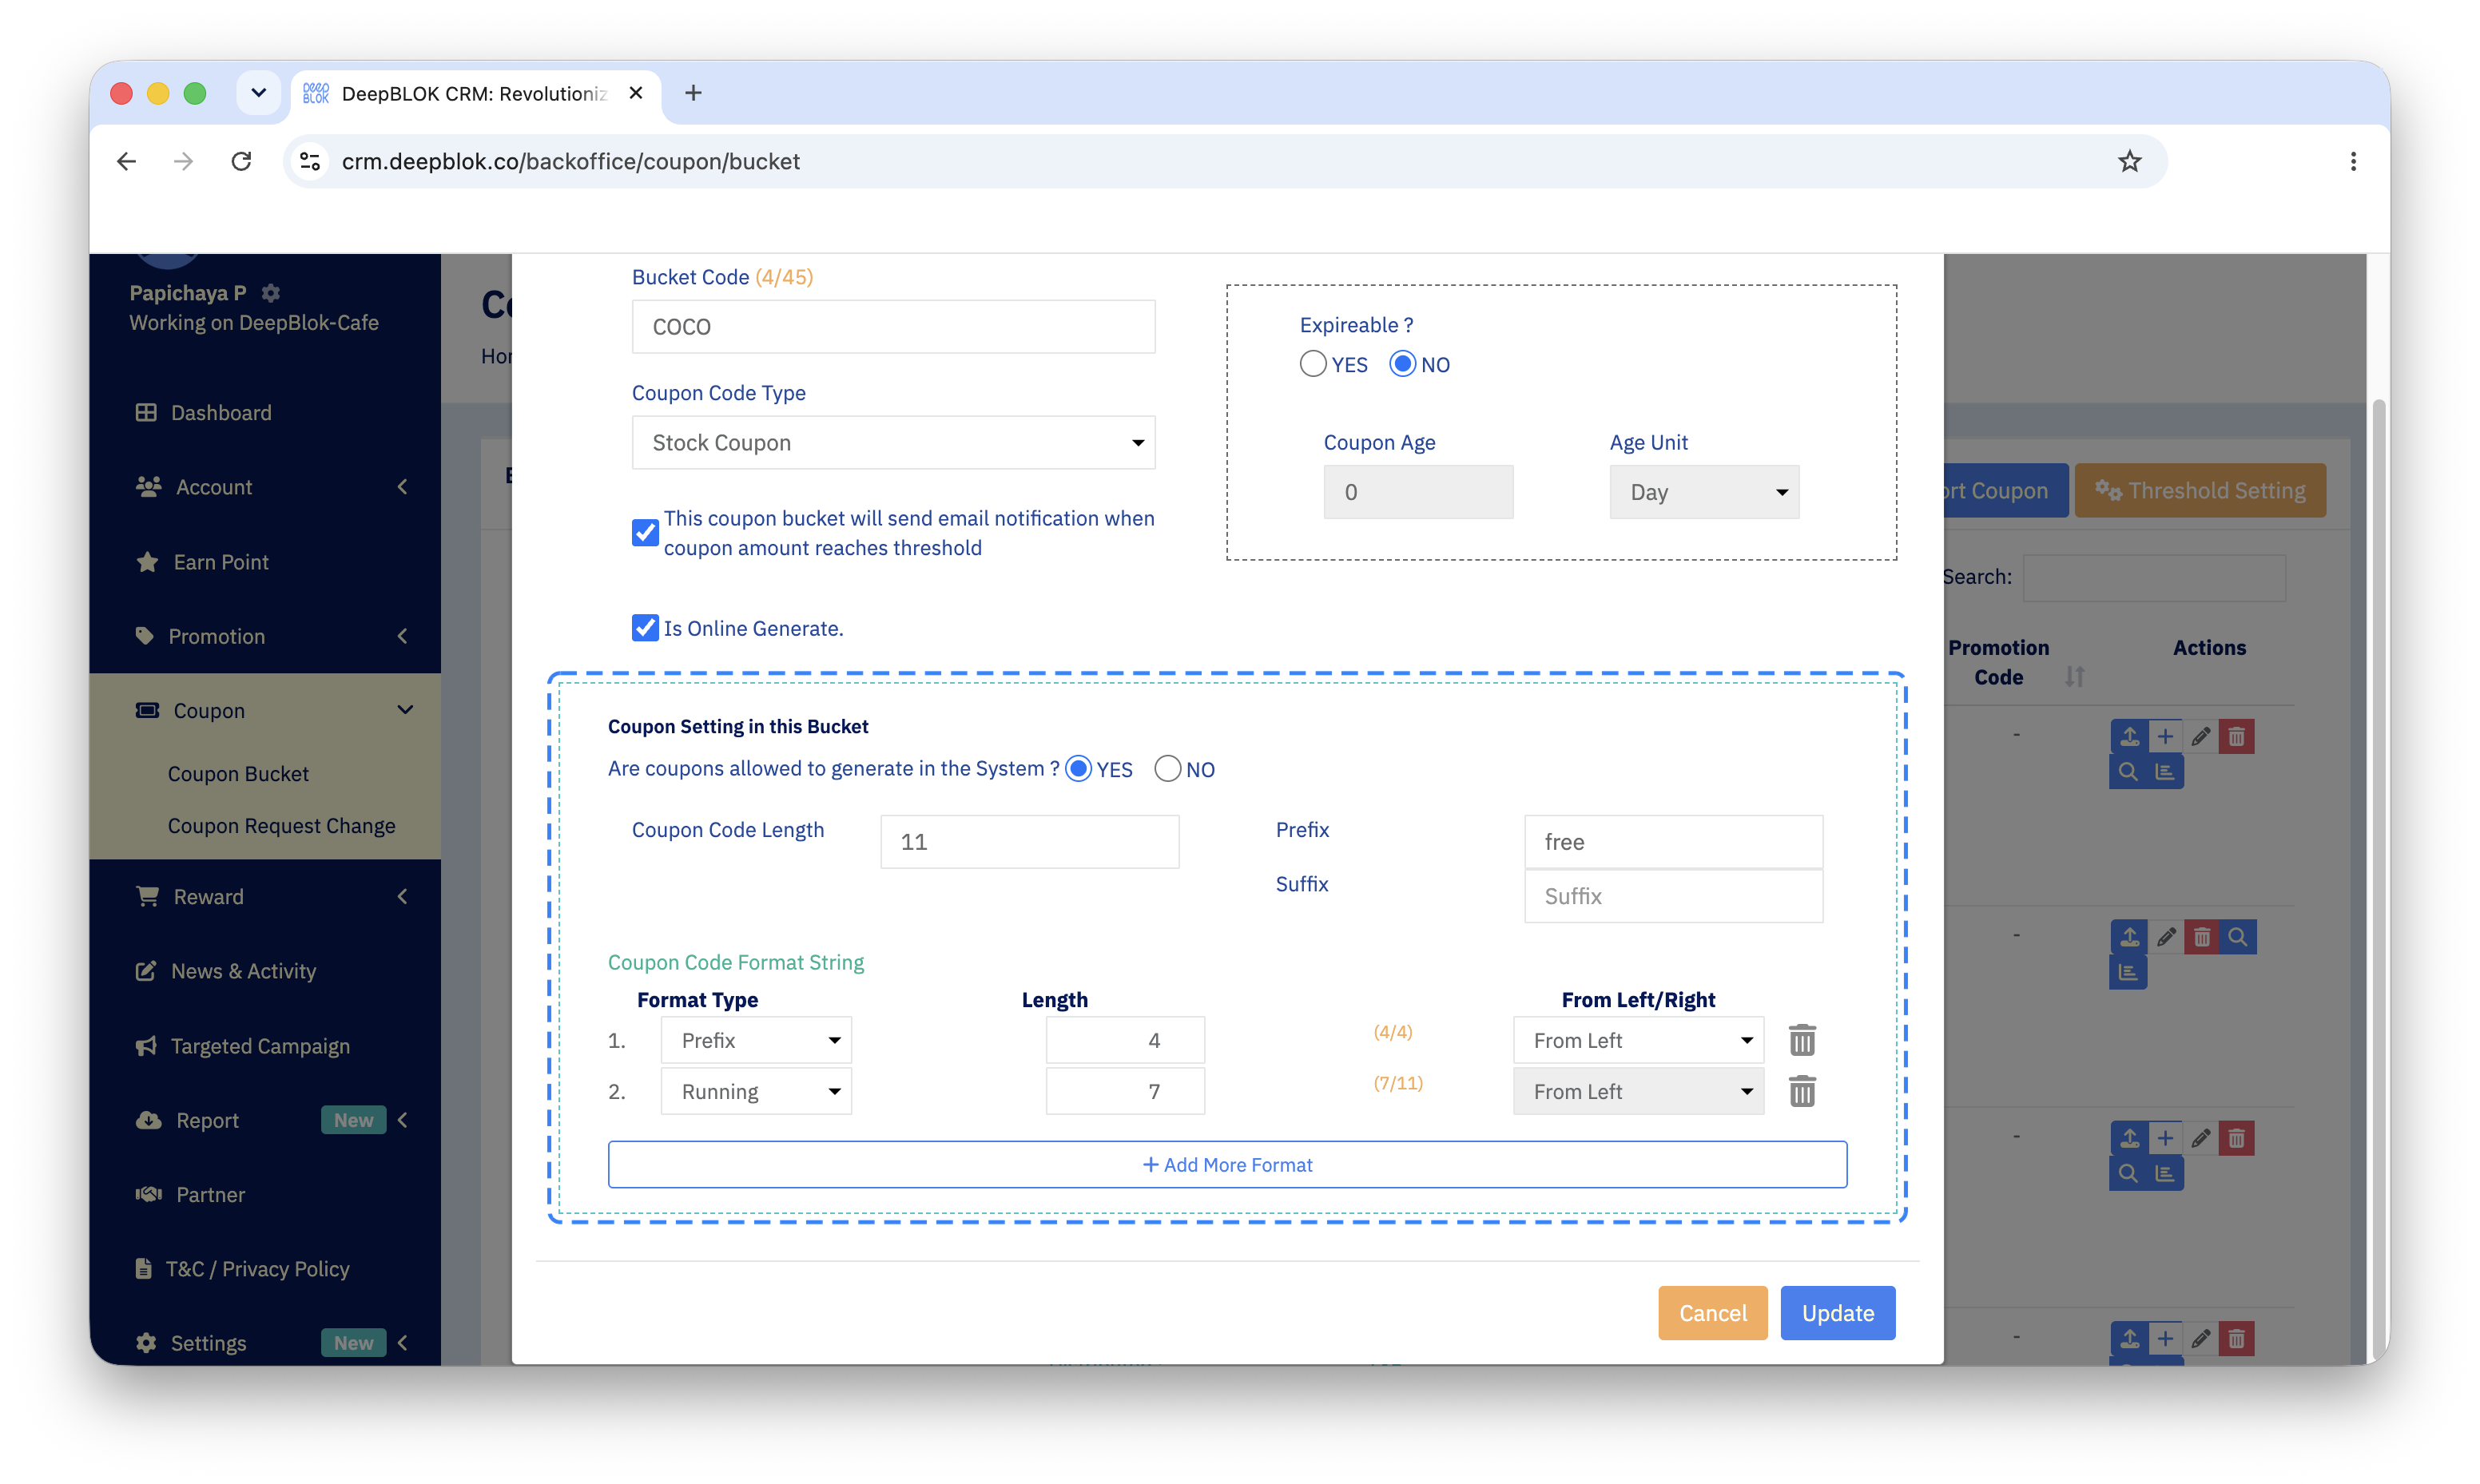
The lower panel, Coupon Setting in this Bucket, is where the shape of a generated code is set.
Its first line is Are coupons allowed to generate in the System ? — answer YES to let the system generate coupons. Then:
Beneath sits the Coupon Code Format String table, which splits the code into segments. Each row is one segment and holds 3 values: a Format Type, that segment's Length, and From Left/Right for which end it counts from. A bin icon at the end of a row removes that segment, and + Add More Format below the table adds one.
Format Type offers 4 values:
A Prefix segment consumes length too. The bracketed figure on each row counts that row into the Coupon Code Length total whatever its type.
⚠️ Watch out: the segment lengths must add up to Coupon Code Length. The figure in brackets beside each segment is the running total — (7/11) means that counting this segment the code has 7 of its 11 characters accounted for, so segments of 4 and 7 make exactly 11. If the total falls short, press + Add More Format or change an existing segment's Length. We recommend reading the bracketed figure on the last segment before saving, every time.
Step 4 Save
Press the blue Save at the bottom right of the dialog. The orange Cancel beside it closes the dialog without saving.
✅ Confirm it worked: back on the Bucket List table, the new bucket's row should appear with the Bucket Code you entered, and its Coupon Count column should read Total: 0 with the text Waiting for update data in place of a timestamp. That is the normal state of a new bucket with no coupons yet, not an error.
The 6 icons in the Actions column and what each does
A bucket's row ends with a run of icons in the Actions column — the way into everything else you do with that bucket. The full set is 6.
📌 Good to know: not every row carries all 6. A bucket whose Allow Generate column shows a cross has no plus icon, because that bucket is not open for the system to generate coupons into, so its row holds 5.
 1. Upload Adds coupons to the bucket by importing a
 .csv file of coupons you already hold.
 2. Plus Has the system generate coupons into the bucket automatically, to a quantity you give, using the format set in step 3.
 3. Pencil Edits this bucket's details.
 4. Red bin Deletes this bucket. Only a bucket with no coupons remaining can be deleted. Checking Codes Remaining and Codes Used covers how to see how many are left.
 5. Magnifier Shows the status and details of the individual coupons in this bucket, with a search box.
 6. Bar chart Shows the stock of all coupons in this bucket, broken down by the lots they were added in.