

When someone leaves, or moves to a team that doesn't touch the system, their account should be closed on their last working day. You do it from the Admin Setting page, it takes under a minute, and there's always a confirmation window first.
⚡ Quick Path:
Settings→Admin Setting→ the gear icon in that row'sActioncolumn →Delete→Yes, delete it!
Deleting closes that person's access to Backoffice. The confirmation window states plainly that it is the admin account being deleted — not member data, and not the campaigns they built.
Requirements before you start
- An account that can open the
Admin Settingpage — in the permission table as configured,Adminis the role with the widest access. If the menu isn't there for you, ask someone with theAdminrole to do it. - Certainty that the person won't need the system again — if you're not sure, move them to the narrowest role your team uses per the article on changing the role on an existing admin account first, and decide about deleting later.
- The email address on the account — it's how you confirm you have the right person, because names repeat and email addresses don't.
- Anything you need for your records, captured first — if your internal reporting uses their
Admin Codeor email address, note it or screenshot it before you delete.
4 Checks before you delete
Deleting cannot be undone, and these 4 checks take under 2 minutes.
- It isn't your own account — read the user name in the top-left of the screen and compare it with the row you're about to delete.
- At least one
Adminrole holder remains — read theRolecolumn and count theAdminbadges first. If there's only one left and it's the one you're deleting, nobody will be able to open this page again. - Their work has been handed over — campaigns in progress, or records waiting for approval.
- Anything you need for reference has been captured — the admin code, email address and join date are all readable from that row before you delete.
⚠️ Watch out: deleting an account cannot be undone. If you delete the wrong person, the fix is to create a new account per the article on creating an Admin account for a teammate, which issues a new admin code and means setting the role and brands again from scratch. This step is important enough to read the email address on the row every single time before you click.
Delete the account in 4 steps
1. Open the admin list page
In the left menu, open Settings and choose Admin Setting. The Admin Setting List panel appears with every admin in a table.
2. Find the row and confirm it by email
Type the person's email address into the Search box at the top right of the table. Once a single row is left, read the Email column once more against what HR or the team lead sent you.
3. Open the gear menu and choose Delete
In the Action column on the far right, click the gear icon. A menu of 3 items appears — choose Delete, the bottom item, shown in red text.
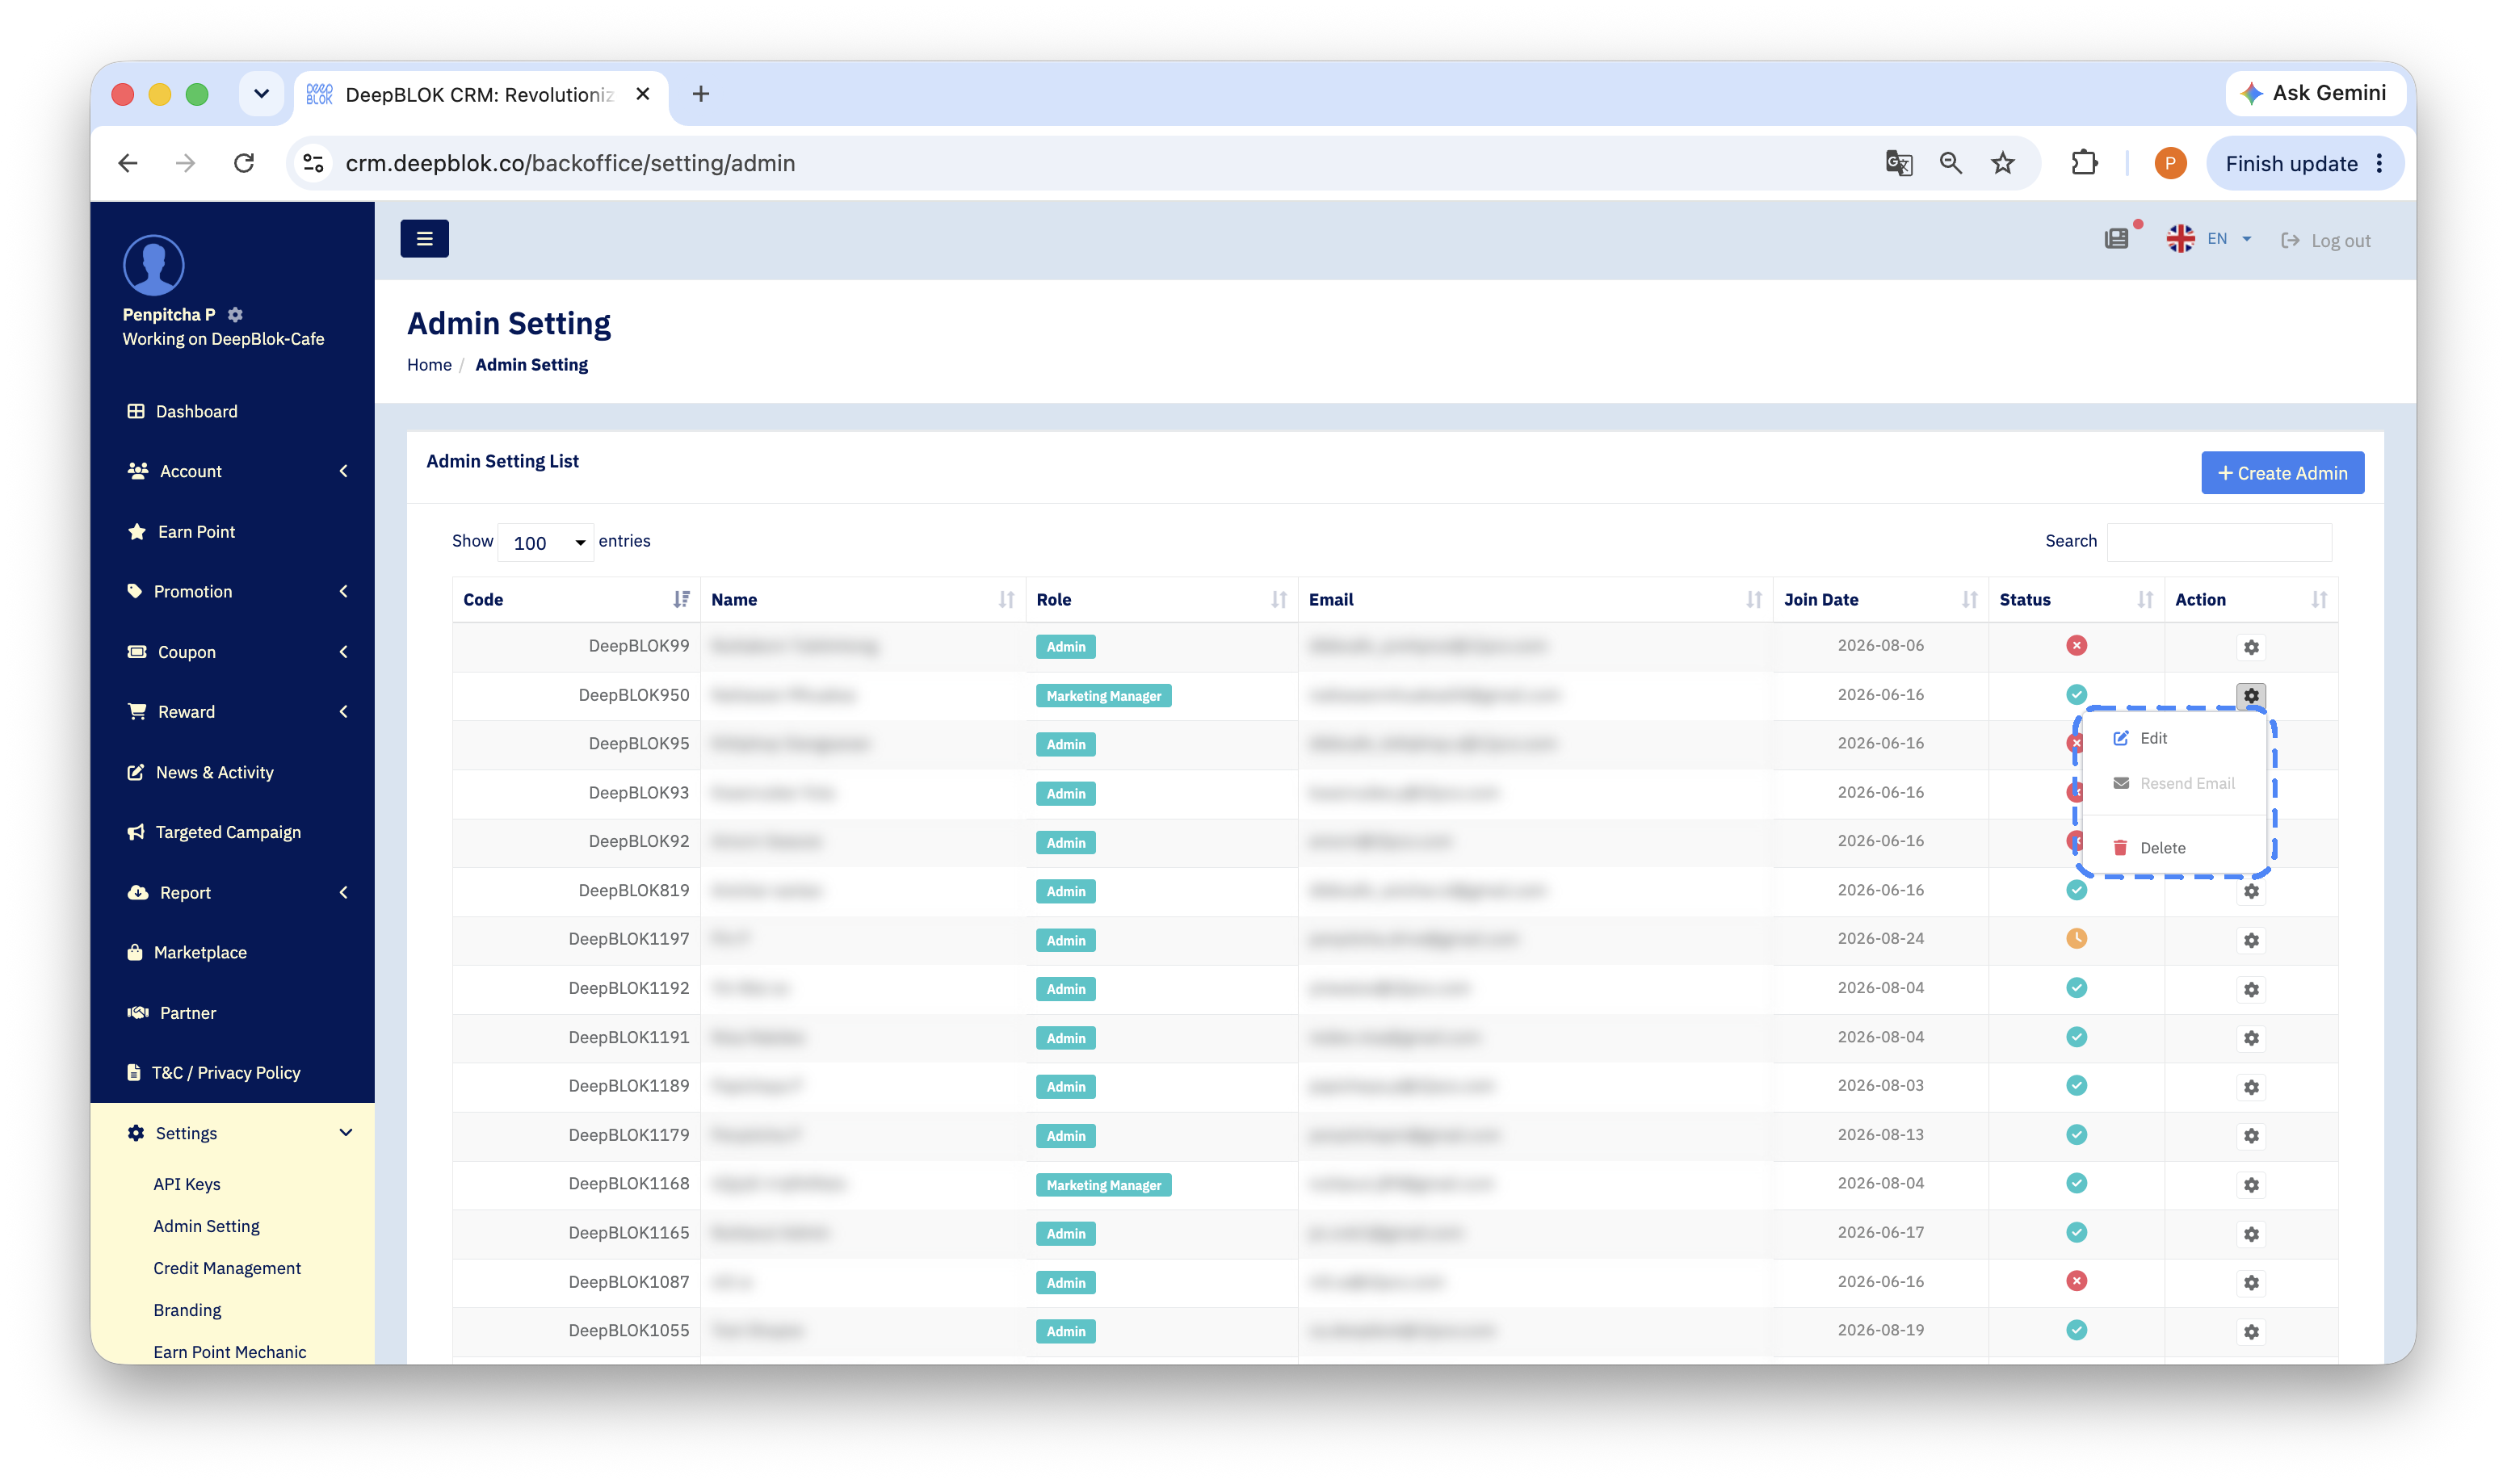
4. Confirm in the Are you sure? window
A confirmation window opens with an orange exclamation icon, the heading Are you sure?, the line You want to delete this Admin account?, and 2 buttons: Cancel and Yes, delete it!.
Click Yes, delete it! to confirm.
✅ Confirm it worked: go back to the table and search for that email address again — the row should be gone, and the
Showing 1 to N of M entriescount under the table should have dropped by one. Checking both proves the account was actually removed, not just filtered out of a search result.
A note on the colour of the confirm button
In the confirmation window, the button that actually deletes is Yes, delete it!, and it is blue, while Cancel is the pale grey button on the left. That's different from what many people expect, because the Delete item in the gear menu is red text while the confirm button in the window is blue.
How to check you're about to click the right button: read the words on the button rather than its colour. The button that deletes always has the word delete in it; the safe one is Cancel. If you read it and you're still not certain you have the right row, click Cancel and go back to confirm the email address in the table. Starting again takes under 10 seconds.
Close accounts properly when someone leaves
Deleting the account is one step in a process worth completing in full. Teams that work from a list like this don't end up with standing access nobody is watching.
- Schedule the account closure for their last working day, not several days after
- Hand over work in progress and any live campaigns first
- Record the account's admin code and email address in your team's internal notes
- Delete the account using the 4 steps above
- Check that the entry count under the table dropped by one
- If they held the
Adminrole, confirm that role still has a holder in the system - Tell the team who has taken over, so questions from the shop floor reach the right person
Common Problems
Frequently Asked Questions
Q: Does deleting an admin account also remove the member data or campaigns they worked on?
A: The confirmation window states that it is the admin account being deleted — the login for Backoffice, which is separate from the member data and campaigns already saved in the system. If your internal reporting relies on records that name who performed an action, capture a screenshot of that section before deleting so you're certain you have a copy in hand.
Q: Can a deleted account be restored?
A: No. The confirmation window is the last checkpoint. If the wrong person is deleted, the fix is to create a new account per the article on creating an Admin account for a teammate — it gets a new admin code, and the role and brands have to be set again. That's why searching by email address before you click is worth the extra few seconds.
Q: Someone has left but might come back — should I delete now?
A: If you're unsure, move them to the narrowest role your team uses per the article on changing the role on an existing admin account first. That closes anything touching customer data on their last working day while keeping the account available for a decision later.
Q: Can an account still showing Pending be deleted?
A: The gear menu offers Delete on every row in the table, so if an invitation went to the wrong address and nobody has signed in with it, deleting and re-creating with the correct address is the most direct route.
Next Step
With access closed, the job worth doing next is looking back at what that account changed on your members' records — particularly if a customer question or an internal audit lands afterwards.
Read Next