

Sending a LINE campaign to your customers normally means someone has to press send every time. A brand can also set up automated messages that go out on the significant moments in a customer's own history — points land in their account, their points are about to expire, their birthday arrives. You set these up at Settings → Automated Line Notification Management, once, and they keep working without you coming back.
What makes this different from a targeted campaign is that you don't choose who receives it and you don't choose when. The event decides that. Your job is to design what the message looks like, choose where the button takes the customer, and switch each event on or off. If you want to pick the audience and press send yourself, read the How to send a notification to a specific group of customers article instead.
⚡ Quick Path:
Settings→Automated Line Notification Management→ pressEditon the row you want → tickActive→ pressSave. That event now sends.
Requirements before you start
- The brand's LINE OA account connected to DeepBLOK — every message here goes out through the brand's LINE account. Without the connection you can still fill the forms in, but nothing sends. Check it at
Settings→Line Settings - Access to the
Settingsmenu — if you can't see it in the left sidebar, ask an Admin on your team to grant it. See the What each role can do article - Your banner images, already made — each message type uses a different image size. There's a size table below; making the images first saves you leaving the page halfway through
- LINE message quota to spend — every message that goes out draws down the brand's quota
The 7 automated message types
The Notification List page shows every event there is, and there is no button to create a new one. Each row is wired to an event the system already recognises. Your job is choosing which rows to switch on and what each one looks like.
📌 Good to know: the table holds one more row,
TARGETEDDISTRIBUTE, with noEditand noReportbutton. That row is the system's own record of targeted-campaign sends. It isn't something you configure from this page.
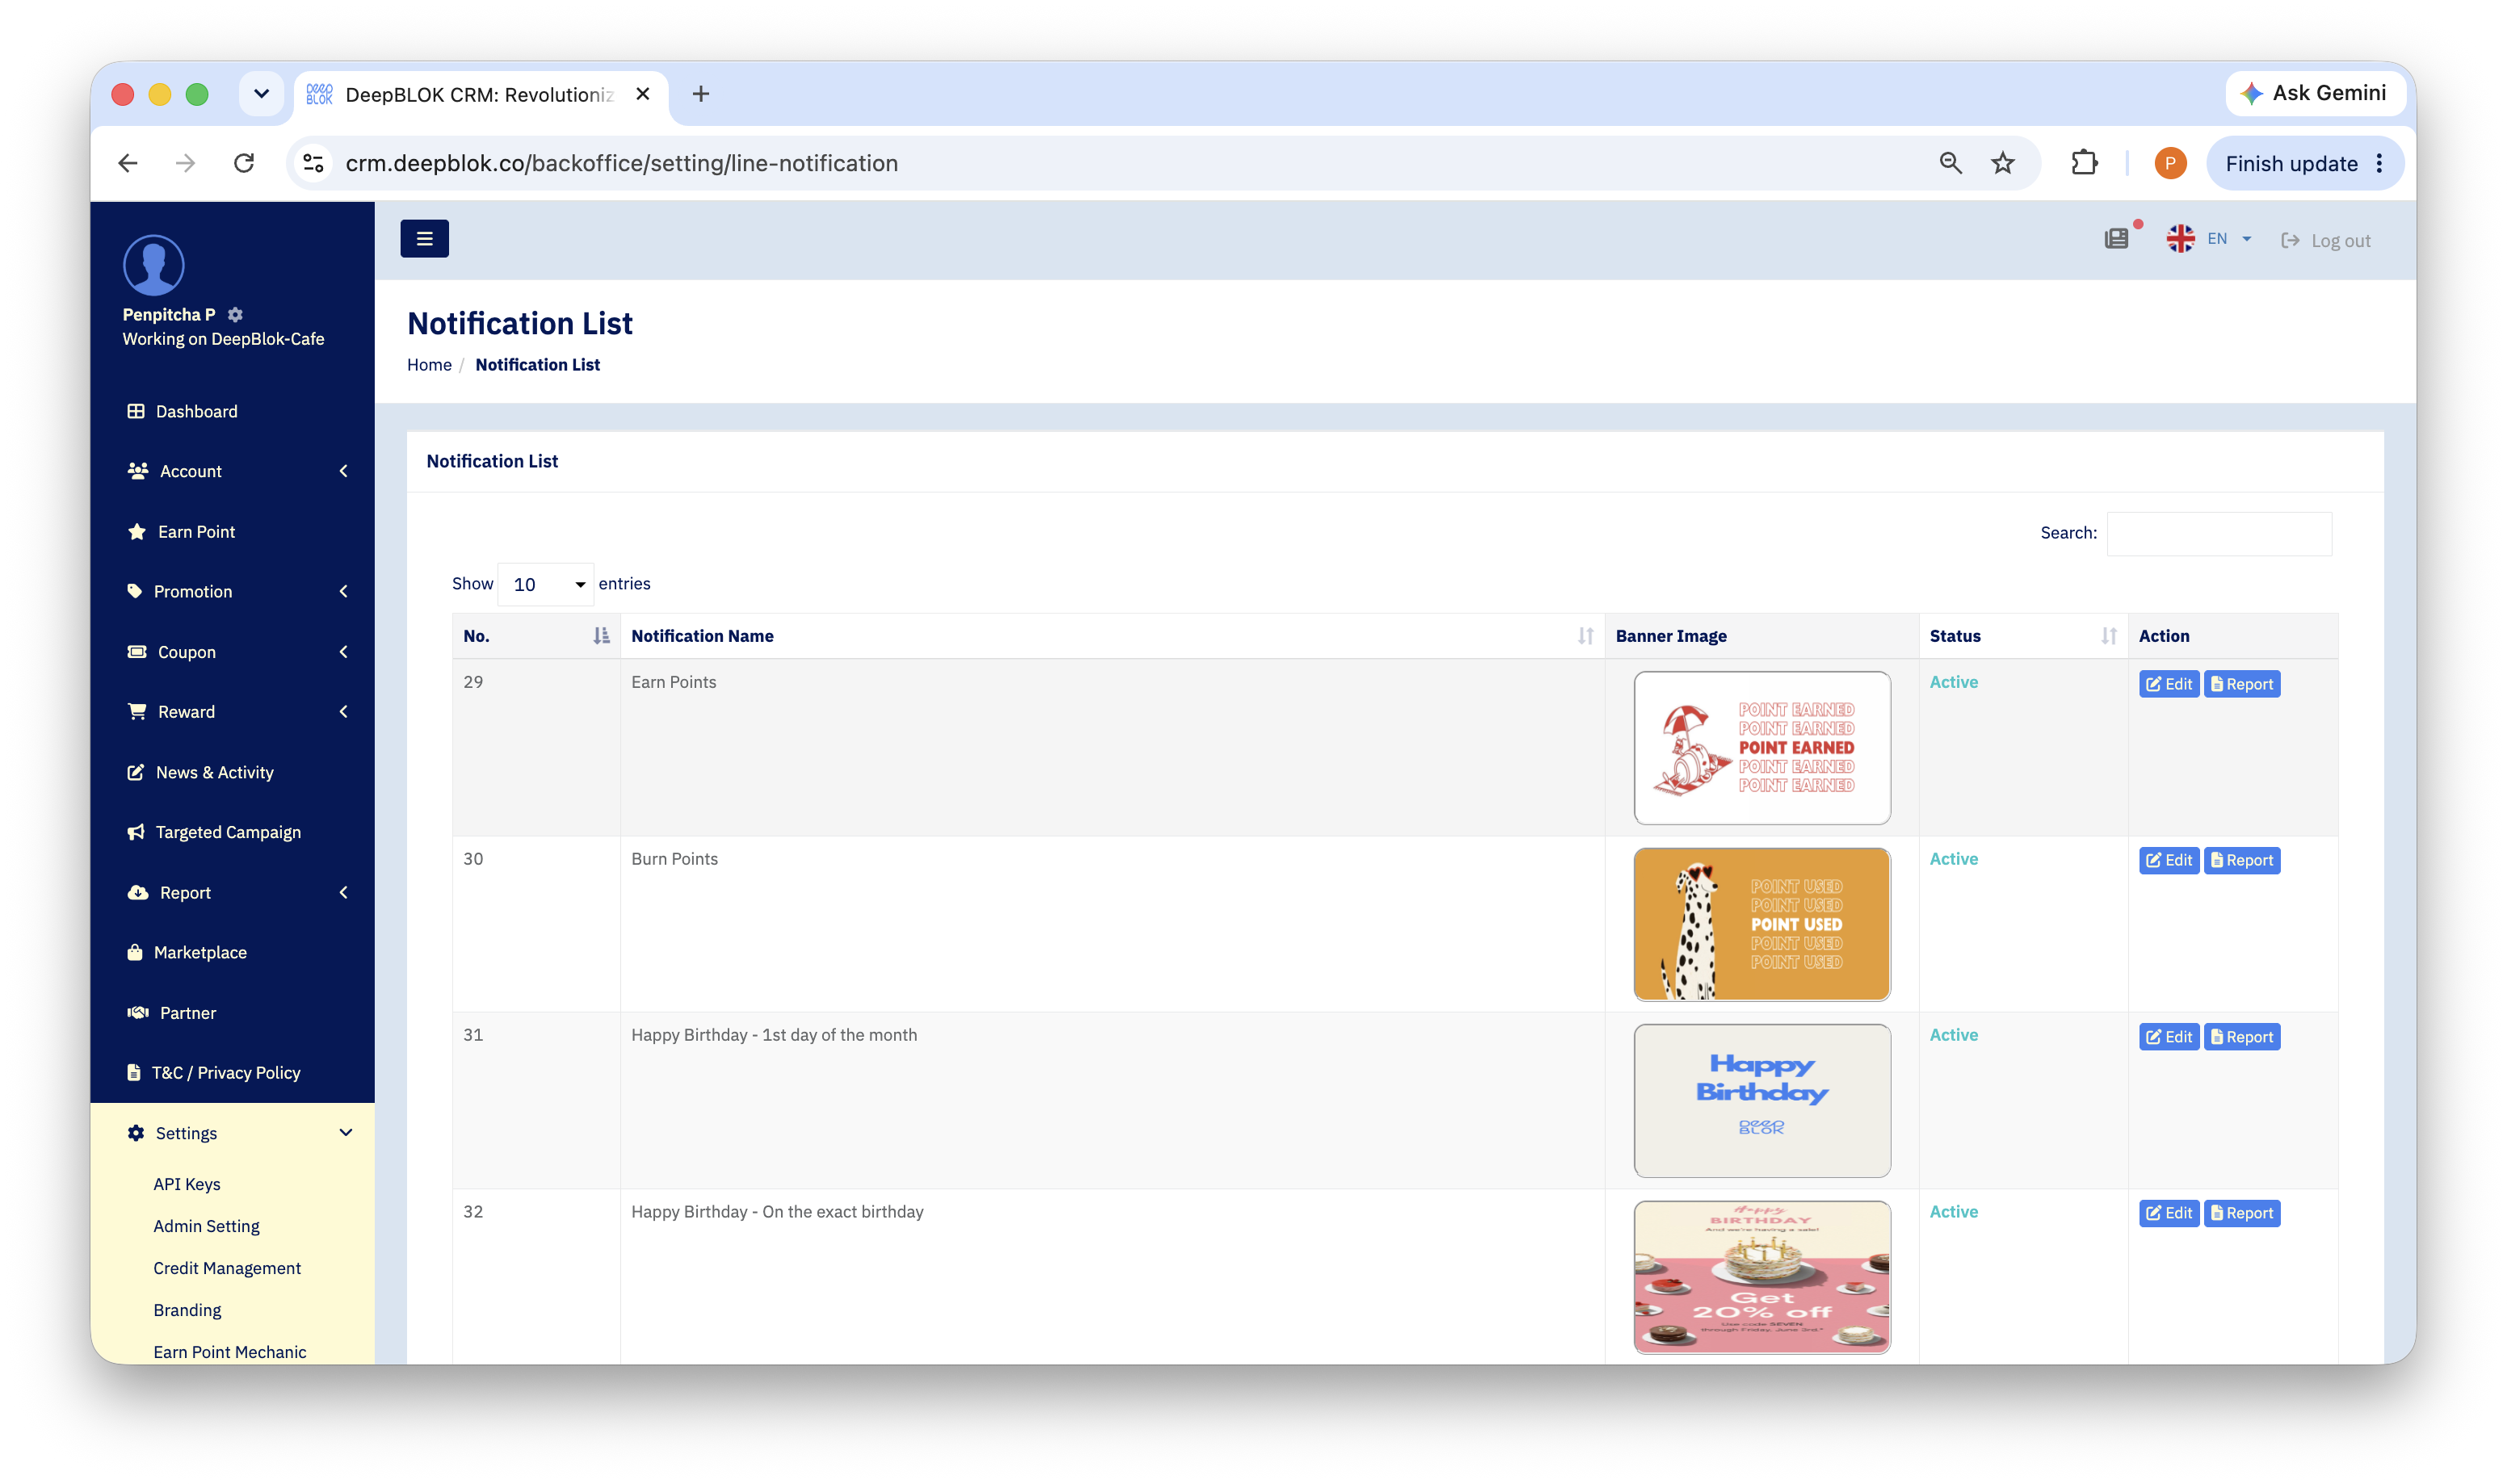
Set up an automated message in 4 steps
Step 1: Open the row with Edit
On that event's row, press Edit in the Action column. The Edit Notification page opens with the form on the left and a Preview panel on the right. The preview updates as you type, so you can check the message without sending anything.
The Notification Name field at the top is read-only — it's the system's name for the event.
Step 2: Upload a banner image at the required size
Press Upload Image and pick a file. The recommended resolution is printed next to the button, and it is not the same for every message type. Check the size table in the next section before you make the artwork.
Every image must be 1 MB or smaller, in JPEG or PNG.
Step 3: Write the message and choose the colours
The message a customer receives reads top to bottom as: banner image → headline → description → figures pulled from their own account → one button. What you fill in here is the middle 3 plus the button; the figures are filled in by the system.
How many text fields you get depends on which event is open. Each one carries a live character counter in its bottom-right corner.
The 2 birthday events have no text fields and no button — they send as a plain image, so all the wording has to live inside the artwork you upload.
Step 4: Choose the destination and switch it on
At Insert Link, choose where tapping the message takes the customer. There are 2 options.
Internal Link goes to a page in the brand's own member app. There are exactly 4 destinations: Home Page · Reward Redemption Page · My Coupon Page · Earn Points Page. Match it to what the message is about — a point-expiry reminder belongs on Reward Redemption Page so they can redeem straight away.
External Link goes to any web address you type, up to 100 characters. Use it when the destination sits outside the member app, such as a delivery-address form.
Then tick Status so it reads Active and press Save. Leave it unticked and your settings are stored, but the system won't send anything when the event fires.
✅ Confirm it worked: go back to
Notification Listand look at the row you just edited. TheBanner Imagecolumn should show the image you uploaded, andStatusshould readActive. An empty image column, or one readingNo image, means the upload didn't go through.
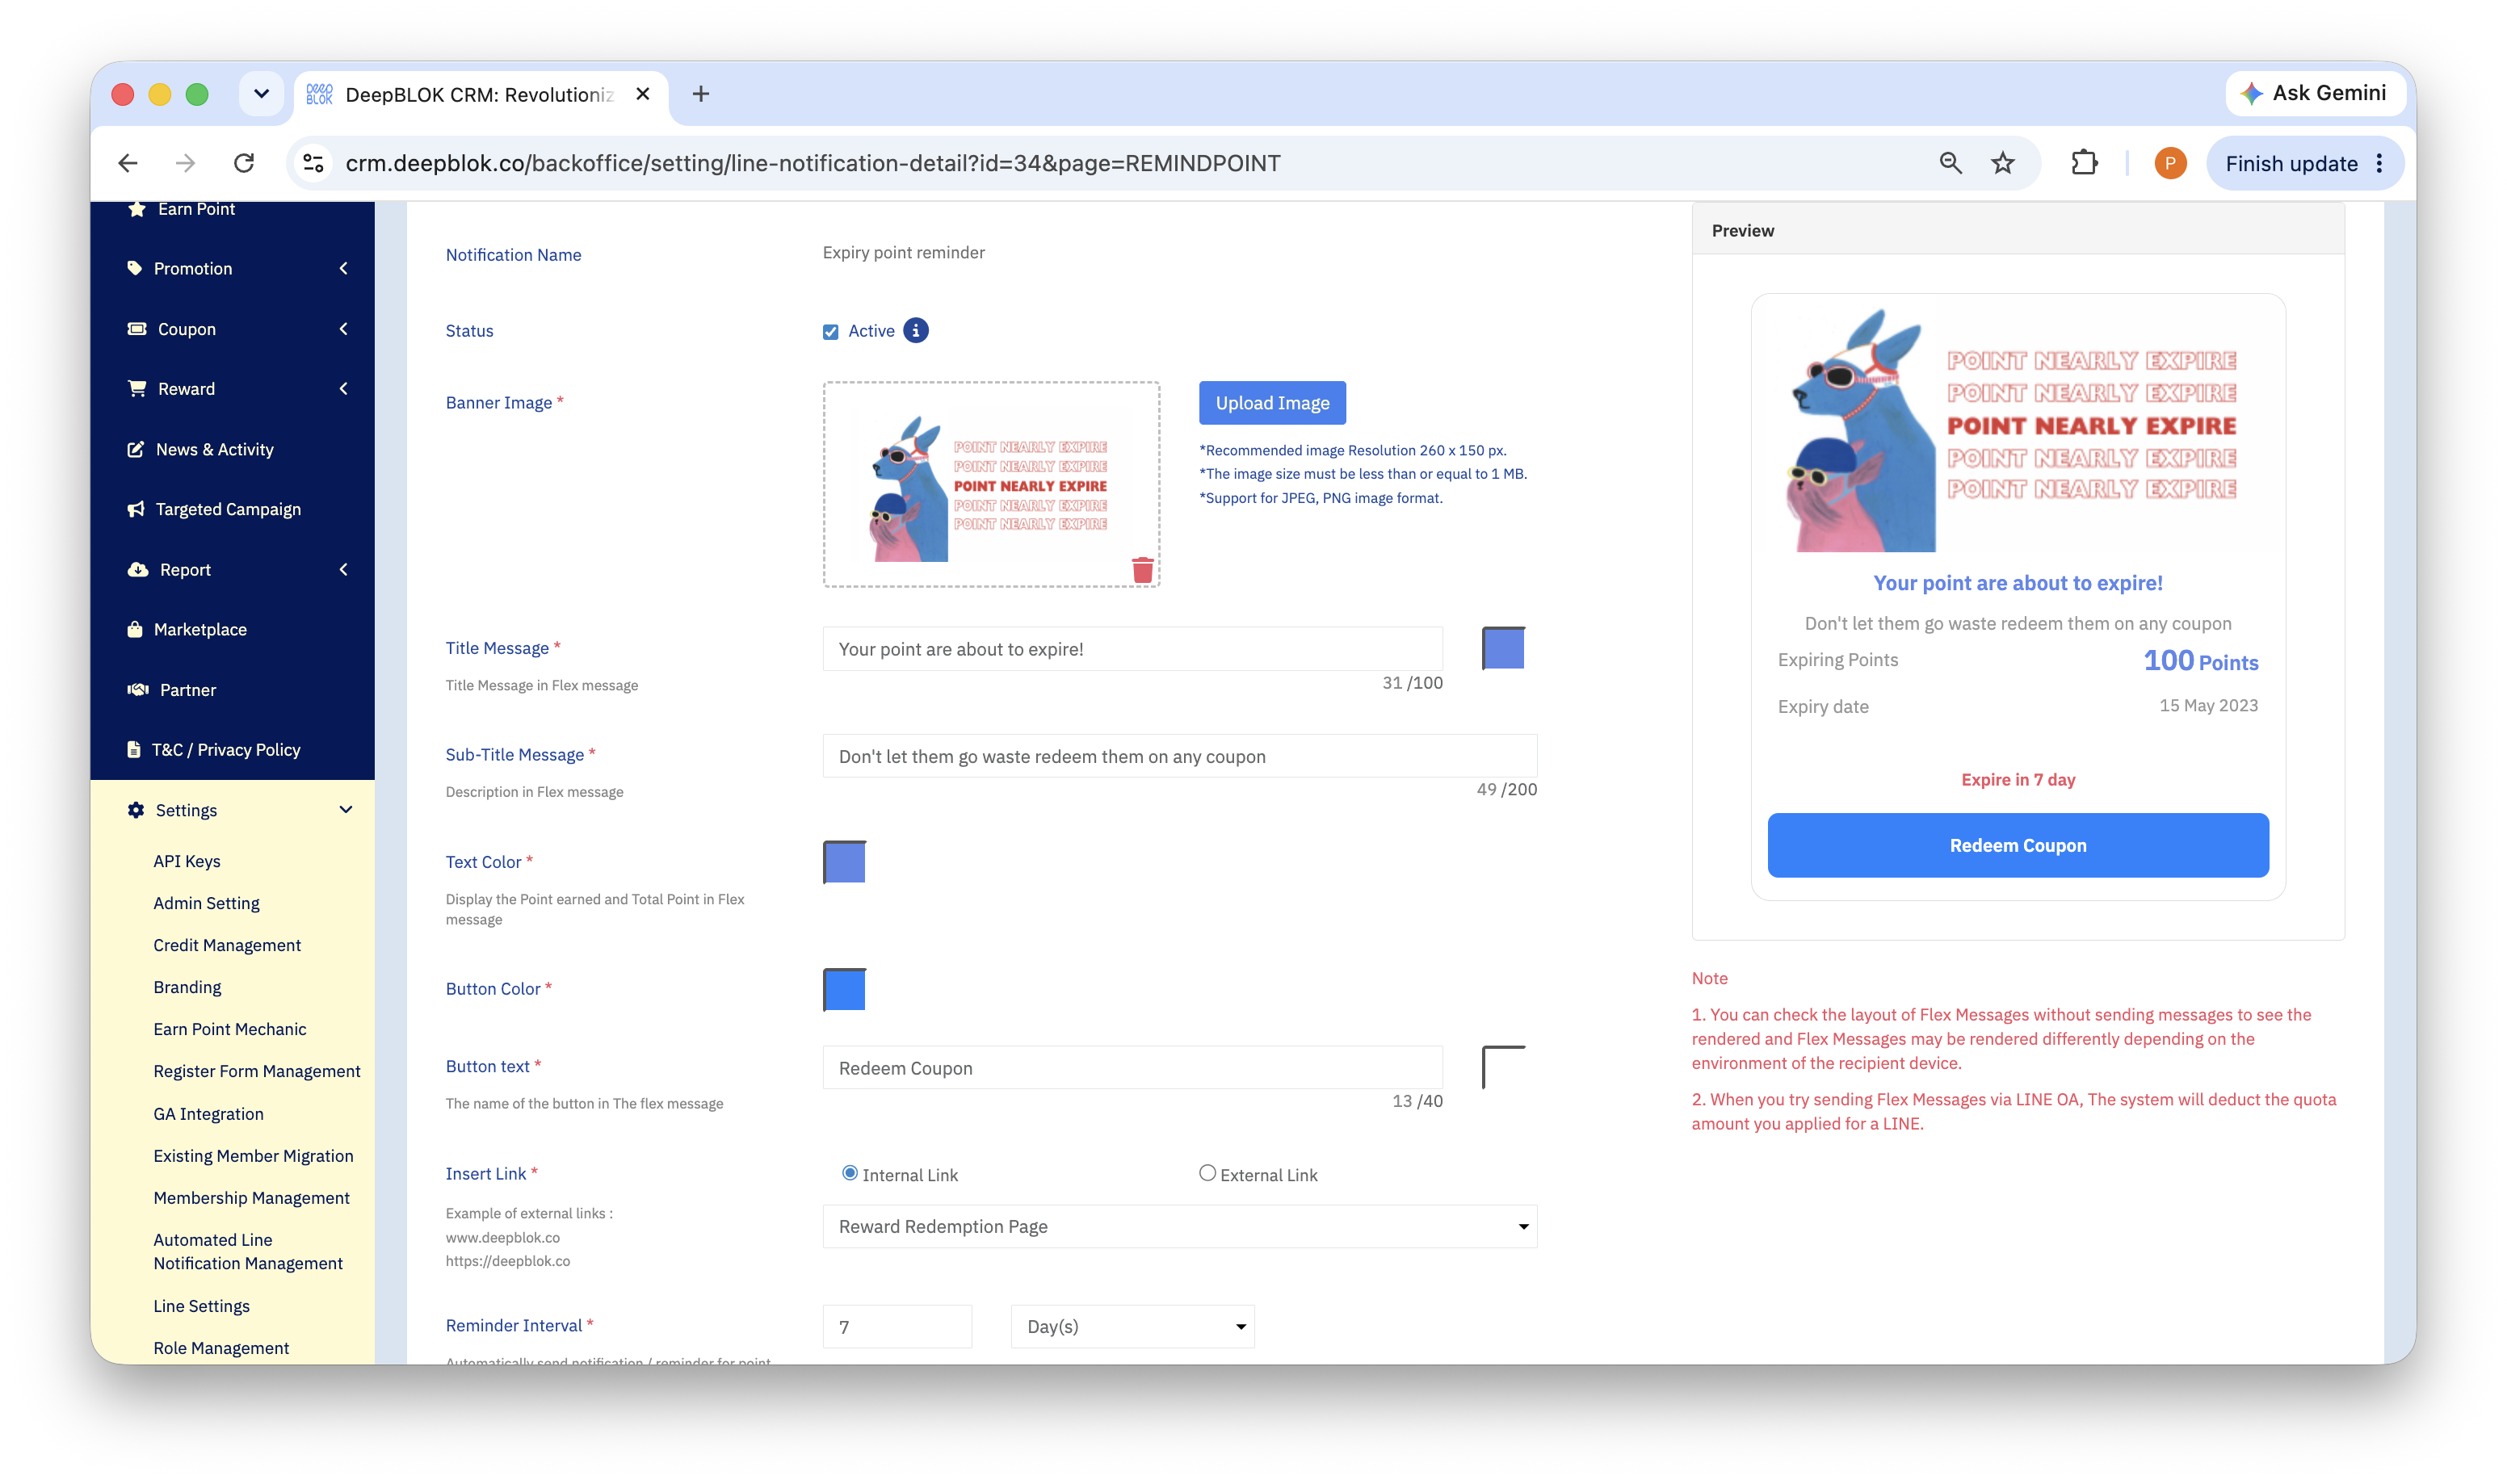
Banner image size by message type
This is what people get wrong most often, because it's natural to make one image and use it everywhere. The system won't refuse a wrong-sized file, but the message the customer receives comes out cropped or stretched.
The file rules are the same at every size: 1 MB or smaller, JPEG or PNG.
Set how far ahead the reminders go out
Expiry point reminder, Expiry coupon reminder and Remain Tier reminder each get an extra Reminder Interval field at the bottom of the form. It sets how far ahead of the expiry the system sends. Type a number in the left box, then pick Day(s) or Month(s) on the right.
The ranges above belong to the number box alone — they are not day counts. The product prints each one as faint placeholder text inside the box, and the unit beside it can be set to either Day(s) or Month(s). Remain Tier reminder accepts a noticeably narrower range than the other 2. A number outside the range stops Save from going through.
⚠️ Watch out: every message the system sends draws down the brand's LINE message quota — the product says so itself, under the
Previewpanel. Switching all 7 events on at once multiplies your message volume with no second confirmation. If quota is tight, start withEarn PointsandExpiry point reminder, which give you the clearest response.
How to check how many customers tapped your message
Every row has a Report button next to Edit, which opens View Report for that event alone. The figures count from the day you switched it on up to now.
1. Sent How many times the system sent this event's message. If it reads 0 while Active is on, no customer has met the event's condition yet.
2. Clicked How many times the button was tapped. Every tap counts, so one customer tapping 3 times counts as 3.
3. Unique Clicked How many people tapped, counting each person once no matter how often they tapped. This is your real count of customers the message carried through to the destination.
Under the 3 cards, a Notification Trend chart plots all 3 figures by day, with a date-range picker in its top-right corner. The Download to CSV button at the top of the page exports the same numbers for your own reporting.