

4 Methods to earn points on an order
Choose the ones that fit how your brand sells:
💡 Good to know: for other channels you connect over the API, such as your own website or a kiosk, you can talk to one of our specialists on DeepBLOK Line Official.
This article covers method 2 — the channel where the customer does the scanning. When a payment happens at a branch, the system generates a redemption code tied to that bill. The customer scans it in LINE, or with their phone camera, and the points land immediately. It suits counters where staff cannot scan for every customer, long queues, and customers who pay and walk straight out.
⚡ Quick Path:
Settings→Earn Point Mechanic→ theScan Redemption Code to earn pointscard → pickYes, I'd like to use this→ choose how many days the code stays valid → clickSaveon that card → track codes from theredemption code managementlink
📌 Good to know: the member app runs in English or Thai — the customer switches it in their own account, and the labels below are quoted as they appear on screen. The confirmation dialog, the success screen and the sign-up screen are still shown in Thai, so read those to the customer exactly as written.
Requirements before you start
- Access to
Settingsand to theRedemption Code Managementpage — if either one is missing, ask an Admin on your team to grant both - A promotion already in
Activestatus — the code is only the channel; the number of points comes from the promotion you built per the How to Create Advanced Rule-Based Promotions article. With no live promotion, customers can scan the code and no points arrive - A point-of-sale system that sends payments through to DeepBLOK — codes come from real bills, so check with the team that runs your sales system before you announce this to customers
- A decision on how long a code stays valid — anything from same-day up to 7 days, and it is a number your counter staff must quote consistently. Agree it with your marketing team before you configure
- One test bill — the fastest way to confirm the path is to close one real bill and check that the code prints on the receipt and a new row appears in the code list
A redemption code and a receipt QR code are the same thing
The product calls this channel a redemption code, but most customers know it as the QR code on the receipt — because many point-of-sale systems take the code from DeepBLOK and print it as a QR code at the bottom of the bill, which is faster and easier than having the customer type the code in themselves.
Printing it as a QR code has 2 advantages, which is why most brands choose it.
1. It saves staff time The customer scans at their table or after leaving the shop, so staff never have to take each customer's phone and scan it. The queue at the counter does not get longer because of your loyalty programme.
2. Delivery customers can earn points too A customer who orders through a delivery channel gets the shop's receipt with the food, and can scan the QR code on that receipt to earn points exactly like a customer who came in.
📌 Good to know: whether the customer receives the code as a QR code or as characters, both are the same code and both are configured on the same card. The customer-side screen supports scanning and typing the code in by hand.
The path of a redemption code, from generated to points in the account
1. The customer pays at a branch The payment reaches the system with the branch and the amount attached. That data appears on the list page later as the Request no., Branch ID/ Branch Name and Total Payment Amount columns.
2. The system generates a redemption code for that bill The code is 16 upper-case letters and digits, e.g. SKZJ8CVI37G011C2, tied to that one bill, with an expiry date and time calculated from the code lifetime you set. Its status is now Generated.
3. The customer scans the code on the earn-points screen in LINE The code sits at the bottom of the customer's receipt. They can scan it from the earn-points screen in LINE or with their phone's own camera. The system shows the points they will get, along with the bill amount, for them to confirm first.
4. The points land, and the code's status becomes Redeemed Points arrive according to the promotion that matches that bill. The list page fills in 3 more columns: the redeemed date and time, the account number that redeemed it, and the Rewards received, which may be POINT, SP_POINT, or both.
📌 Good to know: 1 bill gets 1 code, and 1 code awards points once. If several customers share one bill and all of them want points, award the rest retroactively as a separate entry. And the number of points is not set on the code — it comes from the promotion, so change the campaign's points on the promotion.
Switch it on in 3 steps
Step 1: turn on the redemption code card
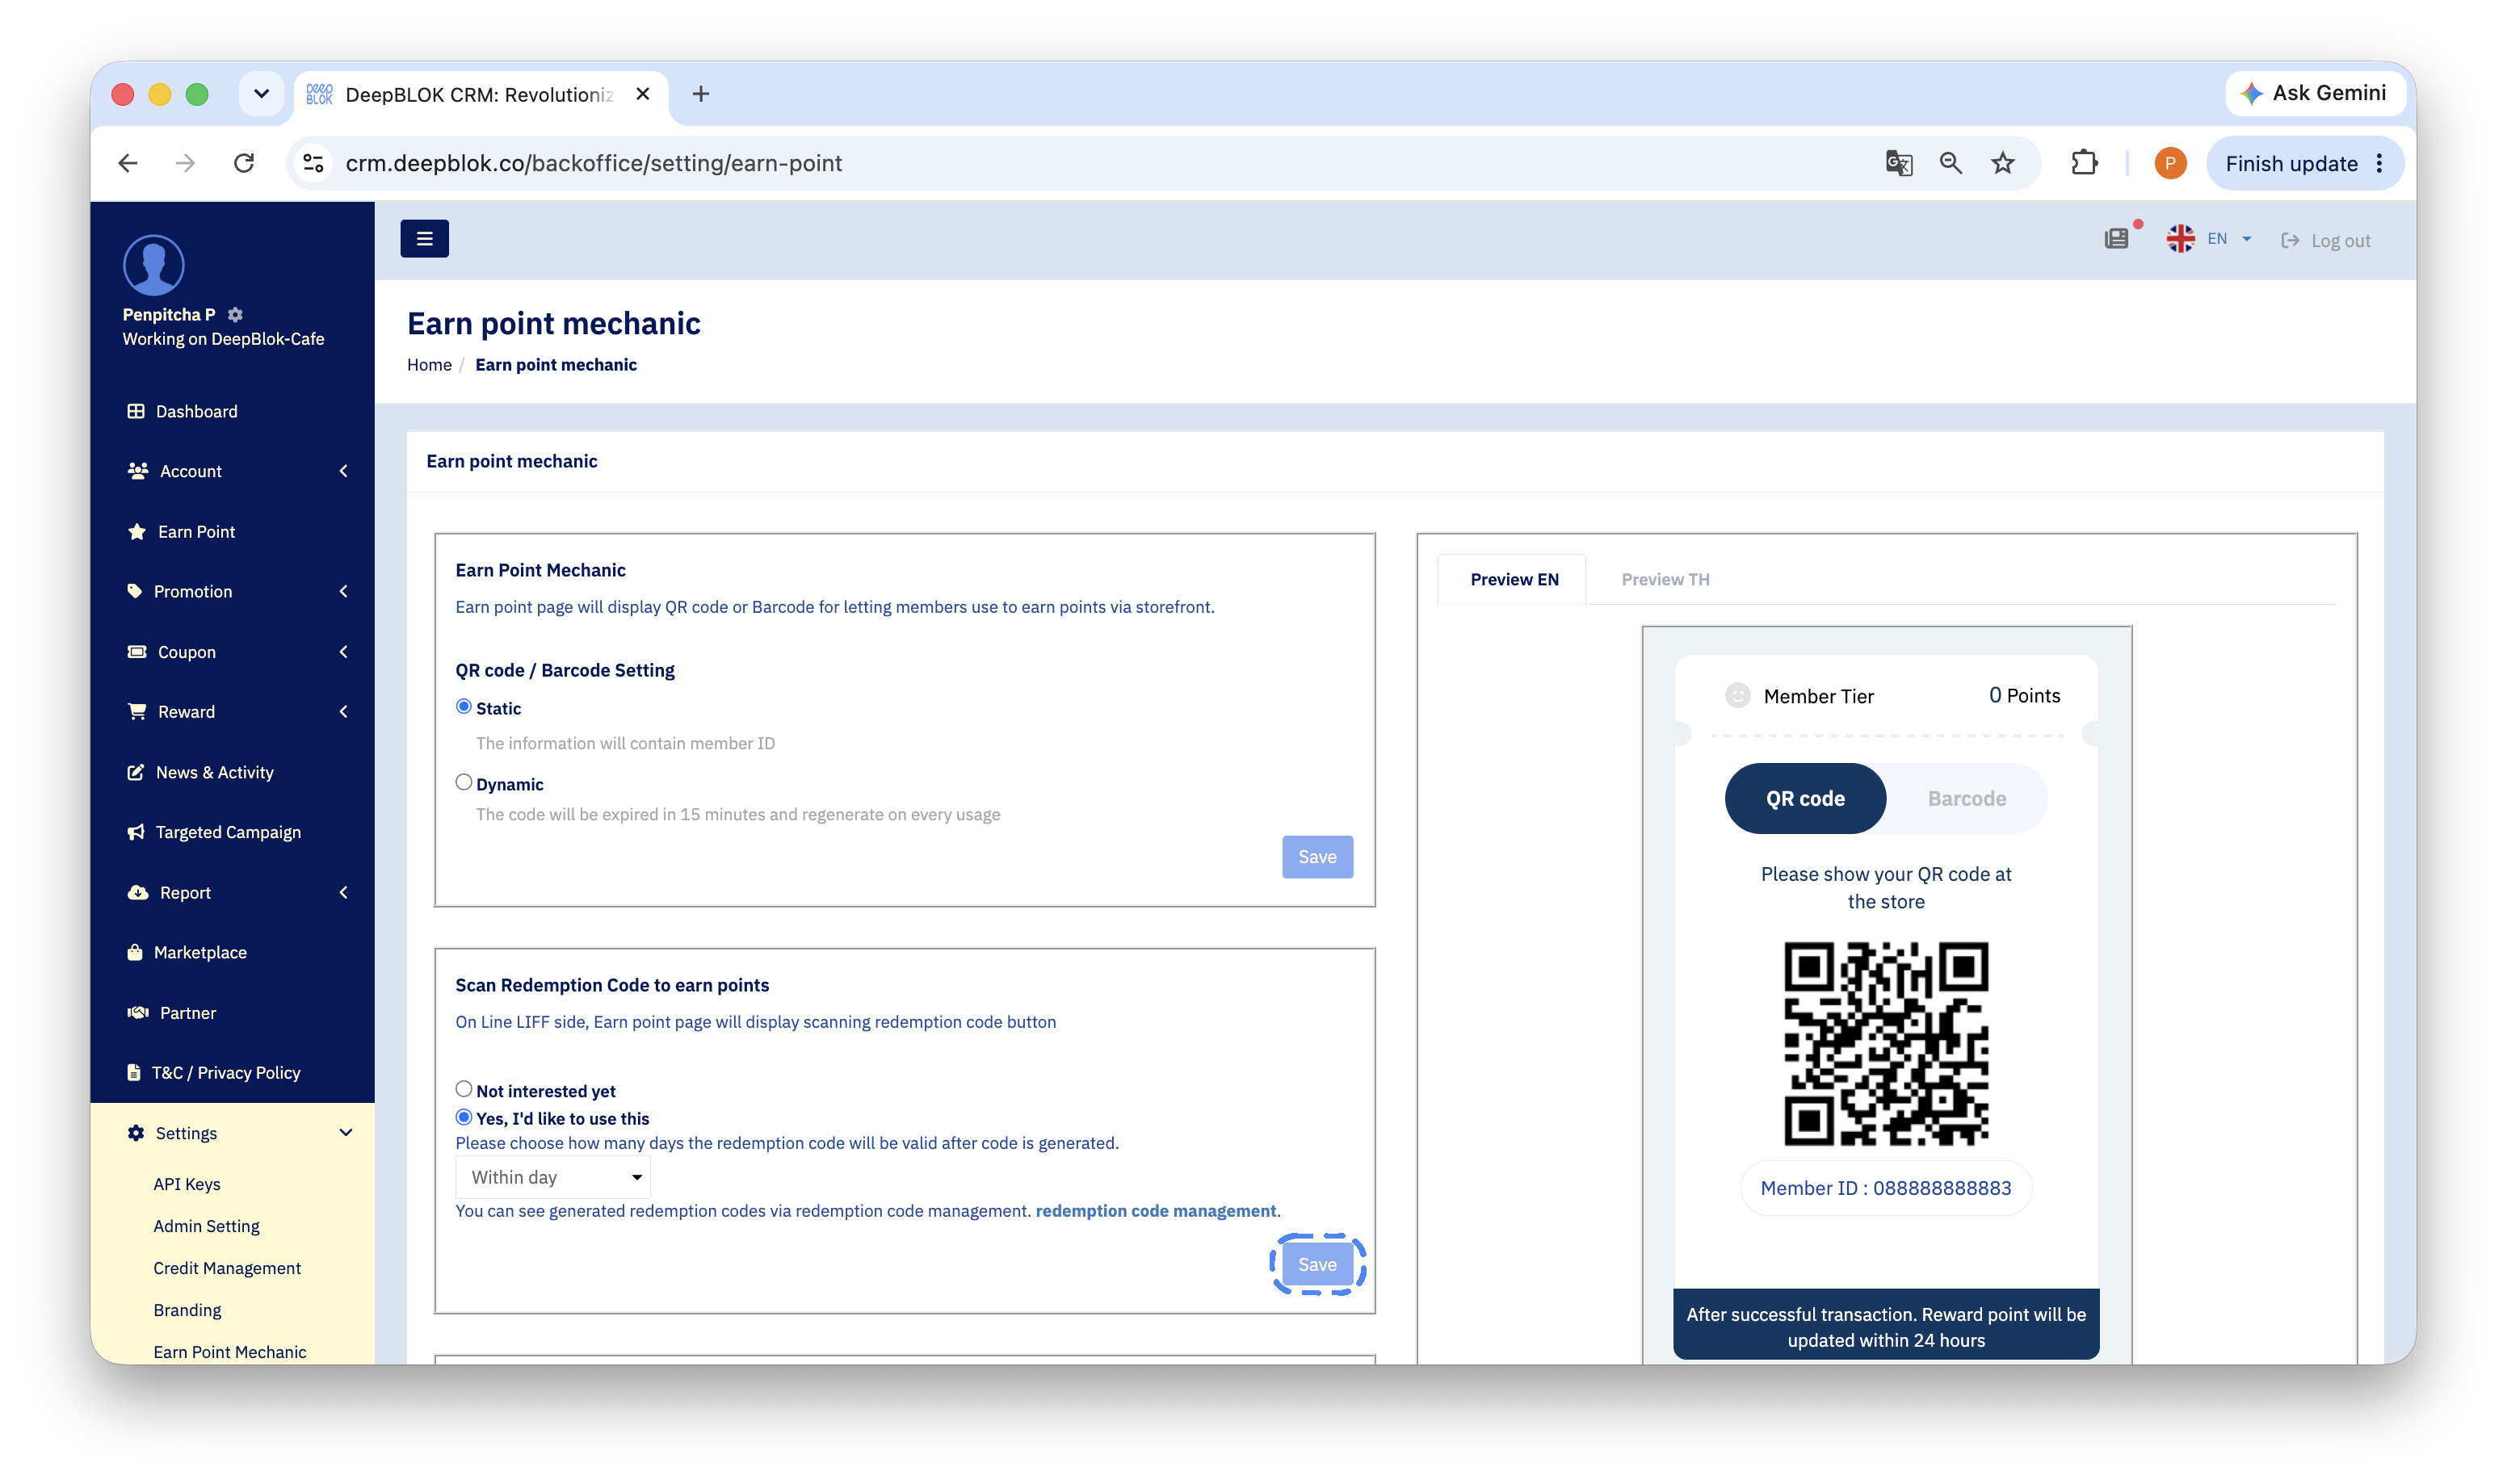
Open Settings → Earn Point Mechanic. The page is a stack of setting cards. Find the card titled Scan Redemption Code to earn points, which carries a blue description saying that once it is on, the earn-points screen in LINE will show customers a button for scanning a code.
Pick Yes, I'd like to use this. The other option, Not interested yet, switches the feature off.
Step 2: choose how many days the code stays valid
Once the feature is on, a dropdown appears for how many days the code stays usable after it is generated. The values run from same-day (Within day) up to 7 days.
Step 3: click Save on the card
Click the blue Save button at the bottom right of the Scan Redemption Code to earn points card.
⚠️ Watch out: every card on this page has its own
Savebutton and there is no page-wideSave. ClickingSaveon a different card leaves what you just picked unsaved.
Below the button is a blue redemption code management link that takes you straight to the code list.
✅ Confirm it worked: close one test bill at a branch, then check 2 things — the printed receipt carries a code at the bottom, and the
Redemption Code Managementpage shows a new row with that bill's request number, branch and payment amount inGeneratedstatus. If both are true, the whole path is ready for customers.
How the customer earns points in LINE
Step 1: open the earn-points screen and tap the scan button
Have the customer open the member page from your brand's LINE chat and tap the round button in the middle of the bottom bar, the QR symbol, to reach the Earn points screen.
This is the screen the customer uses to show their own code for staff to scan. The top carries their tier and point balance, the middle has the QR code and Barcode tabs with the customer's Member ID, and below the card sit 2 full-width buttons: Scan to Earn Points, which is this article's button, and Earn with receipt, which is the receipt-upload channel.
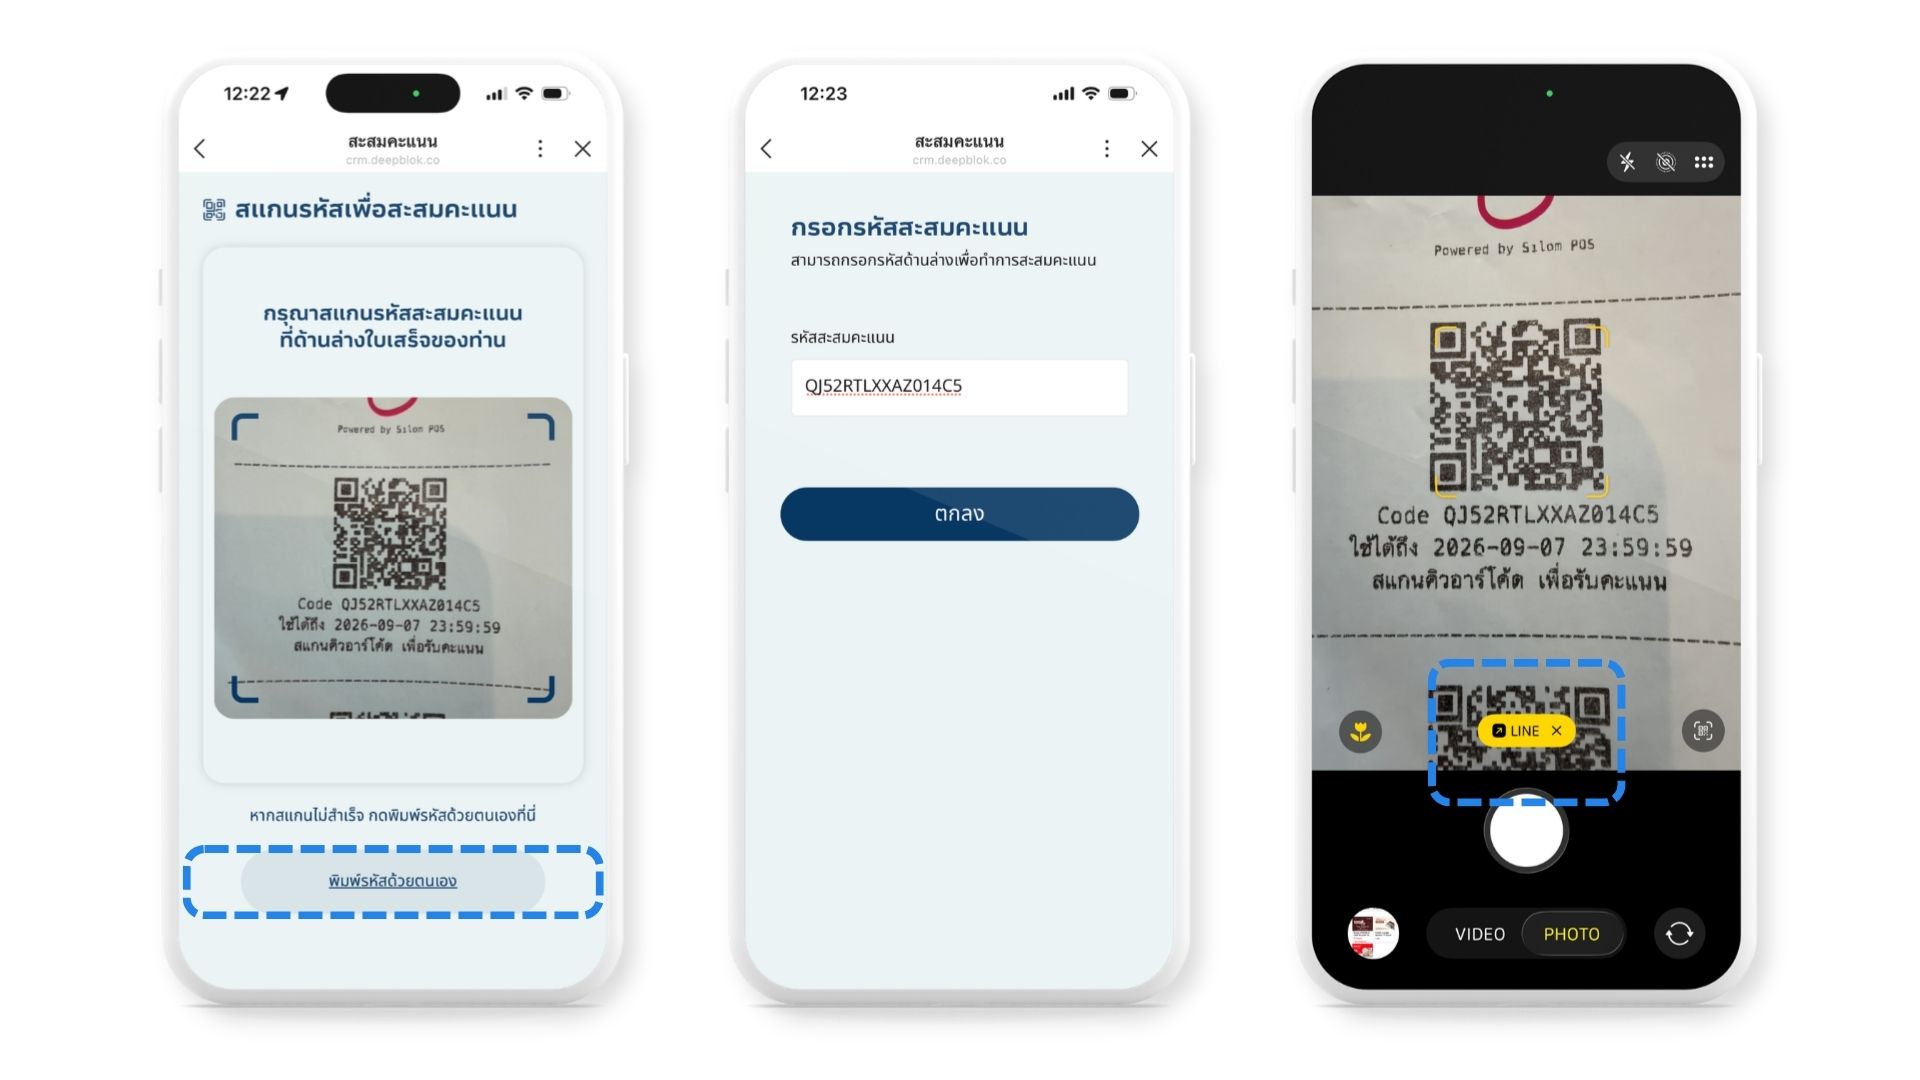
📌 Good to know: the customer can also scan the code on the receipt with their phone camera, without opening LINE first. A yellow link appears on the camera screen, and tapping it takes them straight to the earn-points screen in LINE.
Customers who are not members yet can scan too. The system takes them to the
ลงทะเบียน(sign-up) screen first, in this order: register with a phone number → enter the OTP → fill in the sign-up form → receive the points from the code they scanned at the start, with no need to scan again.
Step 2: scan the QR code on the receipt, or type the code in
The Scan to Earn Points screen offers 2 options.
1. Scan the QR code on the receipt The camera opens with a 4-corner frame and the line "Please scan the points redemption code at the bottom of your receipt."
2. Type the redemption code in by hand For a creased receipt, faded ink or poor light, tap the Enter Code Manually link below the camera frame, type the code from the receipt into the Redemption Code field and tap OK. If the code does not match, รหัสไม่ถูกต้อง (the code is not valid) appears under the field immediately — meaning it was typed wrong or the code can no longer be used, not that the system is down.